LuciadCPillar can project imagery onto the map by simulating a virtual projector in 3D space. The imagery is projected outward from the projector and painted onto whatever surfaces it reaches, such as terrain or 3D meshes. This single API covers three related use cases:
-
Projecting a single still image
-
Projecting a continuous stream of video frames, for example the live feed of an airborne drone or a fixed surveillance camera
-
Displaying 360-degree panoramas, such as a street-level panoramic survey
In all three cases you describe each projection with ProjectedImageryProjectedImageryProjectedImagery, supply the imagery through
an IProjectedImageryModelIProjectedImageryModelIProjectedImageryModel, and render it on the map with a
ProjectedImageryLayerProjectedImageryLayerProjectedImageryLayer.
What you can project
The ProjectionStructureProjectionStructureProjectionStructure describes the geometry of projected imagery, which affects the tile layout of the projection.
LuciadCPillar supports three kinds of projection structures:
- Pinhole
-
A single flat image, projected through a virtual pinhole camera with a horizontal and vertical field of view. This is the right choice for a still photo or a video frame, such as a drone camera feed. Create it with
ProjectionStructure::pinholeProjectionStructure::pinholeProjectionStructure::pinhole.A pinhole projection is the trivial single-level, single-tile case.
- Cubemap
-
A 360-degree panorama made up of six images, one for each face of a cube around the sensor: front, back, left, right, top, and bottom. The sensor is at the center of the cube and the faces connect seamlessly. This is the most common panorama format, used for street-level imagery for example. Create it with
ProjectionStructure::cubeMapProjectionStructure::cubeMapProjectionStructure::cubeMap.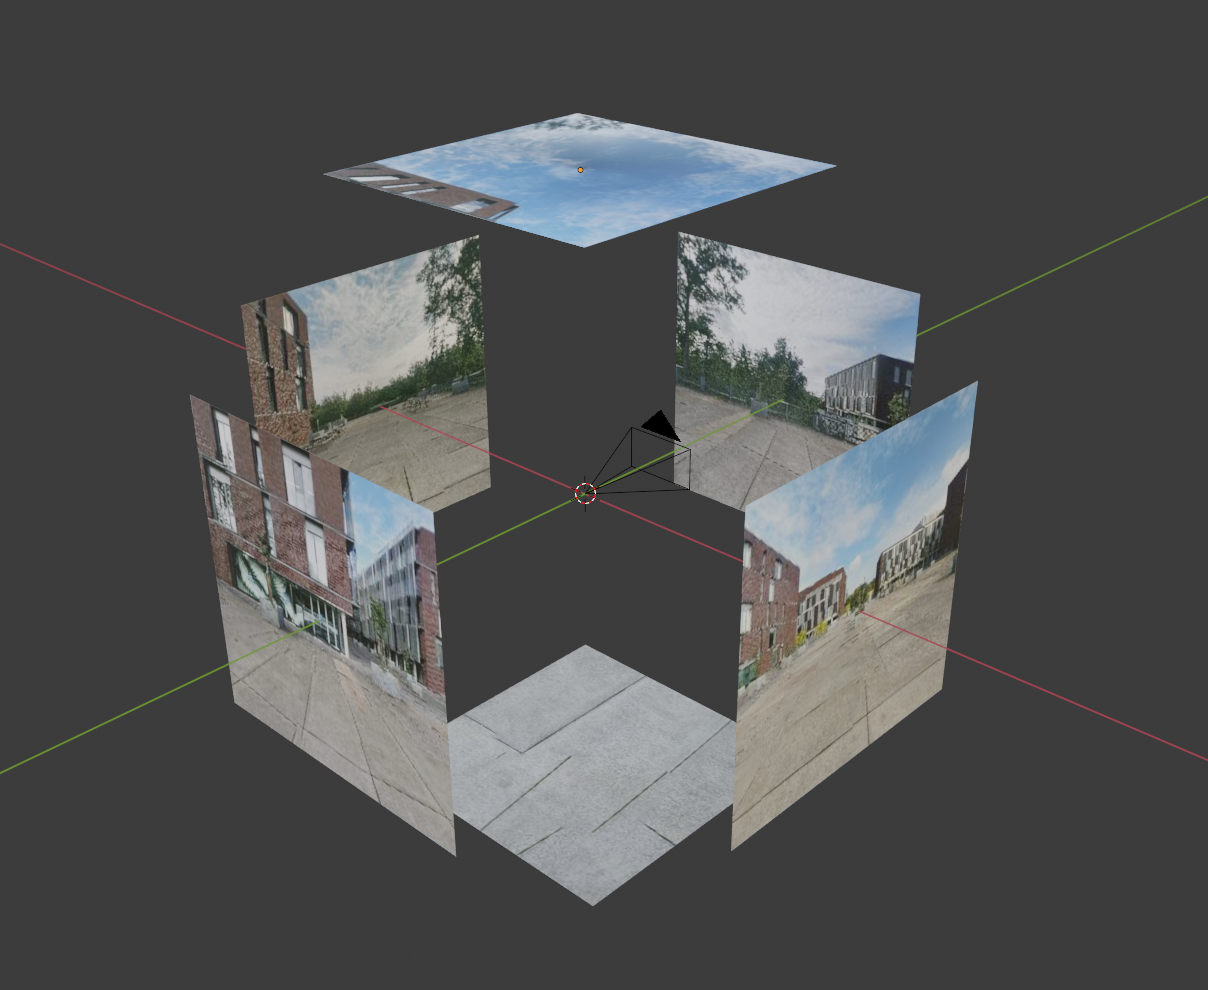 Figure 1. Illustration of a cubemap panorama in 3D. The sensor sits at the center of the cube, looking out at the six faces.
Cubemap panoramas can be multi-leveled: the imagery is split into a pyramid of tiles, so that only the resolution and the area in view need to be fetched.
- Equirectangular
-
A 360-degree panorama stored as a single image, in which the sphere around the sensor is projected onto a 2D plane using an equirectangular projection. Create it with
ProjectionStructure::equirectangularProjectionStructure::equirectangularProjectionStructure::equirectangular.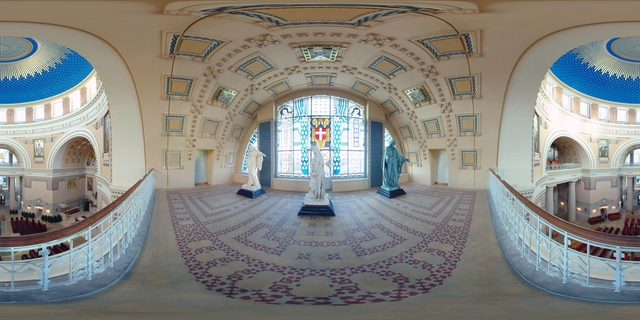 Figure 2. Example of an equirectangular panorama photo. Source: PanoTools wiki
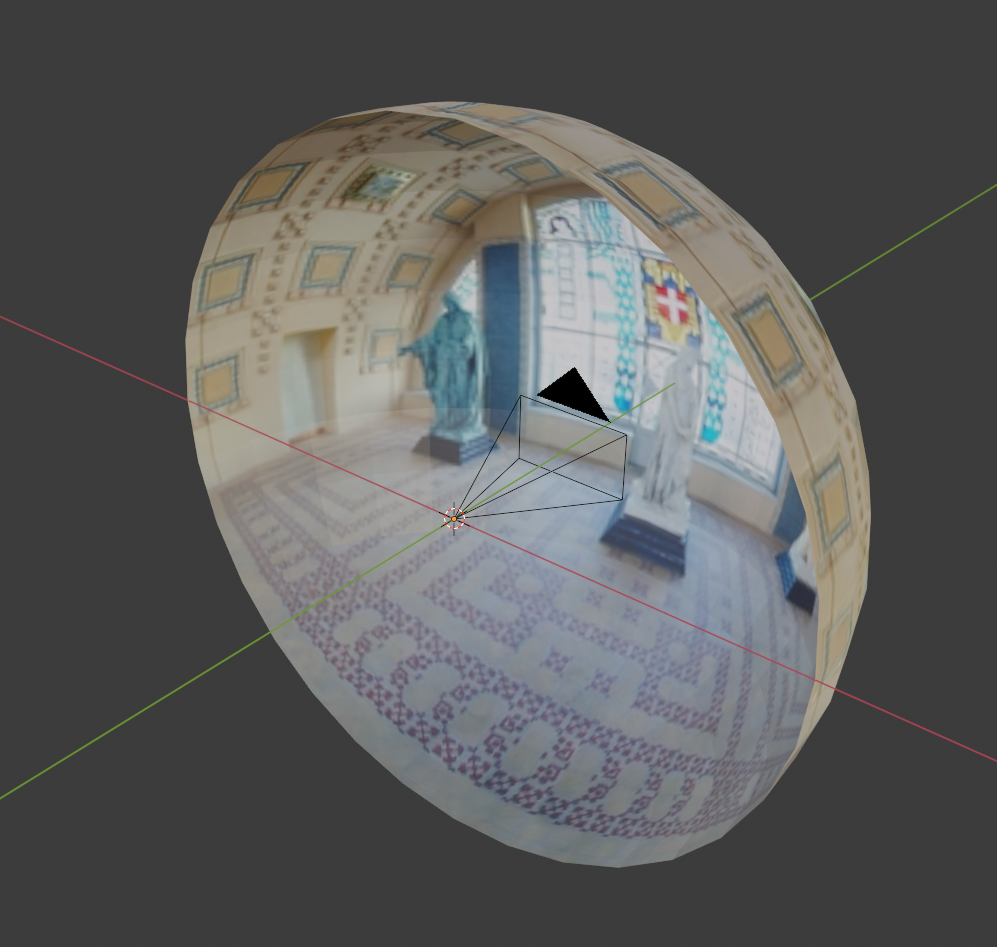 Figure 3. Illustration of an equirectangular panorama in 3D. Only one half of the sphere around the sensor is shown.
Equirectangular panoramas can be multi-leveled: the imagery is split into a pyramid of tiles, so that only the resolution and the area in view need to be fetched.
What you need to describe a projection
To place and orient a projection, you describe it with ProjectedImageryProjectedImageryProjectedImagery.
It holds the pose and geometry of the projector, but not the pixels themselves: the imagery is provided on request by the
matching
IProjectedImageryModelIProjectedImageryModelIProjectedImageryModel.
Each ProjectedImageryProjectedImageryProjectedImagery instance carries these properties:
|
Id |
A stable identifier, used to request the projection’s tiles and to select it on the layer. |
|
Location |
The georeferenced position of the virtual projector, as a |
|
Yaw |
Rotation of the projector around the local up-axis, in degrees, measured clockwise from the north. |
|
Pitch |
Rotation of the projector around its lateral axis, in degrees. A pitch of |
|
Roll |
Rotation of the projector around its longitudinal (viewing) axis, in degrees. |
|
Field of view ( |
The horizontal and vertical field-of-view angles of the projector frustum, in degrees. Typically only used for pinhole projections. |
|
Structure |
The |
The yaw, pitch and roll angles are defined in a local topocentric frame anchored at the projector location:
up is the local vertical (away from the ellipsoid), and north is the local meridian direction.
The rotations are applied in this order: yaw, then pitch, then roll.
For the local up and north directions to be well-defined, the projector location must be a PointPointPoint in a geodetic longitude-latitude-height (LLH) reference such as WGS84.
For a multi-leveled cubemap or equirectangular panorama, the ProjectionStructureProjectionStructureProjectionStructure also captures the tile layout: the number of levels, the tile
size in pixels, the number of tiles at the coarsest level and, for equirectangular panoramas, the fraction of the sphere the
imagery covers.
Choosing a model for your use case
All imagery is supplied through an IProjectedImageryModelIProjectedImageryModelIProjectedImageryModel. For the common use cases,
LuciadCPillar provides ready-made models, so you do not have to implement the interface yourself:
- Live video or a single image
-
Use
ProjectedVideoModelProjectedVideoModelProjectedVideoModel. It exposes one pinhole projection and lets you push frames withupdateFrameupdateFrameupdateFrame, deriving the pinhole structure from the frame’s pixel size and taking care of the tile serving and change notification.projectedVideoModel->updateFrame(videoImage, droneLocation, dronePosition.yaw, dronePosition.pitch, dronePosition.roll, DronePainter::SensorFovX, DronePainter::SensorFovY);_projectedVideoModel.UpdateFrame(image, location, pos.Yaw, pos.Pitch, pos.Roll, DronePainter.SensorFovX, DronePainter.SensorFovY);projectedVideoModel?.updateFrame( image, GeometryFactory.createPoint( wgs84, Coordinate(dronePos.longitude, dronePos.latitude, dronePos.altitude) ), dronePos.yaw, dronePos.pitch, dronePos.roll, DronePainter.SENSOR_FOV_X, DronePainter.SENSOR_FOV_Y )For the full frame-update loop, see Pushing video frames into the model.
- 360-degree panoramas served from a URL
-
Use
PanoramaModelPanoramaModelPanoramaModel. Configure it with a URL pattern and a cubemap or equirectangular structure, then add the panorama positions. The URL pattern supports the{id},{face},{level}(or{z}),{x},{y}and{-y}placeholders. Use{-y}instead of{y}for tilesets with a row coordinate that runs in the opposite direction. Placeholder values are inserted verbatim, without URL encoding, so panorama IDs and face names must be URL-safe. For full control over URL construction, provide aIPanoramaTileUrlProviderIPanoramaTileUrlProviderIPanoramaTileUrlProvider.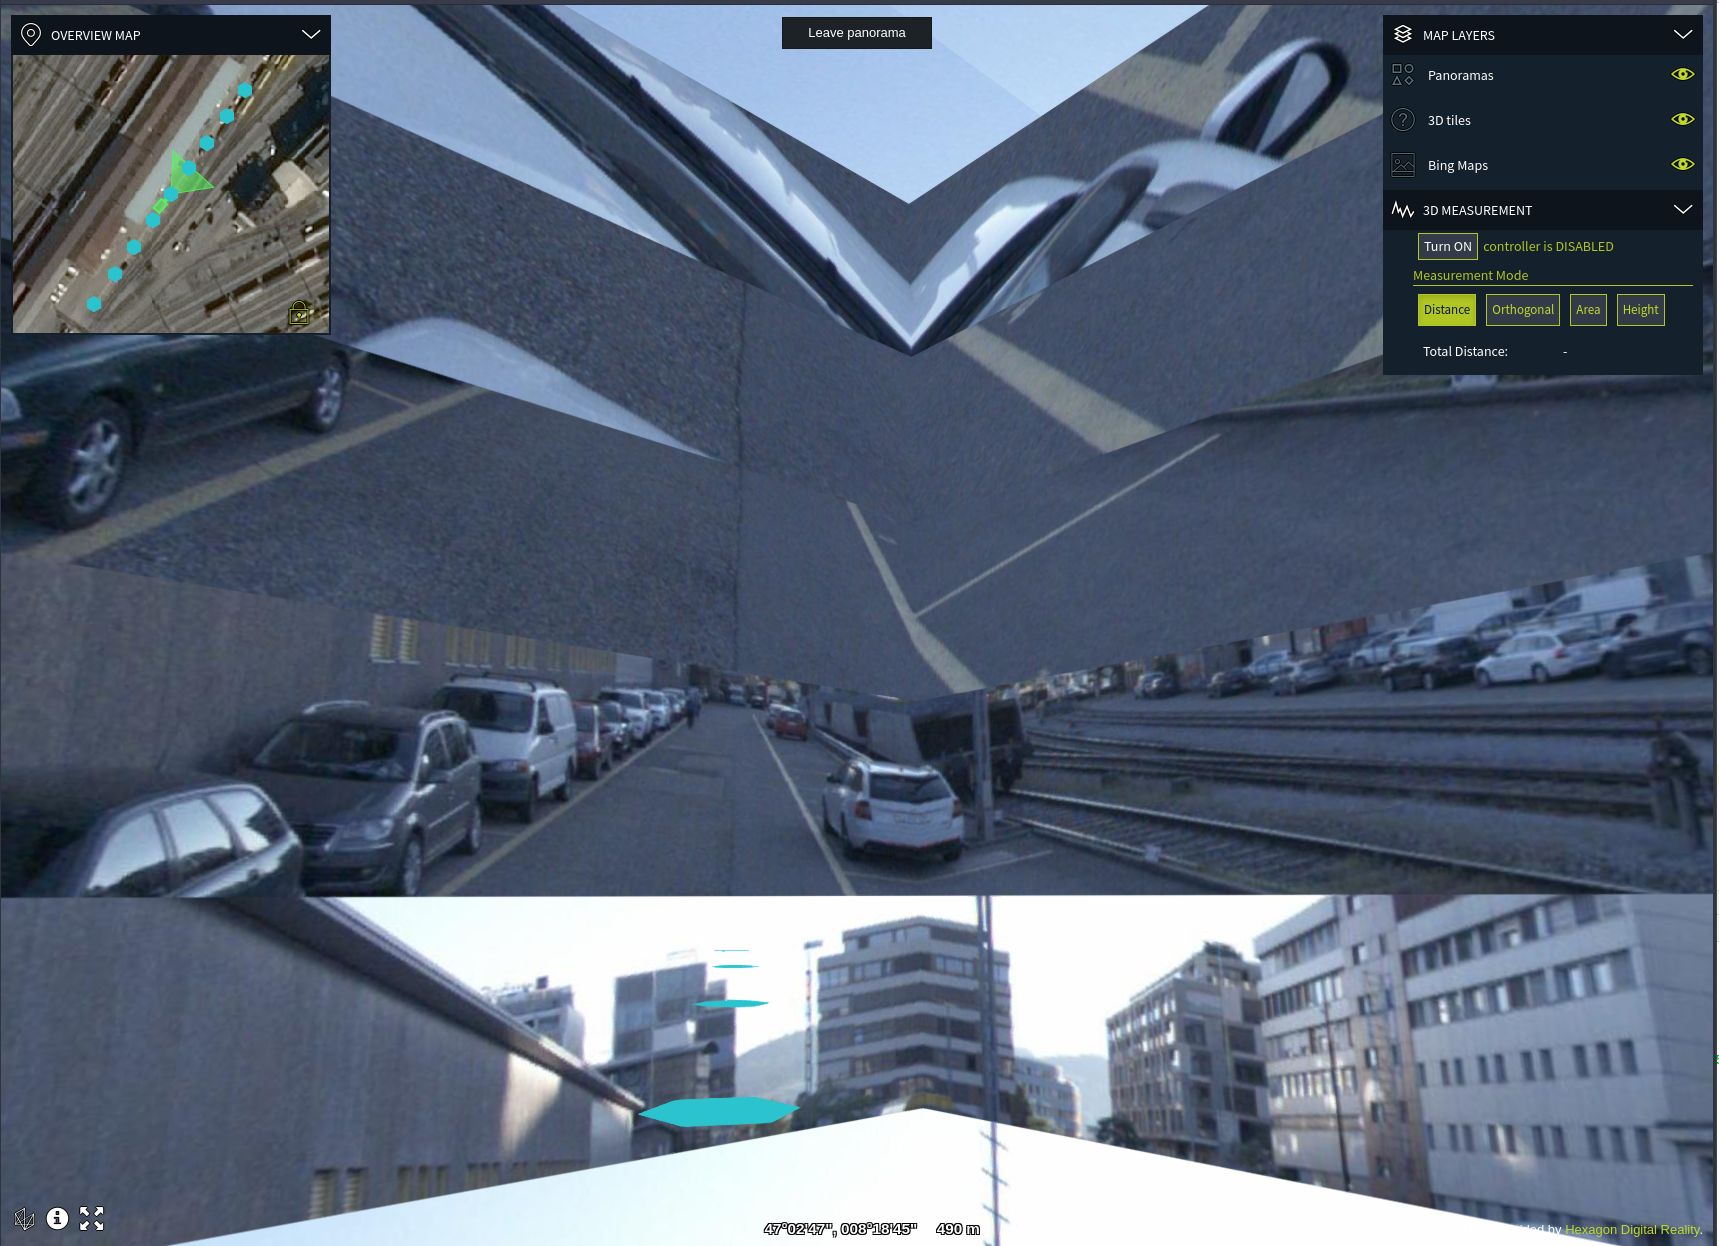 Figure 4. An example of what a multi-leveled panorama looks like when its rows are flipped and it needs
{-y}instead of{y}auto panoramaModel = PanoramaModel::newBuilder() .urlPattern("https://example.com/panoramas/{id}/{face}.jpg") .structure(ProjectionStructure::cubeMap(1, 512, 512, 1, 1)) .build(); panoramaModel->addPanorama("entrance", location);var panoramaModel = PanoramaModel.NewBuilder() .UrlPattern("https://example.com/panoramas/{id}/{face}.jpg") .Structure(ProjectionStructure.CubeMap(1, 512, 512, 1, 1)) .Build(); panoramaModel.AddPanorama("entrance", location);PanoramaModel panoramaModel = PanoramaModel.newBuilder() .urlPattern("https://example.com/panoramas/{id}/{face}.jpg") .structure(ProjectionStructure.cubeMap(1, 512, 512, 1, 1)) .build(); panoramaModel.addPanorama("entrance", location); - A LuciadFusion panorama dataset
-
Use
FusionPanoramaModelDecoderFusionPanoramaModelDecoderFusionPanoramaModelDecoder. It reads a LuciadFusion cubemap dataset from acubemap.jsonfile, and returns a fully configuredPanoramaModelPanoramaModelPanoramaModelwith the cubemap structure, tile URLs and panorama positions filled in from the dataset.auto result = FusionPanoramaModelDecoder::decode(datasetUrl); if (result) { const std::shared_ptr<PanoramaModel>& panoramaModel = *result; // Add the model to a ProjectedImageryLayer to display it. }PanoramaModel panoramaModel = FusionPanoramaModelDecoder.Decode(datasetUrl); // Add the model to a ProjectedImageryLayer to display it.PanoramaModel panoramaModel = FusionPanoramaModelDecoder.decode(datasetUrl); // Add the model to a ProjectedImageryLayer to display it. - A custom source
-
Implement
IProjectedImageryModelIProjectedImageryModelIProjectedImageryModelyourself. See Implementing a custom model.
Implementing a custom model
An IProjectedImageryModelIProjectedImageryModelIProjectedImageryModel exposes a set of projections and serves their tiles on request:
-
getProjectionsgetProjectionsgetProjectionslists the available projections. -
queryTilequeryTilequeryTilereturns the pixels of one tile. It is synchronous and returns aProjectionTileQueryResultProjectionTileQueryResultProjectionTileQueryResultholding the tile’s image, an empty result when the tile does not exist, or an error. -
The model reports changes through an
IProjectedImageryModelObserverIProjectedImageryModelObserverIProjectedImageryModelObserver:onProjectionsChangedonProjectionsChangedonProjectionsChangedwhen the set of projections changes, andonImageryInvalidatedonImageryInvalidatedonImageryInvalidatedwhen a projection’s pixels change, for example on a new video frame.
When you implement the interface yourself, the model must provide:
-
getModelMetadatagetModelMetadatagetModelMetadataandqueryBoundsqueryBoundsqueryBounds, from theModelModelModelinterface. -
getProjectionsgetProjectionsgetProjectionsandqueryTilequeryTilequeryTileto expose the projections and serve their tiles. -
addObserveraddObserveraddObserverandremoveObserverremoveObserverremoveObserver, firingonProjectionsChangedandonImageryInvalidatedwhen the projections or their imagery change.
The outcome you report for a tile decides whether LuciadCPillar ever requests that tile again:
-
A
ProjectionTileQueryResultProjectionTileQueryResultProjectionTileQueryResultholding an image supplies the tile. -
A result without an image means the tile does not exist. LuciadCPillar remembers it and does not request it again.
-
A failed retrieval has the same effect: the tile is not requested again.
-
A canceled request is the only outcome that leaves the tile eligible for a later request.
Report a canceled request as canceled and never as a failure. Otherwise the tile counts as failed and never loads.
|
|
Visualizing the projection with a ProjectedImageryLayer
To render the projections, create a ProjectedImageryLayerProjectedImageryLayerProjectedImageryLayer from your model, select which projections to display with
setSelectedProjectionssetSelectedProjectionssetSelectedProjections, and add the layer to the map’s layer list:
const auto style = ProjectedImageryStyle::newBuilder().projectionTarget(ProjectedImageryTarget::AllSurfaces).skyOpacity(0.0).build();
const auto projectedImageryLayer = ProjectedImageryLayer::newBuilder()
.style(style)
.model(projectedVideoModel)
.selectedProjections({{projectedVideoModel->getProjectionId(), 1.0}})
.title("Video Projection")
.build();
map->getLayerList()->add(projectedImageryLayer);_projectedVideoModel = ProjectedVideoModel.NewBuilder().Title("SampleProjectedVideoModel").Build();
var style = ProjectedImageryStyle.NewBuilder()
.ProjectionTarget(ProjectedImageryTarget.AllSurfaces)
.SkyOpacity(0.0)
.Build();
var projectedImageryLayer = ProjectedImageryLayer.NewBuilder()
.Model(_projectedVideoModel)
.Style(style)
.SelectedProjections(new List<SelectedProjection> { new SelectedProjection(_projectedVideoModel.ProjectionId, 1.0) })
.Title("Video Projection")
.Build();
Map.LayerList.Add(projectedImageryLayer);val style = ProjectedImageryStyle.newBuilder()
.projectionTarget(ProjectedImageryTarget.AllSurfaces)
.skyOpacity(0.0)
.build()
val projectedImageryLayer = ProjectedImageryLayer.newBuilder()
.model(projectedVideoModel!!)
.style(style)
.selectedProjections(listOf(SelectedProjection(projectedVideoModel!!.projectionId, 1.0)))
.title("Video Projection")
.build()
map.layerList.add(projectedImageryLayer)A projection is selected by its ID and a weight: the layer paints the selected projections and blends overlapping ones by their weight. A live video model exposes a single projection, which you keep selected. A panorama model exposes many positions, of which you typically select the one the user has navigated to, switching the selection as they move from panorama to panorama.
The layer subscribes to the model when it is added to the map and unsubscribes when it is removed, repainting whenever the model reports a change. You can register additional observers on the model to react to the same updates from your application code, for example to keep a 3D drone icon or a frustum visualization synchronized with the projector.
Styling with ProjectedImageryStyle
Configure the appearance of the projection with a ProjectedImageryStyleProjectedImageryStyleProjectedImageryStyle.
The style controls, among others:
|
Opacity |
Overall opacity of the projection, in |
|
Sky opacity |
Opacity of the part of the projection that does not hit any surface, in |
|
Projection target |
Determines onto which surfaces the imagery is painted. For more information, see the projection target description. |
|
Base opacity |
Opacity of the base layer drawn on the closest surface, in |
|
Orientation offset |
An additional yaw, pitch and roll offset, in degrees, applied on top of each projection’s own orientation. |
|
Maximum range |
The maximum projection distance, in meters. A value of |
The ProjectedImageryTargetProjectedImageryTargetProjectedImageryTarget enumeration has two values:
-
ProjectedImageryTarget::AllSurfaces(default): projects onto every surface intersected by the frustum, including surfaces hidden behind other surfaces from the projector’s point of view. -
ProjectedImageryTarget::ClosestSurface: projects the imagery only onto the surface closest to the projector along each projected ray.
The difference is most apparent when the camera is not at a projection position, for example when transitioning between two
panoramas or when the camera is moved freely. The camera then sees areas which the projection does not cover.
With AllSurfaces, walls and objects do not block the projection, which can make the result look confusing.
With ClosestSurface, the geometry near the projection is taken into account, so the imagery only covers what that projection can actually see.
For example, if a wall appears both in the imagery and in the loaded geometry, the projection covers the wall but nothing
behind it.
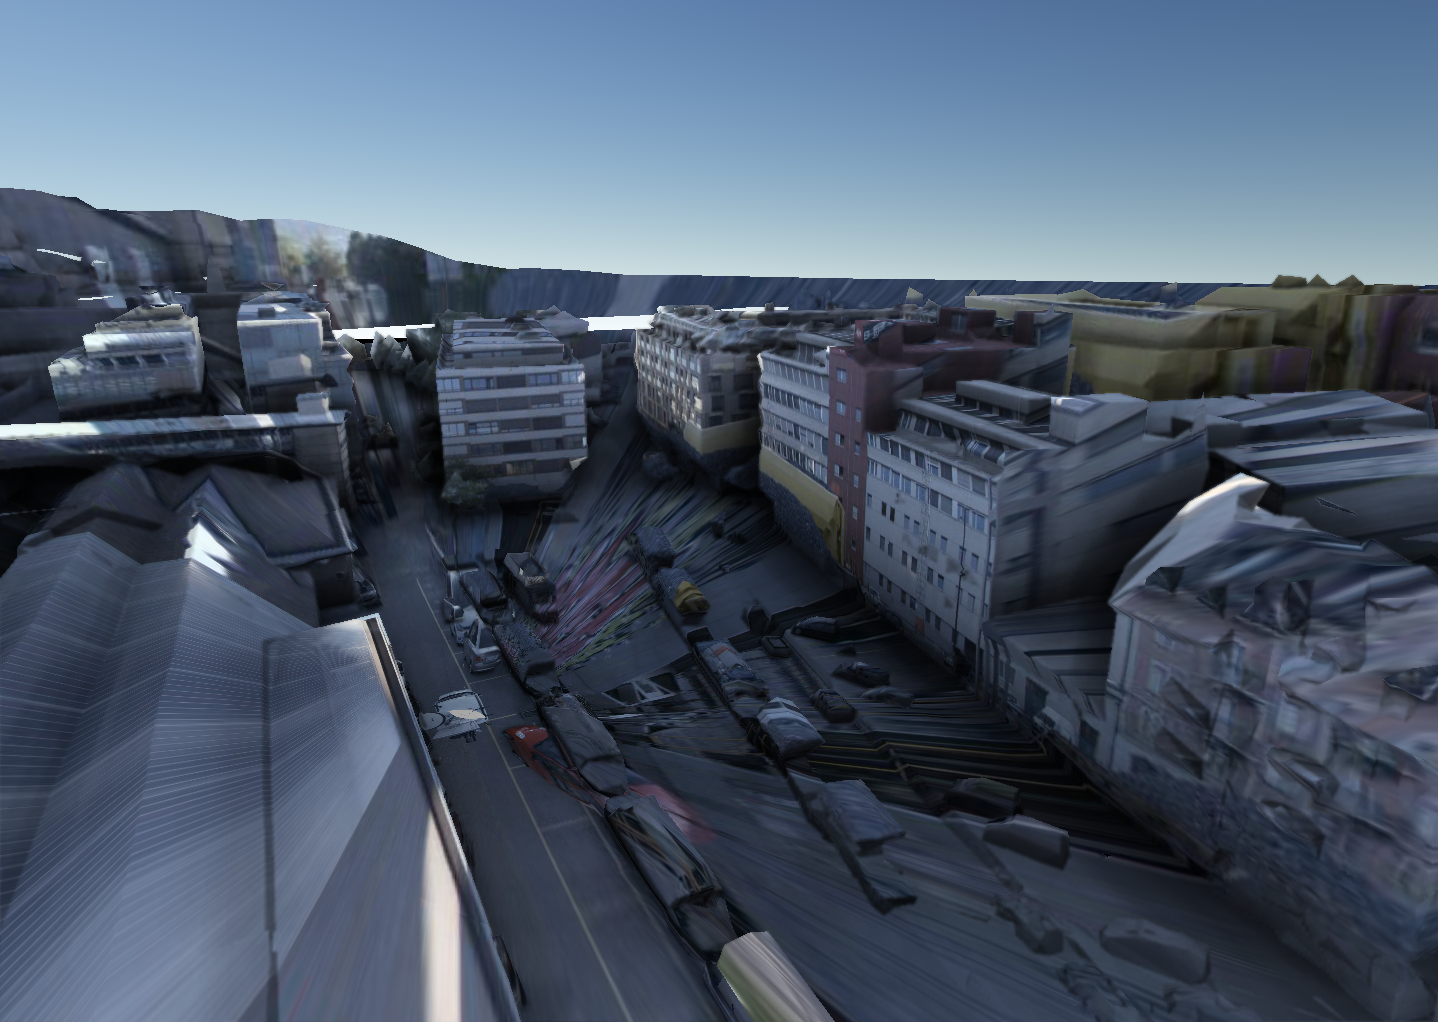
Figure 5. Projection target
AllSurfaces |
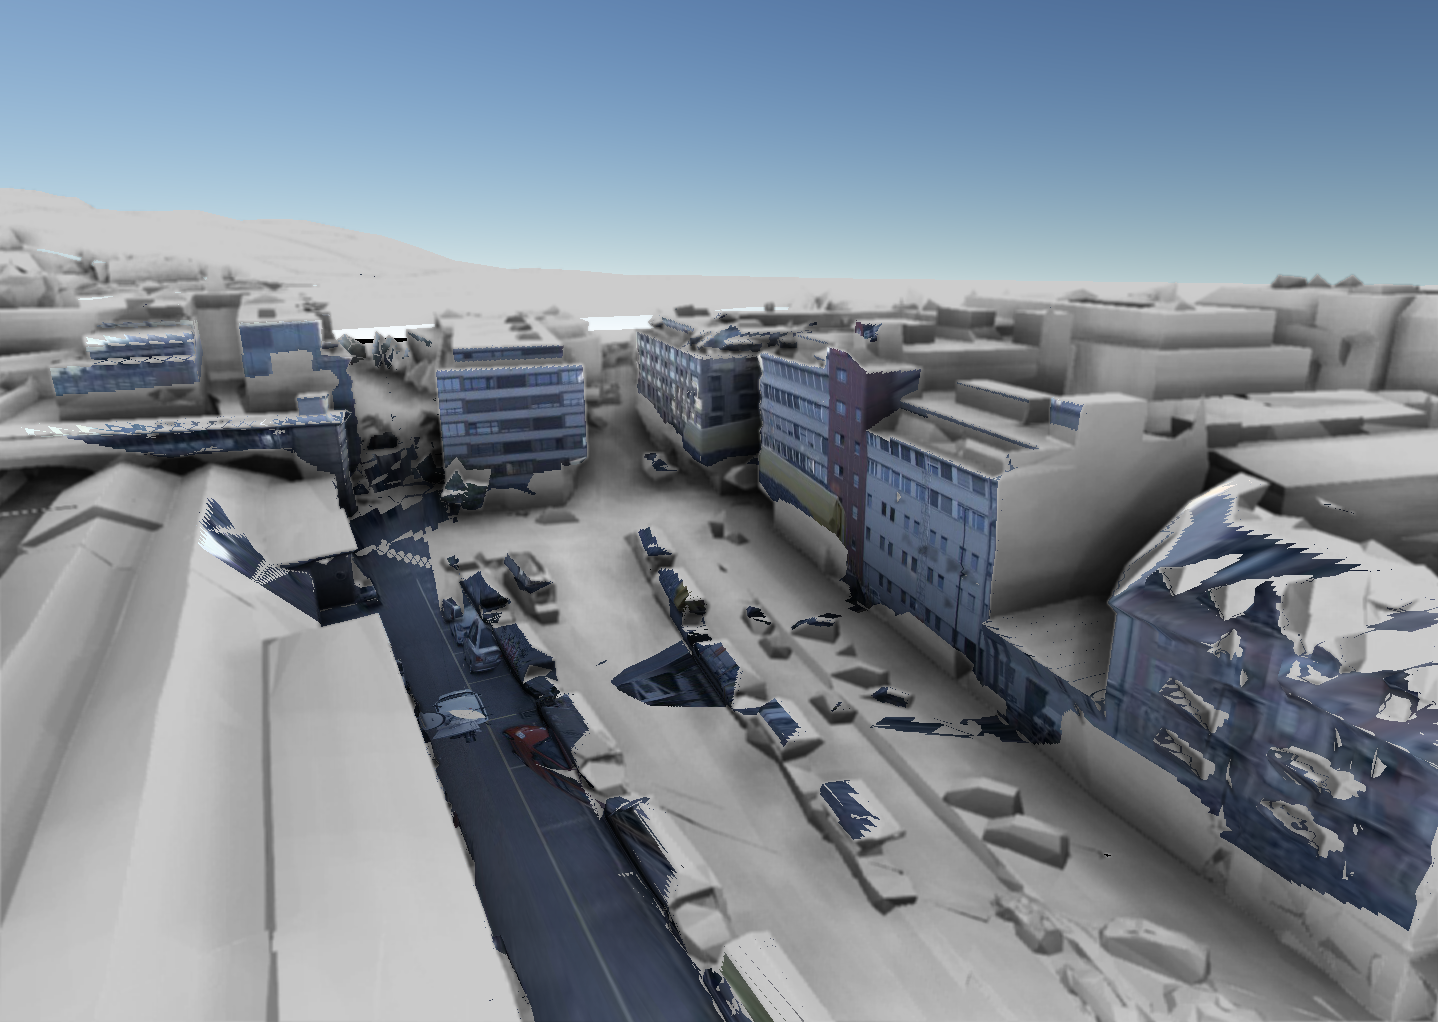
Figure 6. Projection target
ClosestSurface |
|
|
If you are projecting on the closest surface, the base opacity controls an optional base layer.
The color of the closest projection with a line of sight to the surface, assumed to have the best view of that location, is
drawn first and weighted by the base opacity. The selected projections in the line of sight are then painted on top.
This fills surfaces that the closest panorama sees but that are occluded from the others.
A base opacity of 0 (the default) disables the base layer.
The base opacity has no effect for the AllSurfaces target.
Apply the style on the builder, or replace it later with ProjectedImageryLayer::setStyleProjectedImageryLayer::setStyleProjectedImageryLayer::setStyle:
auto style = ProjectedImageryStyle::newBuilder()
.opacity(0.9)
.projectionTarget(ProjectedImageryTarget::ClosestSurface)
.build();
auto layer = ProjectedImageryLayer::newBuilder()
.model(projectedImageryModel)
.style(style)
.title("Panorama")
.build();var style = ProjectedImageryStyle.NewBuilder()
.Opacity(0.9)
.ProjectionTarget(ProjectedImageryTarget.ClosestSurface)
.Build();
var layer = ProjectedImageryLayer.NewBuilder()
.Model(model)
.Style(style)
.Title("Video Projection")
.Build();var style = ProjectedImageryStyle.newBuilder()
.opacity(0.9)
.projectionTarget(ProjectedImageryTarget.ClosestSurface)
.build();
var layer = ProjectedImageryLayer.newBuilder()
.model(projectedImageryModel)
.style(style)
.title("Video Projection")
.build();Tracking the projector with ProjectedImageryFeature
A ProjectedImageryLayerProjectedImageryLayerProjectedImageryLayer renders the projection itself but does not display anything at the projector location.
If you also want to visualize a 3D icon, such as a drone model or a frustum, at the projector’s position, use a ProjectedImageryFeatureProjectedImageryFeatureProjectedImageryFeature.
You can construct a ProjectedImageryFeatureProjectedImageryFeatureProjectedImageryFeature from the values of a ProjectedImageryProjectedImageryProjectedImagery. The newBuildernewBuildernewBuilder overload that takes a ProjectedImageryProjectedImageryProjectedImagery copies the pose and the projection ID for you. Such a feature lets you display an icon with the same position and orientation
as the projector.
|
The feature does not automatically track changes. Therefore, it is recommended to add an observer to the model and use it to update the feature. |
A projected imagery feature carries the projector pose (location, yaw, pitch, roll, fovX, fovY) as feature properties,
exposed through dedicated property paths such as
getLocationPropertyPathgetLocationPropertyPathgetLocationPropertyPath and getYawPropertyPathgetYawPropertyPathgetYawPropertyPath.
The feature also carries the projection’s string ID (ProjectedImagery::getIdProjectedImagery::getIdProjectedImagery::getId) in a dedicated property,
reachable through getProjectionIdPropertyPathgetProjectionIdPropertyPathgetProjectionIdPropertyPath.
This ID is intentionally kept separate from the feature’s numeric FeatureIdFeatureIdFeatureId: a projection ID is a string, so keeping it as a
property lets you match a picked feature back to its projection, for example to select that projection on the layer with setSelectedProjections.
You can add these features to a regular IFeatureModelIFeatureModelIFeatureModel, with feature types that include getProjectedImageryPropertiesDataTypegetProjectedImageryPropertiesDataTypegetProjectedImageryPropertiesDataType. Then, you visualize them with a FeatureLayerFeatureLayerFeatureLayer using a custom painter.
The imagery itself remains in the matching IProjectedImageryModelIProjectedImageryModelIProjectedImageryModel; the feature only describes the pose.
The field of view is optional. A pinhole projector sets it so that a painter can draw the camera frustum, while a 360-degree panorama typically has none.
The video projection sample uses this mechanism to render a 3D drone icon at the projector’s position, updated whenever the projection changes:
auto feature = ProjectedImageryFeature::newBuilder(projection, id)
// The feature model uses the map reference.
.location(Point(llhToWorld->getTargetReference(), *point))
.build();return ProjectedImageryFeature.NewBuilder(projection, id)
// The feature is expressed in the feature model's reference.
.Location(new Point(llhToWorld.TargetReference, worldPoint.Value))
.Build();return ProjectedImageryFeature.newBuilder(projection, id)
// The feature model uses the map reference.
.location(point)
.build()Pushing video frames into the model
For a live video source, repeat these steps on each new frame, using a ProjectedVideoModelProjectedVideoModelProjectedVideoModel:
-
Wrap the frame’s pixel buffer into a
luciad::ImagewithImage::create. -
Provide the projector pose for the frame timestamp (location, yaw, pitch, roll, fields of view).
-
Call
updateFrameupdateFrameupdateFramewith the new image and the pose. The model updates its projection, notifies observers, and the layer reprojects it.
You typically wire this into a video frame callback:
QImage qImage = frame.toImage().convertToFormat(QImage::Format_RGBA8888);
ByteBuffer buffer(reinterpret_cast<const std::byte*>(qImage.constBits()), static_cast<size_t>(qImage.sizeInBytes()));
auto videoImage = Image::create(static_cast<size_t>(qImage.width()), static_cast<size_t>(qImage.height()), false, PixelFormat::Rgba8888, buffer);
auto dronePosition = dronePositions->getDronePosition(mapBackend->getVideoTime());
auto droneLocation = Point(wgs84, Coordinate(dronePosition.longitude, dronePosition.latitude, dronePosition.altitude));
if (!map->getController()) {
setCameraPositionFromDrone(mapBackend, *dronePositions);
}
projectedVideoModel->updateFrame(videoImage, droneLocation, dronePosition.yaw, dronePosition.pitch, dronePosition.roll, DronePainter::SensorFovX,
DronePainter::SensorFovY);_currentTime = time;
var pos = _dronePositions.GetDronePosition(time);
var location = new Point(_wgs84, new Coordinate(pos.Longitude, pos.Latitude, pos.Altitude));
if (Map.Controller == null)
{
UpdateCameraFromDrone();
}
_projectedVideoModel.UpdateFrame(image, location,
                                 pos.Yaw, pos.Pitch, pos.Roll,
DronePainter.SensorFovX, DronePainter.SensorFovY);val dronePos = dronePositions?.getDronePosition(timestampSec) ?: return
projectedVideoModel?.updateFrame(
    image,
    GeometryFactory.createPoint(
        wgs84,
        Coordinate(dronePos.longitude, dronePos.latitude, dronePos.altitude)
    ),
    dronePos.yaw, dronePos.pitch, dronePos.roll,
    DronePainter.SENSOR_FOV_X, DronePainter.SENSOR_FOV_Y
)The video projection sample
The sample_video_projection sample demonstrates the projected imagery API.
The sample plays back a pre-recorded drone video, and projects each video frame onto the terrain with a ProjectedVideoModelProjectedVideoModelProjectedVideoModel and a ProjectedImageryLayerProjectedImageryLayerProjectedImageryLayer, using the default AllSurfacesAllSurfacesAllSurfaces projection target.
A second FeatureLayerFeatureLayerFeatureLayer displays a 3D drone glTF mesh at the projector position. That model is fed by ProjectedImageryFeatureProjectedImageryFeatureProjectedImageryFeature instances, updated from an IProjectedImageryModelObserverIProjectedImageryModelObserverIProjectedImageryModelObserver registered on the same model driving the projection.
The panorama sample
The sample_panorama sample demonstrates 360-degree panoramas.
It loads a LuciadFusion cubemap dataset with a FusionPanoramaModelDecoderFusionPanoramaModelDecoderFusionPanoramaModelDecoder and renders it with a ProjectedImageryLayerProjectedImageryLayerProjectedImageryLayer over the Lucerne city mesh, with the panorama positions running along a street-level track.
A second FeatureLayerFeatureLayerFeatureLayer marks each position with a hexagon on the ground.
Selecting a hexagon flies the camera to that panorama and reveals its imagery by ramping the SelectedProjectionSelectedProjectionSelectedProjection weight up from zero.
A look-around controller then keeps the camera eye pinned at the panorama while the user changes the viewing direction and
field of view, and moving to another panorama cross-fades between the two by animating their weights.