Google 3D Tiles is a photorealistic globe-covering dataset. It follows the OGC 3D Tiles format 1.0 specification, and has a GLB payload.
It contains detailed textured 3D mesh data with high-resolution imagery for over 2000 cities.
To find out the exact coverage of the 3D data, open
Google Earth and activate the 3D Coverage layer.
The uncovered areas contain 3D-textured elevation-like mesh data.
|
Loading and using Google 3D Tiles in LuciadRIA gives you a Google Earth look and feel, but the Google Map Tiles API may provide tiles at a lower resolution than what you experience in Google products. |
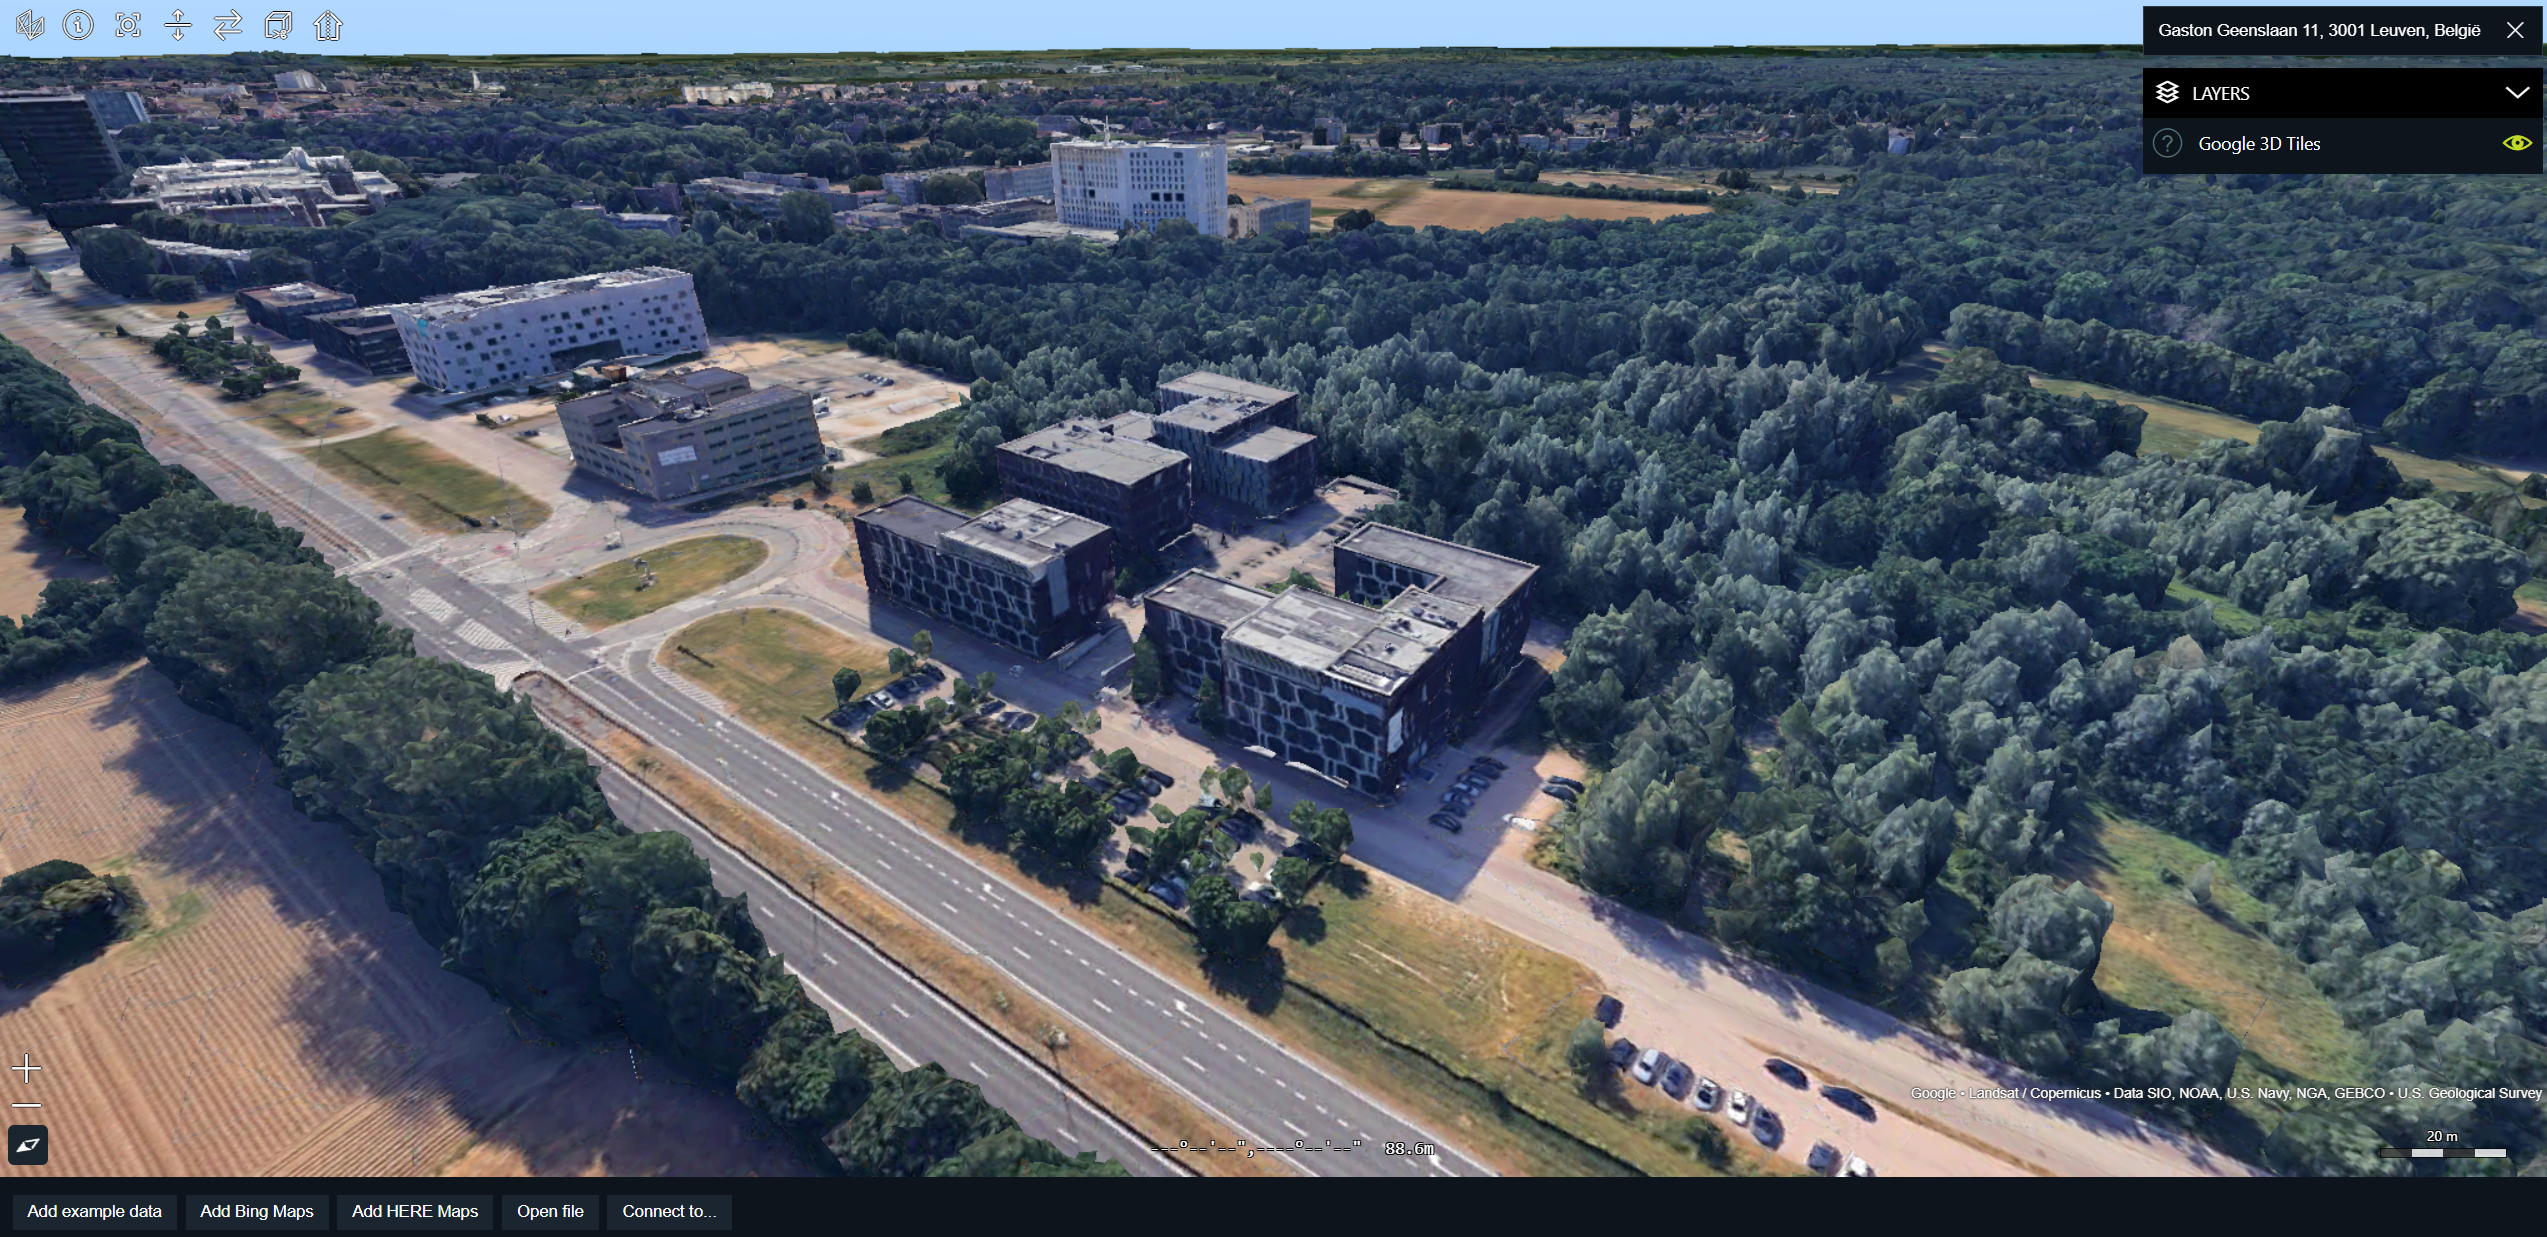
Visualize Google 3D Tiles
To show Google 3D Tiles on a LuciadRIA map, you must access the Google 3D Tiles API, create a model for the Google 3D Tiles data, and visualize that model in a map layer.
Create a session
To start working with Google 3D Tiles, you must get an API key from Google. With this key, you can fetch a session ID and a root URL as illustrated in Program: Get a rootURL and sessionID to start working with Google 3D Tiles.
|
Each root tile request counts against your daily quota. Further requests don’t count. The root request results in a session,
which is valid for a few hours. We advise to re-use this session by saving it in the browser’s |
Expand for Program: Get a rootURL and sessionID to start working with Google 3D Tiles:
export async function fetchSessionAndRootURL(apiKey: string): Promise<{
  rootURL: string,
  sessionID: string
}> {
  const response = await fetch(`https://tile.googleapis.com/v1/3dtiles/root.json?key=${apiKey}`);
  const jsonResponse = await response.json();
  const rootWithSession = "https://tile.googleapis.com" +
                          jsonResponse["root"]["children"][0]["children"][0]["content"]["uri"];
  const rootURL = rootWithSession.split('?')[0];
  const sessionID = rootWithSession.split('=')[1];
  return {
    rootURL,
    sessionID
  };
}
Create the model
You can use the fetched rootUrl and sessionId to build an OGC3DTilesModel as illustrated in Program: Create a model with the correct request parameters.
Expand for Program: Create a model with the correct request parameters:
export function createGoogle3DTilesModel(apiKey: string, rootUrl: string, sessionId: string): Promise<OGC3DTilesModel> {
  return OGC3DTilesModel.create(rootUrl,
      {
        requestParameters: {
          "key": apiKey,
          "session": sessionId
        }
      });
}
Create the layer
To visualize the Google 3D Tiles model, you must create a TileSet3DLayer for it. When you are creating that layer, you can set several layer properties.
For optimal layer behavior, you must define some properties with a particular setting, as you can see in Program: Create a layer with the optimal layer parameters.
You can always add other properties, isDrapeTarget for instance, as you please.
Expand for Program: Create a layer with the optimal layer parameters:
export function createGoogle3DTilesLayer(google3DTilesModel: OGC3DTilesModel): TileSet3DLayer {
  return new TileSet3DLayer(google3DTilesModel, {
    // Make sure to keep "Google" in the label of the layer
    label: "Google 3D Tiles",
    // keep the qualityFactor low, this dataset does not handle larger quality factors well due to it being so big.
    qualityFactor: 0.125,
    // individual buildings cannot be selected, there is no id property for them included in the data.
    selectable: false,
    // the meshStyle
    meshStyle: {
      // don't add lighting, lighting is included in the textures, so this would lead to strange effects.
      lighting: false,
      // use the culling type as specified in the data, which in this case is backface culling.
      facetCulling: FacetCullingType.BASED_ON_DATA,
    },
    // this tileset has terrain elevation information included, the mesh has the correct elevation where no
    // buildings are present.
    isPartOfTerrain: true,
    // no fading when replacing tiles
    fadingTime: 0,
    // add other setting like isDrapeTarget for example
  });
}
Configure the map for Google 3D Tiles
You can load Google 3D Tiles on a 3D WebGL map only. The Google 3D Tiles dataset is globe-covering and has the correct elevation baked in its meshes. Because of the particular nature of this dataset, you must take specific measures when you add it to the LuciadRIA map.
By default, LuciadRIA visualizes a 3D map with a globe of a certain color. This colored globe, an ellipsoid, intersects with your Google 3D Tiles data. To alleviate that problem, you can override the default light gray color with any fully transparent color.
Expand for Program: Make sure your map is transparent:
// We need a transparent globe when showing Google 3D Tiles.
map.globeColor = "rgba(0,0,0,0)";|
As soon as you start loading more layers with imagery data, they are draped on the globe, and the globe will no longer be transparent. These layers will break through your Google 3D Tiles data, so don’t make them visible in a regular view. You can still use them in swipe or flicker mode. You can also drape these kind of layers on your Google 3D Tiles mesh. |
Convenient 3D Google Tiles loading with the loader sample
For your convenience, the LuciadRIA sample code includes a Google3DTilesLoader.
If you provide this utility class with your Google API key, it creates a layer with the optimal settings for Google 3D Tiles.
You can also specify optional parameters for the loader to improve your browsing experience. The LuciadRIA loader can store your session ID, and can automatically renew it when it’s about to expire. That way, your tile browsing experience doesn’t get interrupted. If you provide the map, the loader takes care of globe color and layer visibility.
Expand for Program: Google 3D Tiles accommodation:
/**
 * Almost all TileSet3DLayerConstructorOptions can be used to create a Google tileset 3D layer,
 * except
 * <ul>
 *   <li>qualityFactor: fixed at 0.125</li>
 *   <li>pointCloudStyle: no pointCloud layer.</li>
 * </ul>
 */
type GoogleTileSet3DLayerConstructorOptions = Omit<TileSet3DLayerConstructorOptions, "pointCloudStyle" | "qualityFactor">;

export interface Google3DTilesLoaderOptions {
  /**
   * Provide the map if you want to automatically
   * <ul>
   *   <li> make the globe transparent (without doing this, terrain intersects with the tiles). </li>
   *   <li> add the above mesh constraint. </li>
   *   <li> make all terrain-draped layers invisible. </li>
   * </ul>
   * These special map conditions will only remain in place as long as the Google tiles layer is visible.
   */
  map?: Map,

  /**
   * Set to true if you want to renew your session when the session expires.
   * <br>
   * From <a href="https://developers.google.com/maps/documentation/tile/3d-tiles"> the Google 3D tiles documentation</a>,
   * we learn that the same session can be used for 3 hours.
   * <br>
   * <i>"The render can make at least three hours of tile requests from a single root tileset request.
   * After reaching this limit, you must make another root tileset request."</i>
   *
   * @default false
   */
  autoRenew?: boolean,

  /**
   * Set to true if you want to keep your session active (through the use of local storage)
   *
   * @default false
   */
  keepSession?: boolean,

  /**
   * Almost all TileSet3DLayerConstructorOptions can be provided here, except for pointCloudStyle and qualityFactor
   * @default {}
   */
  layerConstructorOptions?: GoogleTileSet3DLayerConstructorOptions,
}

export const Google3DTilesLoader = {

  /**
   * Async function to create a TileSet3DLayer for Google 3D Tiles
   * @param googleApiKey your API key
   * @param options
   */
  createLayer: async (googleApiKey: string, options?: Google3DTilesLoaderOptions): Promise<TileSet3DLayer> => {
The utility class also offers a method to check the validity of your API key.
Note that checking validity loads the "root tile", which is counted against your daily quota. If you re-use a previous session, as described above, you don’t need to validate your key.
Expand for Program: Check your API key validity:
/**
 * Async function to check the validity of the Google API key
 * @param apiKey your API key
 */
export async function validateGoogleAPIKey(apiKey: string): Promise<{
  valid: boolean,
  message: string
}> {
  const response = await fetch(`https://tile.googleapis.com/v1/3dtiles/root.json?key=${apiKey}`);
  if (response.status !== 200) {
    const errorMsg = (await response.json())["error"]["message"];
    return {valid: false, message: errorMsg};
  }
  return {valid: true, message: "Valid API key"};
}
Add the Google attributions
Google requires you to show the Google logo and the correct attributions as an overlay on the map.
Overlay the Google logo
To set the correct logo, override the getLogo method of your OGC3DTilesModel.
Program: Add the Google logo shows how you can do that.
Expand for Program: Add the Google logo:
return OGC3DTilesModel.create(googleInfo.rootUrl,
    {requestParameters: {"key": googleInfo.apiKey, "session": googleInfo.sessionId}})
    .then(model => {
      model.getLogo = function(): string {
        return GoogleLogoUrl;
      };
Overlay tileset attributions
The attributions for Google 3D Tiles vary depending on the tiles that you have in your view. Each loaded tile has its own copyright information. The Google Map Tiles API policies specify that you must collect, sort, and aggregate all that information. LuciadRIA does that for you automatically.
Get the logo and attributions on screen
You can use the TileSetAttributionProvider to get the correct logo and attributions for your view.
To receive notifications about new attributions, subscribe to the AttributionStringsChanged event.