Goal
The goal of this tutorial is to give the reader a high-level understanding of the Lucy architecture. As an illustration, we will extend Lucy with simple functionality.
|
The Lucy API is built on top of the LuciadLightspeed API. Once you completed this tutorial, it is strongly recommended to follow the Create your first 2D/3D map application or the Create your first 2D map application tutorial as well, to familiarize yourself with the basic concepts of the LuciadLightspeed API. |
Introduction to Lucy
What is Lucy?
Lucy is a powerful, high-level application framework for rapidly building applications that let you explore, analyze, and edit all kinds of geospatial data. Lucy is based on LuciadLightspeed, and integrates the functionality of LuciadLightspeed in a configurable application.
The major Lucy benefit is that it comes with a lot of functionality common to many GIS applications built-in. For example, Lucy allows you to:
-
Load extra data by drag-and-dropping it on the application, or going to File | Open from the menu
-
Select objects on the map, and display the object properties
-
Open a tabular view of your data, in addition to visualizing the data on the map
-
Open a terrain profile view that contains the data from your main map
-
Search through all your data, and fit the map on the results
-
Customize the styling of your data through the UI
-
Add annotations to the map
-
Print the map, or convert it to PDF
-
Save the state of your application in a workspace
-
Work with time-dependent data, and use the UI to control data visualization from a time perspective
|
Lucy is neither a finished application nor an end-user product. It is a framework that allows you to build your own application by customizing functionality, and by adding it to and removing it from the Lucy framework. |
Lucy modular design: the framework in combination with add-ons
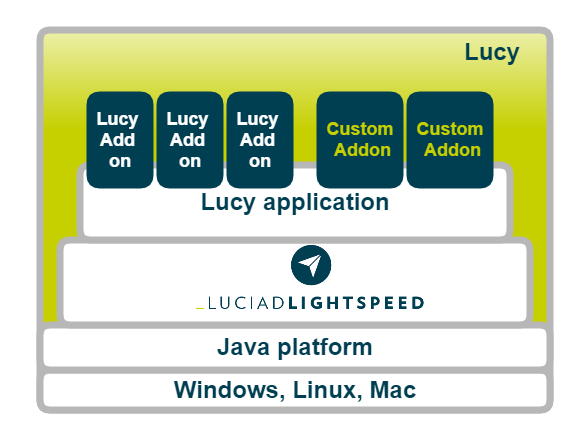
Lucy consists of two main parts:
-
The add-ons: an add-on is a piece of code that plugs in a specific piece of functionality such as the ability to create a map view, to perform terrain analysis, and so on.
It is very easy to:
-
Remove add-ons: because each of the add-ons provide specific functionality to Lucy, you can remove that functionality by removing the add-on.
-
Customize existing add-ons: often you want to keep the functionality offered by an add-on, but tune it slightly to match your specific Lucy application requirement. The majority of the add-ons have a configuration file that allows you to make simple modifications.
For more complex modifications, you can write custom code using the API offered by the add-on.
-
Adding your own add-ons: by writing your own add-on and plugging it into the framework, you can add your own piece of functionality to Lucy.
-
-
The Lucy framework: the glue between the different add-ons for presenting them as a single, solid application. Its main responsibilities include providing the communication between the different add-ons, loading all the add-ons when the application starts, and providing the main UI of Lucy.
The Lucy API is built on top of the other LuciadLightspeed API. Lucy add-ons are built on top of the Lucy API but they can also use the rest of the LuciadLightspeed API:
Starting Lucy
If you have performed the IDE setup correctly, you can start the regular Lucy by running the main method of the com.luciad.lucy.TLcyMain
class. The Lucy you start from the IDE looks exactly the same as the Lucy you start from the Lucy.bat or Lucy.sh scripts that come with the LuciadLightspeed release.
If you want to run a Lucy sample, run the corresponding main class instead of TLcyMain.
For example, to run the Lucy MapCentric sample, run the main method of the samples.lucy.frontend.mapcentric.Main class.
Creating the Hello World add-on
You add custom functionality to Lucy by creating your own add-ons and adding them to Lucy. This section describes how to create such an add-on. To keep things as simple as possible, the add-on just prints out "Hello world!" on the console.
An add-on must:
-
Extend from the abstract base class
ALcyAddOn, and implement the abstract methods -
Be a public class
-
Have a public, no-argument constructor
When the Lucy framework loads the add-on, the ALcyAddOn.plugInto method is called.
It is that method that must provide the extra functionality to Lucy.
In our Hello World example, it is therefore also that method that must print out the string.
package samples.lucy.helloworld;

import com.luciad.lucy.ILcyLucyEnv;
import com.luciad.lucy.addons.ALcyAddOn;

public class HelloWorldAddOn extends ALcyAddOn{
  /**
   * Default, no-args constructor
   */
  public HelloWorldAddOn(){ }

  @Override
  public void plugInto( ILcyLucyEnv aLucyEnv ){
    System.out.println("Hello world !");
  }

  @Override
  public void unplugFrom( ILcyLucyEnv aLucyEnv ){
  }
}
Adding the add-on to Lucy
|
The approach described in this section is the most straight-forward one. However, it makes upgrading your LuciadLightspeed version in the future more difficult. See Setting up your IDE for a Lucy based application for the recommended way of setting up your project. |
Lucy uses an XML file to keep track of all add-ons that it must load. To have a look at it, go to config/lucy/addons.xml.
The addons.xml file defines a name for each add-on and points to its full class name.
You can define other optional settings for the add-on as well, but the name and class name are the mandatory ones.
The entry for our HelloWorldAddOn is:
HelloWorldAddOn<addon>
<name>Hello World</name>
<class>samples.lucy.helloworld.HelloWorldAddOn</class>
</addon>Add the entry at the bottom of the file, right above the </addons> closing tag.
Run TLcyMain.main again to load the custom add-on and call the plugInto method that prints out the string.
|
If you want to add the add-on to the map-centric version of Lucy, update the
|