About this tutorial series
This tutorial series show you how to build your first LuciadLightspeed application that loads data and allows you to navigate on a 2D/3D map:
Prerequisites
This tutorial series require no prior LuciadLightspeed knowledge, but you do need some basic familiarity with Java Swing or JavaFX.
Goal
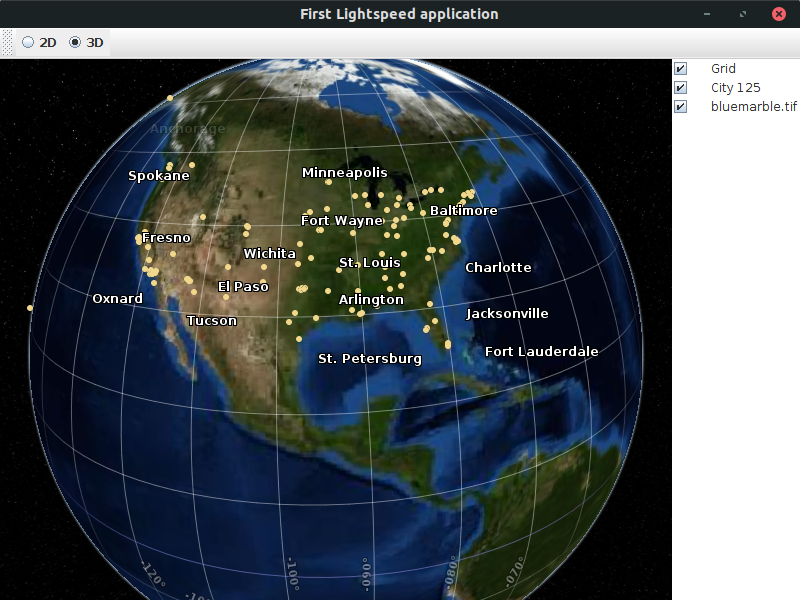
This tutorial series provides a step-by-step guide to building a basic LuciadLightspeed application with a hardware-accelerated map. The application built in this series allows users to view major USA cities on a raster image of the world in either 2D or 3D. This tutorial series discusses the setup of the basic View, Model and Controller components of the application, before expanding that basic configuration with more functions.
More specifically, the application offers the following functionality:
-
A map displayed inside a window
-
A raster image of the world used as background data
-
The major cities of the USA, read from a
.SHPfile -
The ability to navigate through the view
-
The ability to switch between 2D and 3D visualization
-
Check boxes to toggle the visibility of the data on the map
You can find the complete, runnable code at the end of the tutorial.
|
This tutorial uses the hardware-accelerated Lightspeed view. A similar tutorial for the non-hardware-accelerated GXY view is available here. Read High-level overview of the different technologies if you are unsure which view is most suitable for you. |
Overview of the main API concepts
A standard LuciadLightspeed application follows the M(odel)-V(iew)-C(ontroller) architectural pattern. The idea behind the MVC architecture is to separate the data (model), the representation of the data (view), and the user interaction (controller) from each other. That separation results in a simpler design of the application and a higher flexibility and re-usability of code.
The MVC parts of the LuciadLightspeed API are defined as follows:
-
A LuciadLightspeed model stores and describes geographical data regardless of how the data is visualized and interacted with. For example: a model contains the location of a number of hospitals and additional hospital information such as capacity.
In the LuciadLightspeed API, the model is an
ILcdModelinstance. -
A LuciadLightspeed view contains all information needed for the visual representation of the data in the LuciadLightspeed models. A view doesn’t contain data. For example, in the case of the hospitals, the view uses a red cross to represent the location of a hospital.
-
A LuciadLightspeed controller interprets user interaction and performs the required action on LuciadLightspeed models and views, regardless of the type of model and view. For example, in the case of the hospitals, a mouse right-click on a red cross results in an information pop-up with the hospital location and capacity.
In the LuciadLightspeed API, these are
ILspControllerinstances.
Separating the different parts of the application allows you to re-use objects for different purposes, and to re-define objects without changing other objects. You can, for example, change a view without making changes to the models represented in the view. You can also re-define the user interaction with a view without changing the view itself. Object re-use shortens the time for writing an application. In addition, it promotes a consistent design and functionality for all your applications.
Creating the Swing application UI
Before we can turn to the LuciadLightspeed API to create our map, we need a JFrame to display the map in,
and a main method to start the application:
public class FirstApplicationTutorial {
  public JFrame createUI() {
    JFrame frame = new JFrame("First Lightspeed application");
    frame.setSize(2000, 1500);
    frame.setDefaultCloseOperation(JFrame.EXIT_ON_CLOSE);
    return frame;
  }
  public static void main(String[] args) {
    //Swing components must be created on the Event Dispatch Thread
    EventQueue.invokeLater(() -> {
      JFrame frame = new FirstApplicationTutorial().createUI();
      frame.setVisible(true);
    });
  }
}
Creating the JavaFX application UI
In JavaFX, we need to set a Scene to display the map in.
public class FirstApplicationFXTutorial extends Application {
  @Override
  public void start(Stage primaryStage) {
    primaryStage.setTitle("First Lightspeed application");
    BorderPane borderPane = new BorderPane();
    Scene scene = new Scene(borderPane, 800, 600);
    primaryStage.setScene(scene);
    primaryStage.show();
  }
}
Creating the map
Now that we have a window, we need to create the map and add it to the UI.
In LuciadLightspeed terminology, a map is known as a view. It is defined by the interface
ILspView.
We use the builder TLspViewBuilder to instantiate an ILspView.
For Swing we’ll use a TLspAWTView, for JavaFX we’ll use a TLspFXView.
ILspAWTView createView() {
  return TLspViewBuilder.newBuilder().buildAWTView();
}private TLspFXView createView() {
return TLspViewBuilder.newBuilder().buildFXView();
}Once the view is created, we can add its host component to our UI.
ILspAWTView view = createView();
frame.add(view.getHostComponent(), BorderLayout.CENTER);TLspFXView view = createView();
borderPane.setCenter(view.getHostNode());Running the program at this point results in an empty window. Because the view doesn’t contain any data yet, it only displays a window background. Continue with the next tutorial in this series to add some data to the map.
The full code
import java.awt.BorderLayout;
import java.awt.EventQueue;
import java.awt.event.ActionEvent;
import java.io.IOException;
import java.util.Collection;
import javax.swing.AbstractAction;
import javax.swing.Action;
import javax.swing.ButtonGroup;
import javax.swing.JComponent;
import javax.swing.JFrame;
import javax.swing.JRadioButton;
import javax.swing.JToolBar;
import com.luciad.geodesy.TLcdGeodeticDatum;
import com.luciad.model.ILcdModel;
import com.luciad.model.ILcdModelDecoder;
import com.luciad.model.TLcdCompositeModelDecoder;
import com.luciad.projection.TLcdEquidistantCylindrical;
import com.luciad.reference.TLcdGridReference;
import com.luciad.util.service.TLcdServiceLoader;
import com.luciad.view.lightspeed.ILspAWTView;
import com.luciad.view.lightspeed.ILspView;
import com.luciad.view.lightspeed.TLspViewBuilder;
import com.luciad.view.lightspeed.layer.ILspLayer;
import com.luciad.view.lightspeed.layer.ILspLayerFactory;
import com.luciad.view.lightspeed.layer.TLspCompositeLayerFactory;
import com.luciad.view.lightspeed.painter.grid.TLspLonLatGridLayerBuilder;
import com.luciad.view.lightspeed.util.TLspViewTransformationUtil;
import com.luciad.view.swing.TLcdLayerTree;
public class FirstApplicationTutorial {
public JFrame createUI() {
JFrame frame = new JFrame("First Lightspeed application");
ILspAWTView view = createView();
frame.add(view.getHostComponent(), BorderLayout.CENTER);
addData(view);
JComponent layerControl = createLayerControl(view);
frame.add(layerControl, BorderLayout.EAST);
view.addLayer(createGridLayer());
JToolBar toolBar = new JToolBar();
JRadioButton b2d = new JRadioButton(createSwitchTo2DAction(view));
b2d.setSelected(true);//start with a 2D view
JRadioButton b3d = new JRadioButton(createSwitchTo3DAction(view));
//Place the buttons in a ButtonGroup.
//This ensures that only one of them can be selected at the same time
ButtonGroup group = new ButtonGroup();
group.add(b2d);
group.add(b3d);
toolBar.add(b2d);
toolBar.add(b3d);
frame.add(toolBar, BorderLayout.NORTH);
frame.setSize(2000, 1500);
frame.setDefaultCloseOperation(JFrame.EXIT_ON_CLOSE);
return frame;
}
ILspAWTView createView() {
return TLspViewBuilder.newBuilder().buildAWTView();
}
static void addData(ILspView view) {
try {
ILcdModel shpModel = createSHPModel();
view.addLayer(createLayer(shpModel));
ILcdModel rasterModel = createRasterModel();
view.addLayer(createLayer(rasterModel));
} catch (IOException e) {
throw new RuntimeException("Problem during data decoding", e);
}
}
private static ILcdModel createSHPModel() throws IOException {
// This composite decoder can decode all supported formats
ILcdModelDecoder decoder =
new TLcdCompositeModelDecoder(TLcdServiceLoader.getInstance(ILcdModelDecoder.class));
// Decode city_125.shp to create an ILcdModel
ILcdModel shpModel = decoder.decode("Data/Shp/Usa/city_125.shp");
return shpModel;
}
private static ILcdModel createRasterModel() throws IOException {
// This composite decoder can decode all supported formats
ILcdModelDecoder decoder =
new TLcdCompositeModelDecoder(TLcdServiceLoader.getInstance(ILcdModelDecoder.class));
// Decode a sample data set (imagery data)
ILcdModel geopackageModel = decoder.decode("Data/GeoPackage/bluemarble.gpkg");
return geopackageModel;
}
private static ILspLayer createLayer(ILcdModel aModel) {
TLspCompositeLayerFactory layerFactory =
new TLspCompositeLayerFactory(TLcdServiceLoader.getInstance(ILspLayerFactory.class));
if (layerFactory.canCreateLayers(aModel)) {
Collection<ILspLayer> layers = layerFactory.createLayers(aModel);
//We only expect a single layer for our data
return layers.iterator().next();
}
throw new RuntimeException("Could not create a layer for " + aModel.getModelDescriptor().getDisplayName());
}
static ILspLayer createGridLayer() {
return TLspLonLatGridLayerBuilder.newBuilder().build();
}
private JComponent createLayerControl(ILspView aView) {
return new TLcdLayerTree(aView);
}
static Action createSwitchTo2DAction(ILspView aView) {
AbstractAction action = new AbstractAction("2D") {
@Override
public void actionPerformed(ActionEvent e) {
TLspViewTransformationUtil.setup2DView(
aView,
new TLcdGridReference(new TLcdGeodeticDatum(),
new TLcdEquidistantCylindrical()),
true
);
}
};
action.putValue(Action.SHORT_DESCRIPTION, "Switch the view to 2D");
return action;
}
private Action createSwitchTo3DAction(ILspView aView) {
AbstractAction action = new AbstractAction("3D") {
@Override
public void actionPerformed(ActionEvent e) {
TLspViewTransformationUtil.setup3DView(aView, true);
}
};
action.putValue(Action.SHORT_DESCRIPTION, "Switch the view to 3D");
return action;
}
public static void main(String[] args) {
//Swing components must be created on the Event Dispatch Thread
EventQueue.invokeLater(() -> {
JFrame frame = new FirstApplicationTutorial().createUI();
frame.setVisible(true);
});
}
}import javafx.application.Application;
import javafx.scene.Node;
import javafx.scene.Scene;
import javafx.scene.control.RadioButton;
import javafx.scene.control.ToggleGroup;
import javafx.scene.control.ToolBar;
import javafx.scene.layout.BorderPane;
import javafx.stage.Stage;
import com.luciad.geodesy.TLcdGeodeticDatum;
import com.luciad.projection.TLcdEquidistantCylindrical;
import com.luciad.reference.TLcdGridReference;
import com.luciad.view.lightspeed.ILspView;
import com.luciad.view.lightspeed.TLspFXView;
import com.luciad.view.lightspeed.TLspViewBuilder;
import com.luciad.view.lightspeed.util.TLspViewTransformationUtil;
import samples.lightspeed.javafx.common.layercontrols.FXLayerControl;
public class FirstApplicationFXTutorial extends Application {
@Override
public void start(Stage primaryStage) {
primaryStage.setTitle("First Lightspeed application");
BorderPane borderPane = new BorderPane();
TLspFXView view = createView();
borderPane.setCenter(view.getHostNode());
FirstApplicationTutorial.addData(view);
Node layerControl = createLayerControl(view);
borderPane.setRight(layerControl);
view.addLayer(FirstApplicationTutorial.createGridLayer());
ToolBar toolBar = new ToolBar();
borderPane.setTop(toolBar);
RadioButton b2d = new RadioButton("2D");
RadioButton b3d = new RadioButton("3D");
toolBar.getItems().add(b2d);
toolBar.getItems().add(b3d);
//Place the buttons in a group.
//This ensures that only one of them can be selected at the same time
ToggleGroup group = new ToggleGroup();
b2d.setToggleGroup(group);
b3d.setToggleGroup(group);
group.selectedToggleProperty().addListener((observable, oldValue, newValue) -> {
if (newValue == b2d) {
TLspViewTransformationUtil.setup2DView(
view,
new TLcdGridReference(new TLcdGeodeticDatum(), new TLcdEquidistantCylindrical()), true);
} else {
TLspViewTransformationUtil.setup3DView(view, true);
}
});
b2d.setSelected(true);//start with a 2D view
Scene scene = new Scene(borderPane, 800, 600);
primaryStage.setScene(scene);
primaryStage.show();
}
private TLspFXView createView() {
  return TLspViewBuilder.newBuilder().buildFXView();
}
private Node createLayerControl(ILspView aView) {
return new FXLayerControl(aView);
}
}