|
The content of this article applies to LuciadRIA 2019 and older versions only. LuciadRIA 2020.0 has been migrated to TypeScript and is released as a JavaScript library with TypeScript definition files generated from the source TypeScript files. The separate TypeScript declaration file discussed in this article is no longer required. For more information about TypeScript, and how it is used as of LuciadRIA 2020, see: |
You can integrate LuciadRIA modules in TypeScript projects. To make this as easy as possible, we developed the LuciadRIA TypeScript declaration file, which you can add to your application development project. As a result, the TypeScript compiler can verify that your application uses the LuciadRIA API correctly.
|
The TypeScript declaration is included in the LuciadRIA release as of version 2017.0. You can find it in the Keep in mind that the declaration file in the release distribution is maintained with each version. |
This article explains how to write LuciadRIA TypeScript code in LuciadRIA versions prior to 2020.0. It illustrates two project setup options that integrate the required support for the AMD module format into a TypeScript development project.
Developing LuciadRIA applications with TypeScript
What’s the purpose of the LuciadRIA TypeScript declaration file?
Starting from version 2017.0, LuciadRIA is released with a TypeScript declaration file. You can find the luciad.d.ts file in the web/luciad/ directory of a LuciadRIA release. With this declaration file, the TypeScript compiler can verify the correctness of any LuciadRIA
API call you that you make in your application.
The LuciadRIA declaration file contains the complete API, including support for optional components such as Defense Symbology and Advanced GIS Engine. Because LuciadRIA is shipped as an AMD library, the declaration file also contains the mapping of TypeScript classes to AMD modules. This allows you to import only the required LuciadRIA modules in your TypeScript project, while the TypeScript compiler will pick up the types that are exported by that module.
Writing LuciadRIA TypeScript code
Importing modules
Once you have the LuciadRIA TypeScript declaration file, you can start writing TypeScript code that imports LuciadRIA AMD modules and uses the LuciadRIA API. Just like in any other LuciadRIA project, you must import the corresponding module before you can use a component.
TypeScript uses both the ES6 syntax and the CommonJS syntax to import modules, because the export semantics of ES6, CommonJS
and AMD aren’t compatible. See the TypeScript module documentation for more details. Therefore, you must use the CommonJS syntax in your TypeScript code to import LuciadRIA AMD modules. For
example, you import the WebGLMap LuciadRIA module as follows:
import WebGLMap = require("luciad/view/WebGLMap");The LuciadRIA declaration file declares the luciad/view/webGLMap module and associates it with the WebGLMap class. As a result, the compiler and your IDE can perform static analysis and make suggestions when you use the WebGLMap import. In addition, the import statement will be translated to the module standard that was configured in tsconfig.json. In the case of AMD, the earlier import statement is transpiled to the following:
define(["require", "exports", "luciad/view/WebGLMap"], function(require, exports, WebGLMap) {
});
Example code
This is an example of how to create a WebGL Map and add a WMS layer in TypeScript:
import WebGLMap = require("luciad/view/WebGLMap");
import WMSTileSetModel = require("luciad/model/tileset/WMSTileSetModel");
import ReferenceProvider = require("luciad/reference/ReferenceProvider");
import ShapeFactory = require("luciad/shape/ShapeFactory");
import RasterTileSetLayer = require("luciad/view/tileset/RasterTileSetLayer");
import $ = require("jquery");

$("document").ready(() => {
  let map: WebGLMap = new WebGLMap("mapNode", {
    reference: ReferenceProvider.getReference("EPSG:4978")
  });

  let ref = ReferenceProvider.getReference("CRS:84");
  let wmsBounds = ShapeFactory.createBounds(ref, [-180, 360, -90, 180]);

  let model = new WMSTileSetModel({
    getMapRoot: "http://fusion.3d.luciad.com/wms",
    version: "1.3.0",
    bounds: wmsBounds,
    layers: ["4ceea49c-3e7c-4e2d-973d-c608fb2fb07e"],
    transparent: true
  });

  let layer = new RasterTileSetLayer(model);

  map.layerTree.addChild(layer);
});
After the code is transpiled to ES5 code with AMD, it looks as follows:
define([
  "require",
  "exports",
  "luciad/view/WebGLMap",
  "luciad/model/tileset/WMSTileSetModel",
  "luciad/reference/ReferenceProvider",
  "luciad/shape/ShapeFactory",
  "luciad/view/tileset/RasterTileSetLayer",
  "jquery"
], function(require, exports, WebGLMap, WMSTileSetModel, ReferenceProvider, ShapeFactory, RasterTileSetLayer, $) {
  "use strict";
  $("document").ready(function() {
    var map = new WebGLMap("mapNode", {
      reference: ReferenceProvider.getReference("EPSG:4978")
    });
    var ref = ReferenceProvider.getReference("CRS:84");
    var wmsBounds = ShapeFactory.createBounds(ref, [-180, 360, -90, 180]);
    var model = new WMSTileSetModel({
      getMapRoot: "http://fusion.3d.luciad.com/wms",
      version: "1.3.0",
      bounds: wmsBounds,
      layers: ["4ceea49c-3e7c-4e2d-973d-c608fb2fb07e"],
      transparent: true
    });
    var layer = new RasterTileSetLayer(model);
    map.layerTree.addChild(layer);
  });
});
Setting up a LuciadRIA project with TypeScript
LuciadRIA is shipped as a modular AMD library. Therefore, to embed LuciadRIA in your application, your TypeScript development tool chain must support the AMD module format. Possible options are:
-
Option A. Using AMD module loaders and optimizers, such as RequireJS and R.js or SystemJS and jspm.
-
Option B. Using a module bundler that collects multiple modules into a single bundle before the code is loaded to the browser, such as webpack, jspm or browserify.
Both options are described in detail below. For each approach, we provide a template project that you can download and run yourself.
|
These two options are provided as an illustration, to help you understand the basics. You have other options to perform the same task. For instance, your could use an IDE such as Visual Studio or WebStorm to create and compile your project. To keep this article concise, we won’t cover IDEs here. |
Option A. Setting up a project with an AMD tool chain
If you use an AMD module loader, you can keep using your AMD tool chain by configuring the TypeScript compiler to compile TypeScript modules to AMD modules. Consider the following project structure:
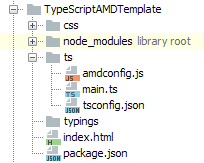
The project is created in the web/samples directory of a LuciadRIA release. It consists of a ts directory, which contains the TypeScript source code for our web application, the AMD loader configuration in amdload.js, and the TypeScript compiler options in tsconfig.json. The TypeScript configuration file contains the following directives:
{
  "compilerOptions": {
    "module": "amd",
    "outDir": "../js",
    "allowJs": true,
    "noResolve": true,
    "sourceMap": true
  },
  "include": ["**/*", "../../../luciad/**/*.d.ts", "../typings/**/*"]
}
These settings give the following instructions to the TypeScript compiler:
|
|
Instructs the TypeScript compiler to output AMD modules. Those can then be loaded with an AMD module loader, or built into a deployment bundle using an AMD module optimizer. |
|
|
Instructs the TypeScript compiler to put the compiled files in the |
|
|
Tells the compiler not to copy module imports other than the application-specific code to the |
|
|
Allows you to mix JavaScript code with TypeScript code. This makes the TypeScript compiler pick up the |
|
|
Tells the compiler to generate source map files, which makes it easier to debug the compiled code in the web browser. |
|
|
Tells the compiler to pick up all the files in the current directory, and the LuciadRIA TypeScript declaration file located
in the |
When the TypeScript compiler has finished, you can load the application in the browser by loading RequireJS in the web page
and instructing it to load amdconfig.js.
<script type="text/javascript" data-main="js/amdconfig" src="node_modules/requirejs/require.js"></script>The contents of amdconfig are:
require.config({
  paths:
  {
    "jquery": "../node_modules/jquery/dist/jquery"
  },
  packages:
  [
    {
      name: "luciad", location: "../../../luciad"
    }
  ]
});

require(['main']);
It configures the AMD loader with the location of jquery and LuciadRIA, and boots the application by loading the main module.
Try it out
You can download the the project template. You can try it out as follows:
-
Unzip the file in the samples directory
-
Run
npm installto download all necessary dependencies -
Run
npm run buildto compile the TypeScript files to JavaScript -
Start the sample server and navigate your web browser to http://localhost:8072/web/samples/TypeScriptAMDTemplate/
Option B. Setting up a project with WebPack
Module bundlers allow you to mix and match different module standards. Typically they support ES6, AMD, CommonJS, and UMD. Aside from module bundling, they also allow for additional processing of the JavaScript code. For example, you can transpile ES6 to ES5 by integrating with Babel, or transpile TypeScript code to ES5 by invoking the TypeScript compiler. We’ll show you how you can set up a webpack project with LuciadRIA and TypeScript.
This image illustrates a possible webpack project setup:
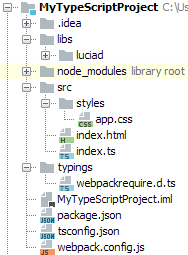
The project-specific HTML, CSS, and TypeScript code resides in the src directory. LuciadRIA, with the TypeScript declaration file, is located in the libs directory. The node_modules directory contains the necessary development dependencies such as webpack, webpack loaders and the TypeScript compiler.
The project structure is defined in webpack.config.js. The following file shows only the relevant snippets required by webpack to compile TypeScript code and package LuciadRIA
code:
module.exports = {
  entry: './src/index.ts',

  output: {
    path: './dist',
    filename: '[name].js'
  },

  resolve: {
    modulesDirectories: ['node_modules', 'libs'],
    extensions: ['', '.ts', '.js', '.json']
  },

  module: {
    loaders: [
      {
        test: /\.ts?$/,
        loader: 'awesome-typescript-loader',
        exclude: /node_modules/
      },
        ...
    ]
  },

  //configure NodeJS's fs module to be absent, otherwise LuciadRIA WebGL will refuse to function
  node: {
    fs: "empty"
  }
};
The configuration file exports a configuration object in which the following keys are defined:
|
|
Defines the application entry point. Starting from this point, webpack will calculate all module dependencies and collect them in a bundle. |
|
|
Defines where to put the bundle and how to name it. |
|
|
Defines the locations of the bundling resources. By default, webpack looks for resources in |
|
|
Defines how to treat particular modules before they are bundled. You do so by defining a loader for those module types. The
preceding example shows a loader for TypeScript files only. Other loaders have been omitted from the example. The TypeScript
loader is applied to files with the |
|
|
The WebGL rendering engine in LuciadRIA code checks if the NodeJS |
With this configuration file, webpack picks up your TypeScript code, transpiles it to JavaScript, resolves the dependencies
to the required LuciadRIA modules, and creates a bundle. tsconfig.json defines how webpack transpiles the TypeScript code:
{
  "compilerOptions": {
    "module": "amd",
    "target": "es5"
  },
  "exclude": [
    "node_modules",
    "dist"
  ]
}
This tells the TypeScript compiler to output AMD modules, and use ES5 as a compilation target. The exclude setting is there to speed up the TypeScript compiler. If you leave it out, webpack even suggests this setting to you. The
TypeScript compiler output is picked up by webpack and bundled into a single JavaScript file called main.js in the dist directory.
Try it out
You can download this setup by downloading and unpacking this zip file. Then perform the following actions:
-
Verify that you have included your LuciadRIA license file in your LuciadRIA installation.
-
Copy the LuciadRIA javascript files from
<LUCIADRIA_INSTALLATION_ROOT>/web/luciad/*to<WEBPACKSETUP>/libs/luciad>. -
Execute
npm installin the webpack project root. -
Execute
npm run dev:webpackserverin the webpack project. -
When the compilation and packaging has finished, navigate to http://localhost:8080/ in your web browser.