Object painting in a Lightspeed view
Find out about the role of each of the main players in LuciadLightspeed visualization.
Layers take care of object visualization
Object painting in a Lightspeed view starts from the layer, the container that visualizes the objects of a model in a view.
Different layer types support different data types
LuciadLightspeed offers several layer types, each of which offers its specific benefits to the visualization of a certain model object type. While some layer types are tailored to the visualization of rasters, other layers are particularly suitable for shape objects, positioned at particular coordinates in the world. Regardless of the data types they display, LuciadLightspeed layers support multiple ways of visually representing an object. These modes of object visualization are called paint representations.
Paint representations
Raster layers and shape layers can display the same object in different ways. A shape layer, for instance, typically uses the geometrical information about the object to visualize the object.
However, the shape layer may also paint the objects as labels, positioned at screen coordinates. In this case, the layer uses additional information available about the object, such as text, to construct the label.
The layer can even paint both the shapes and the labels, and also display shape handles that allow users to manipulate, or edit, the shape. In the latter case, the layer uses three paint representations of one and the same object:
-
The object’s BODY paint representation for the shape
-
The object’s LABEL paint representation for the label
-
The object’s HANDLE paint representation for the edit handles
This list is not final. You can expand this list with other paint representations.
Each of the paint representations has a specific place in the layer’s painting cycle. The layer uses a specific order to paint these representations into the view. By default, it paints shapes first, then it paints the labels, and finally the handles. This painting order can be customized.
Paint states
An additional factor taken into account for object painting is paint state. An object’s paint state indicates whether an object is selected, or in the process of being edited. If an object is selected, for instance, there usually has to be some visual indication of this state on screen. The paint state allows the layer to distinguish between all those visualization requirements, so that it can paint selected shapes (BODY paint representation, SELECTED paint state) very differently from deselected labels (LABEL paint representation, REGULAR paint state). To specify how these paint representations look, you can make use of styles. See What if you want to change the look of your object? for more information.
Painters
To display the paint representation, the layer makes use of painter objects. Painters take care of the mechanics to render a visual representation of an object on screen. For instance, to paint shapes, shape handles and labels, the layer uses both a shape painter and a label painter.
|
LuciadLightspeed offers layer builders to construct your layers. If you use such a layer builder, painters are automatically created as soon as a layer is set up. You only very rarely need to work with painters directly, let alone implement your own painters. If you want to change the way in which an object is visualized, it is far more convenient to make use of the myriad possibilities of the LuciadLightspeed styling API. |
For a discussion of these concepts at the level of the API, see Advanced visualization of domain objects.
What if you want to change the look of your object?
Your object’s styling determines if it is visible on the screen. If you do not define any specific styling for the objects of a new model, LuciadLightspeed displays them in a default styling. Styling can be anything from a line width to a shape’s transparency. To change the way objects look, you can make use of the LuciadLightspeed styles and stylers.
Styles
Styles offer you an abundance of options to manipulate the look of your domain objects. There is no need for any painter customization. You can set up your styling so that an object’s paint representation and paint state influence the styling characteristics of an object, or a group of objects. You can go so far as to add a nice animation to highlight a certain object, or to apply distinct styles to different parts of a shape’s geometry.
The first thing you need to do is build your styles, like a line style object or a fill style object, using a style builder. Style builders allow you to focus on the construction of the look of your style, rather than on LuciadLightspeed style representation details. Next, you need to apply the styles to one or more objects. To link styles to objects, you use stylers.
Stylers
Stylers reside on the layer, and provide one or more styles to the objects that are being visualized. They determine which styles can be applied to which objects. Each available style is also a styler. Stylers allow you to evaluate whether objects fulfill a number of conditions required to receive a certain style. You can set up stylers so that they single out one or more objects in a group of objects to apply a distinct styling to, while they apply generic styling to all the other objects in the group.
Style collectors
To actually apply the appropriate styles to the objects, you must pass these styles to a style collector, supplied to the styler by the painter. Style collectors are passed to the styler as arguments, and provide the methods necessary to apply styles to objects.
|
Concepts such as paint representations, paint states and style collectors allow for the organization of individual objects into groups. The approach of grouping objects for styling contributes greatly to an efficient use of OpenGL visualization techniques. |
Setting up your layers
The first step in the visualization of your domain objects is the setup of your layers. The LuciadLightspeed layer builders are especially suited to accomplish this goal. You can make use of layer builders for the setup of various layer types. In this section, the setup of vector layers and raster layers is discussed.
Quickly and easily creating vector layers: TLspShapeLayerBuilder
When you are writing a layer factory for vector data, always start from TLspShapeLayerBuilder. It offers you a convenient way to create your layer, without having to consider too many details. In fact, it hides the
actual implementation details of your layer setup. This way, LuciadLightspeed tries to choose the optimal setup for you.
If you use TLspShapeLayerBuilder, you get layers of the type ILspInteractivePaintableLayer. These layers paint and style model objects using stylers.
|
Layers built with |
Customizing vector layers
You can configure many different styles if you use TLspShapeLayerBuilder. If the possibilities of TLspShapeLayerBuilder do not cover your requirements after all, you can always set up a custom layer and painter combination. This provides you
with more options, but may take a little more programming.
In that case, you will most likely use TLspLayer in combination with TLspShapePainter for vector painting.
Creating raster layers
Beside vector data, you probably also want to visualize raster images and terrain using raster layers. We recommend the use
of TLspRasterLayerBuilder for the creation of raster layers wherever possible. If you use such a raster layer builder, LuciadLightspeed automatically
tries to choose the optimal setup for you. Alternatively, you can directly create a TLspRasterLayer.
A raster layer supports the following domain objects:
-
Rasters: regularly and irregularly structured rasters in general, modeled by
ALcdBasicImage,ILcdRasterandILcdMultilevelRaster. Rasters are used by many data formats in LuciadLightspeed , such as GeoTIFF and JPEG 2000 for example. -
Tilesets: regularly structured raster data, modeled by
ILcdEarthTileSetwith eitherCoverageType.IMAGEorCoverageType.ELEVATION, depending on the data type in the tile set. Tilesets are used in the Luciad Earth repositories, for example.
You can influence the behavior of a raster layer by setting the LayerType:
-
BACKGROUND: indicates that the raster is used as background data in the view and rarely changes.
-
INTERACTIVE: indicates that the layer should support smooth interaction, such as changes of the visibility or style of the raster data.
|
It is preferable to keep background raster layers at the bottom of the layer stack. This allows the Lightspeed view to optimize performance and memory consumption, by combining and caching the data of the different raster layers. |
Visualizing rasters at an appropriate scale
Aerial or satellite image files can be very large, and may be over a gigabyte in size. Such files take a long time to load into the application completely, even though a computer screen cannot display these images in full detail. To prevent excessive image loading times when you have zoomed out too much to view any image detail anyway, LuciadLightspeed displays the contours of the raster data, on the area of the map that the full image file would cover. Actual image content is omitted, and the contours are filled with a hatch pattern. To make the raster data appear, just zoom in. The use of this technique is key to the prevention of the loading of excessive amounts of data at a scale at which it was never intended to be viewed.
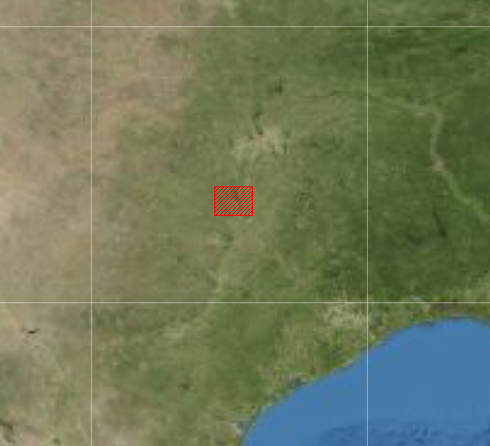
To visualize the imagery regardless of the map scale, see Why does my imagery layer show a red (hatched) rectangle? for tips.