What are complex strokes?
The complex stroking capability makes it possible to visualize lines constructed from repeating patterns and decorations.
An example is a zigzag line with an arrow, or with text decorations. LuciadRIA offers the ComplexStrokedLineStyle API for this purpose. Using this powerful API, you can create a line in virtually any way you want.
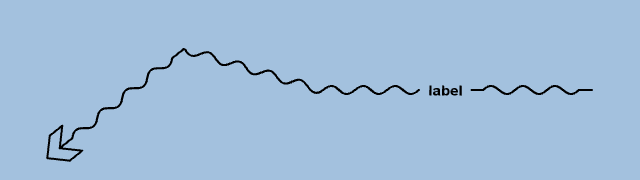
This article explains how complex stroking works, and shows how you can build a complicated complex stroke in a sequence of steps. It applies the main complex stroking principles along the way. The end result is the following line:
How complex strokes work
You can compose a complex stroke of the following elements:
-
Decorations Small non-repeating elements that you add at a specific location on a line, such as arrow heads, text decorations, and icons.
-
Regular stroke pattern A pattern that you repeat along the entire line, zigzag lines, wavy lines or dash patterns, for example.
-
Fallback stroke pattern: like the regular stroke pattern, but you use it in places where you can’t paint decorations or regular stroke patterns. It’s typically a simple pattern, like a plain line.
Sometimes, a complex stroke is interrupted, and partly skipped:
-
Obstacles When a decoration is already present somewhere along the line, it forms an obstacle for all other decorations, regular strokes or fallback stroke. At the location of the obstacle, the decoration, or the obstructed part of the regular/fallback stroke pattern, is dropped. It isn’t painted. Note that you can tweak this behavior. We also show how to do that in the following sections.
-
Corners When a decoration or regular stroke patterns crosses a sharp corner of the line, it gets dropped.
The next sections show how to create and compose decorations, regular stroke patterns and fallback stroke patterns in an example.
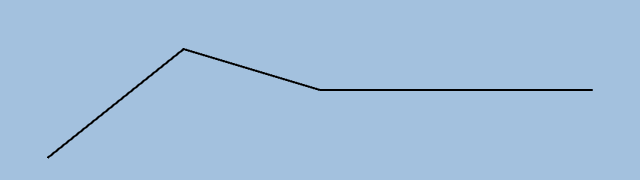
1. Painting a plain line
We start off our complex stroke with a plain line. We use this line as our fallback while we proceed with the construction
of a more complex stroke. The following code shows how you can use a ComplexStrokedLineStyle to paint a plain line with a width of 2 pixels.
var plainLine = PatternFactory.parallelLine({line: {width: 2, color: "rgb(0,0,200)"}});
return { fallback: plainLine };
In this code, we construct a Pattern that represents a plain line. We want to use the plain line as a fallback stroke, to make sure that a line is painted whenever
nothing else is painted. We set the plain line on ComplexStrokedLineStyle using the fallback property. In this example, the plain line is visualized as the fallback stroke because nothing else has been painted:
2. Adding an arrow
Of course, we want more than a plain line. Otherwise, we could have used LineStyle. We want a line with an arrow. To create the arrow, we construct another Pattern. The following code shows how to add the arrow head to the plain line as a decoration.
var plainLine = PatternFactory.parallelLine({line: {width: 2, color: "rgb(0,0,200)"}});
var arrow = PatternFactory.arrow({size: 32, forward: false, fill: {color: "rgb(0,0,200)"}});
return {
    decorations: [{
        location: 0,
        pattern: arrow
    }],
    fallback: plainLine
};
The code adds a default arrow head at the start of the line. The arrow head has a length of 32 pixels, a black color, and
points to the start of the line. Using the PatternFactory.arrow() method, you can create a large variety of arrow heads of any color or size.
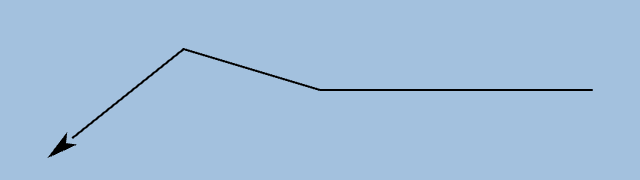
The result is an arrow head decoration at the start of the complex stroke, followed by the plain fallback line. The fallback line is there only because we haven’t defined our regular stroke yet.
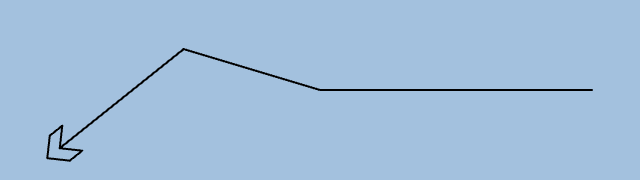
3. Filling the gap between the arrow and the line
You may have noticed that there is a small gap between the arrow head and the line in Figure 3, “Adding an arrow”. This isn’t quite what we want, so how do we fill this gap?
Remember that fallback strokes are only painted whenever nothing else is painted. In this case, the arrow has a length of
32 pixels, but the arrow base has an indentation so that its center lies a few pixels closer to the tip of the arrow. The
fallback stroke doesn’t know that, though. It only detects that the arrow is 32 pixels wide, and stops a few pixels short
of the arrow base because it thinks something is there already. To connect the line to the arrow, we must tell the fallback
stroke that it can partly overlap with the arrow head through an extra stroke. We can use the combineWithFallback() method to get such an overlap. It tells the fallback stroke that it’s okay to add an extra stroke even though there is something
there already.
var plainLine = PatternFactory.parallelLine({line: {width: 2, color: "rgb(0,0,200)"}});
var arrowShape = PatternFactory.arrow({size: 32, forward: false, fill: {color: "rgb(0,0,200)"}});
var arrowFallback = PatternFactory.append([PatternFactory.gap(16), PatternFactory.combineWithFallback(PatternFactory.gap(16))]);
var arrow = PatternFactory.compose([arrowShape, arrowFallback]);

return {
    decorations: [{
        location: 0,
        pattern: arrow
    }],
    fallback: plainLine
};
The code creates a transparent stroke of the same length as the arrow head, 32 pixels. This is the arrow fallback line. It
consists of one gap stroke of 16 pixels concatenated with another stroke of 16 pixels created with the combineWithFallback() method. The combineWithFallback() method makes it so that the fallback pattern is painted, whenever nothing is painted by the pattern that’s passed in. By
passing a transparent gap of 16 pixels, we ensure that the fallback pattern is painted in the second half of the arrow. Next,
the arrow shape and the transparent stroke, which has the combineWithFallback() method, are composed to form one Pattern. The resulting decoration is added to the complex stroke style.

4. Creating a custom arrow
What if the set of default arrow heads doesn’t have the right one for the job?
In that case, you can create your own arrow. You can do so by appending or composing other basic Pattern building blocks,
like lines. The example shows how to use the polyline() method, which creates a stroke pattern that consists of several line stroke patterns:
var lineStyle = {width: 2, color: "rgb(0,0,200)"};
var plainLine = PatternFactory.parallelLine({line: lineStyle});

var points = [[0, 0], [16, 16], [32, 16], [16, 0], [32, -16], [16, -16], [0, 0]];
var arrowShape = PatternFactory.polyline({points: points, line: lineStyle});
var arrowFallback = PatternFactory.append([PatternFactory.gap(16), PatternFactory.combineWithFallback(PatternFactory.gap(16))]);
var arrow = PatternFactory.compose([arrowShape, arrowFallback]);

return {
    decorations: [{
        location: 0,
        pattern: arrow
    }],
    fallback: plainLine
};
This code defines a polyline, consisting of 6 line segments. The resulting custom arrow is 32 pixels wide as well.
5. Adding a repeating pattern along the line
It’s often useful to repeat a pattern along the line, to turn it into a symbol with a specific meaning for example. To repeat
a pattern, you can create a regular stroke using the regular property. This method repeats a pattern along the entire line. Remember that parts of the regular stroke may be dropped if
a decoration is already present, or when the stroke passes through a corner of the line.
var lineStyle = {width: 2, color: "rgb(0,0,200)"};
var plainLine = PatternFactory.parallelLine({line: lineStyle});

var points = [[0, 0], [16, 16], [32, 16], [16, 0], [32, -16], [16, -16], [0, 0]];
var arrowShape = PatternFactory.polyline({points: points, line: lineStyle});
var arrowFallback = PatternFactory.append([PatternFactory.gap(16), PatternFactory.combineWithFallback(PatternFactory.gap(16))]);
var arrow = PatternFactory.compose([arrowShape, arrowFallback]);

var wave1 = PatternFactory.wave({length: 16, amplitude: 4, startAngle: 0, angle: 180, line: lineStyle});
var wave2 = PatternFactory.wave({length: 16, amplitude: 4, startAngle: 180, angle: 180, line: lineStyle});
var wavePattern = PatternFactory.append([wave1, wave2]);

return {
    decorations: [{
        location: 0,
        pattern: arrow
    }],
    regular: wavePattern,
    fallback: plainLine
};
In this example, a wave pattern is applied to the line. A wave consists of an upper arc and a lower arc. Those two wave parts are created first. Next, they’re appended to form a complete wave. Such an approach makes it possible to drop just a part of the wave when the stroke encounters an obstacle or a corner. One part of the wave is replaced with the fallback line, while the other part remains visible.

6. Adding a text decoration
This step adds a text decoration at a location along the line. The text decoration is surrounded by gaps of 8 pixels.
Note that the combination of the gaps and the text is atomic, meaning that the gaps and the text are treated as one unit. As a result, both the text and the gaps are dropped when the text can’t be placed, for example because it crosses a corner of the line.
var color = "rgb(0,0,200)";
var lineStyle = {width: 2, color: color};
var plainLine = PatternFactory.parallelLine({line: lineStyle});

var points = [[0, 0], [16, 16], [32, 16], [16, 0], [32, -16], [16, -16], [0, 0]];
var arrowShape = PatternFactory.polyline({points: points, line: lineStyle});
var arrowFallback = PatternFactory.append(
    [PatternFactory.gap(16), PatternFactory.combineWithFallback(PatternFactory.gap(16))]);
var arrow = PatternFactory.compose([arrowShape, arrowFallback]);

var wave1 = PatternFactory.wave({length: 16, amplitude: 4, startAngle: 0, angle: 180, line: lineStyle});
var wave2 = PatternFactory.wave({length: 16, amplitude: 4, startAngle: 180, angle: 180, line: lineStyle});
var wavePattern = PatternFactory.append([wave1, wave2]);

var textStyle = {
  font: "18px Arial, sans-serif",
  fill: color
};
var text = PatternFactory.atomic(PatternFactory.append([
  PatternFactory.gap(8),
  PatternFactory.text({text: ["Text"], textStyle: textStyle}),
  PatternFactory.gap(8)
]));
return {
    decorations: [{
        location: 0,
        pattern: arrow
    }, {
        location: 0.75,
        pattern: text
    }],
    regular: wavePattern,
    fallback: plainLine
};
Of course you can add other patterns and decorations as well. This article doesn’t mention all available complex stroke building
blocks. For those, have a look at the reference documentation of the ComplexStrokedLineStyle and PatternFactory classes.