Editing tactical graphics with the MilitarySymbologyEditor
This article gives you an overview of some of the editing capabilities provided by the
new MilitarySymbologyEditor through some examples of tactical graphics.
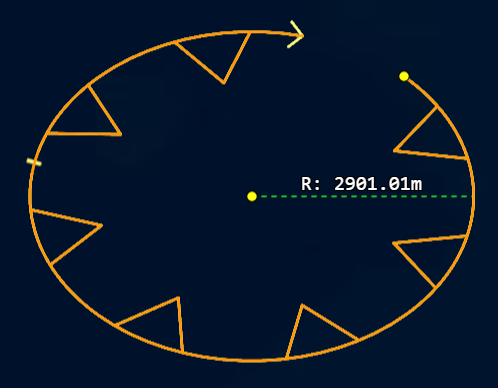
Circular tactical graphics
Circular tactical graphics are symbols that are defined by a center point and a radius. They are represented by a point list containing two points: the first point represents the center of the circle, and the second point represents a point on the circumference.
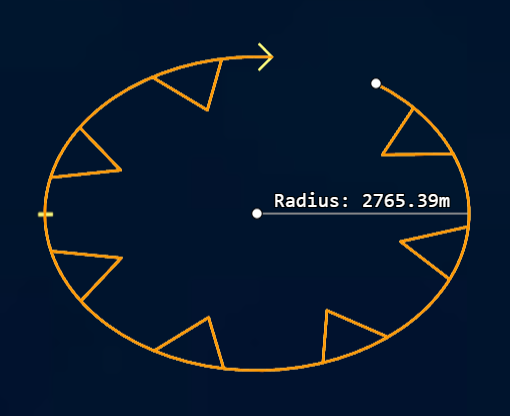
When you’re editing these symbols, you move the center point to move the entire symbol. To adjust the radius, you move the circumference point. A label is displayed during the editing process to indicate the current radius of the circle.
Elliptical tactical graphics
Elliptical tactical graphics are symbols that are defined by a center point, a major axis radius, a minor axis radius and an azimuth (rotating the ellipse). They are represented by a point list containing three points: the first point represents the center of the ellipse, the second point represents the end of the major axis, and the third point represents the end of the minor axis.
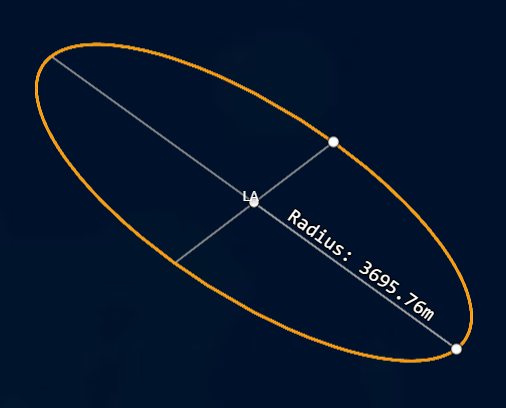
When you’re editing these symbols, you move the center point to move the entire symbol. To adjust the radii as well as the azimuth, you move their respective points. A label is displayed during the editing process to indicate the value of the radius currently being adjusted.
Buffer-like tactical graphics
Buffer-like tactical graphics are symbols that are defined by a center line and a buffer width. The buffer width is the distance on both sides of the center line that the buffer extends to.
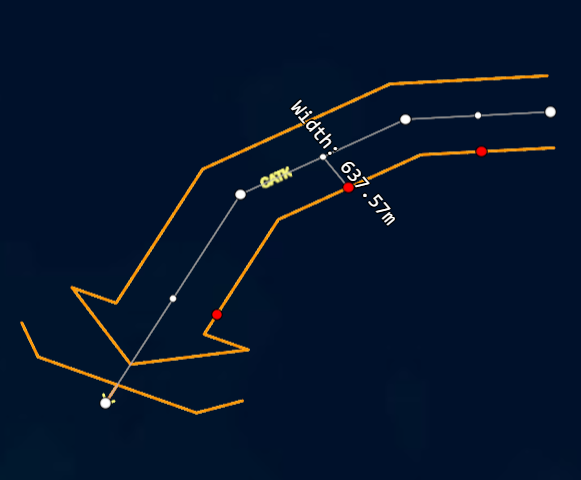
When you’re editing these symbols, you adjust the center line by moving its points. Depending on the kind of symbol, you can also add or delete points. To adjust the width of the symbol, move the dedicated "width" handles.
Shape-constrained tactical graphics
Some tactical graphics constrain how their points can be moved. For example, in T-constrained tactical graphics, the points must remain aligned to a T-shape. When you’re editing these symbols, some points might not be able to move freely, like the leg of the T-shape. This point only moves on a line perpendicular to the top of the T-shape. Other points, like the points defining the top of the T-shape, can move more freely, but they influence the positions of the other points defining the shape.
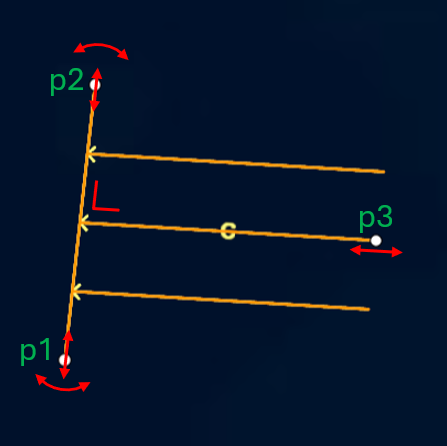
The symbol in Figure 4, “Editing the APP_6D "Mission Tasks - Clear" symbol” is an example of such a T-constrained tactical graphic. When you’re editing this symbol, the first point (p1) can move freely, making the whole symbol rotate around p2. The second point (p2) can also move freely, rotating the entire symbol around p1. The third point (p3) can only move on the line through the center of p1-p2, perpendicular to p1-p2. Moving p3 won’t affect the positions of p1 and p2, but it will change the size of the T-shape.
Sector tactical graphics
The most advanced tactical graphic for editing purposes is the APP_6D "Fire Areas - Weapon/Sensor Range Fan Sector" symbol. It consists of multiple sectors that can be edited independently. The editor also allows adding and removing sectors.
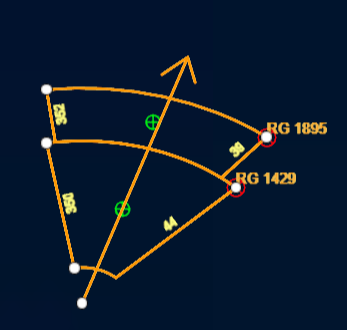
In this case, you add sectors by clicking the green handle in the center of a sector. You delete sectors by holding the Ctrl key and clicking the right-top point of a sector, marked by the red handle.
When to use/set a custom MilitarySymbologyEditor
Both the MilitarySymbologyEditController and
the MilitarySymbologyCreateController already provide a default MilitarySymbologyEditor.
However, if you want to customize the behavior of the editor, you can provide your own
implementation of the MilitarySymbologyEditor.
You can do so by providing a militarySymbologyEditor option when you’re creating either of the two controllers.
For example, when you want to create the MS2525d "Launch Area" symbol, using an Ellipse shape,
and you want the used template ellipse to have another aspect ratio than the default one,
you can create a custom MilitarySymbologyEditor that overrides the createTemplateShape method
and provides your ellipse template.
MilitarySymbologyEditor to provide a custom template shape.
class CustomMilitarySymbologyEditor extends MilitarySymbologyEditor {
  constructor() {
    super();
    this.delegates = [new CustomEllipseEditor(),
      // Further delegate to the milsym editors, which also delegates to the default ShapeEditor.
                      ...this.delegates];

  }
}

/**
 * Ellipse Editor encapsulates the Creation and Editing behavior for Ellipse shapes.
 */
class CustomEllipseEditor extends EllipseEditor {
  /**
   * The CreateHandle is used to create an Ellipse.  Ellipses are created by template:  This method creates an Ellipse
   * on the location where the user clicked but adapts the size to match the current zoom level and adapts the axes
   * so it is a more rounded ellipse
   * @param context
   */
  getCreateHandle(context: EditContext): EditHandle | null {
    return new CreateByTemplateHandle(context, this.getEditHandles(context), (context: EditContext, point: Point) => {
      const ellipse = context.shape as Ellipse;
      ellipse.move2DToPoint(point);
      const radius = getDefaultSize(context.map);
      ellipse.a = radius;
      ellipse.b = radius * 19 / 20;
    });
  }
}
Customizing editing handles and labels
So far, the images in this article have shown the default handles and labels provided by the MilitarySymbologyEditor.
You can customize their styling by providing custom styles when you’re creating the
MilitarySymbologyEditController or the MilitarySymbologyCreateController, through their constructor options.
MilitarySymbologyCreateController.
export function createMilsymCreateControllerCustomStyle(shapeType: ShapeType,
                                                        symbology: HierarchicalSymbology,
                                                        symbolCode: string,
                                                        defaultModifiers?: { [key: string]: string },
                                                        createByTemplate?: boolean,
                                                        editor: MilitarySymbologyEditor = new MilitarySymbologyEditor(),
                                                        displayScale: number = 1.0,
                                                        wantEditLabels: boolean = true): MilitarySymbologyCreateController {
  return new MilitarySymbologyCreateController({
    shapeType: shapeType,
    symbology: symbology,
    symbolCode: symbolCode,
    defaultModifiers: defaultModifiers,
    symbologyAccessor: {
      get: (f: Feature) => f.properties.symbology,
      set: (f: Feature, symbology: HierarchicalSymbology) => {
        f.properties.symbology = symbology;
      }
    },
    symbolCodeAccessor: {
      get: (f: Feature) => f.properties.code,
      set: (f: Feature, code: string) => {
        f.properties.code = code;
      }
    },
    symbolModifierAccessor: {
      get: (f: Feature) => f.properties.modifiers,
      set: (f: Feature, modifiers: { [key: string]: string }) => {
        f.properties.modifiers = modifiers;
      }
    },
    createByTemplate: createByTemplate ?? false,
    editor: editor ?? new MilitarySymbologyEditor(),
    finishOnSingleClick: true,
    styles: {
      helperStyle: getCustomHelperStyle(), // any ShapeStyle can be used here
      handleIconStyle: getCustomIconHandleStyle(displayScale), // any IconStyle can be used here
      editLabelStyle: wantEditLabels ? getCustomEditLabelStyle() : null, // null to disable labels
      insertPointHandleIconStyle: getCustomInsertPointHandleIconStyle(displayScale), // any IconStyle can be used here
      changeModifierHandleIconStyle: getCustomModifierHandleIconStyle(displayScale), // any IconStyle can be used here
      addItemHandleIconStyle: getCustomAddItemHandleIconStyle(displayScale), // any IconStyle can be used here
      removeItemHandleIconStyle: getCustomRemoveItemHandleIconStyle(displayScale), // any IconStyle can be used here
    }
  });
}

function getCustomEditLabelStyle(): MilitarySymbologyLabelFormattingOptions {
  return {
    lengthFormat: new DecimalFormat({prefix: "L", suffix: "metres"}),
    widthFormat: new DecimalFormat({prefix: "W", suffix: "metres"}),
    radiusFormat: new DecimalFormat({prefix: "R", suffix: "metres"})
  }
}
Some examples of customizations are:
-
Changing the icon used for the editing handles
-
Changing the shape style used for the helper handles
-
Changing the formatting of the labels shown during editing
-
Removing the editing labels completely
-
Changing the color and size of the text in the labels, through CSS
|
On top of these editing customization options, you can also customize the selection color.
However, it’s not the |