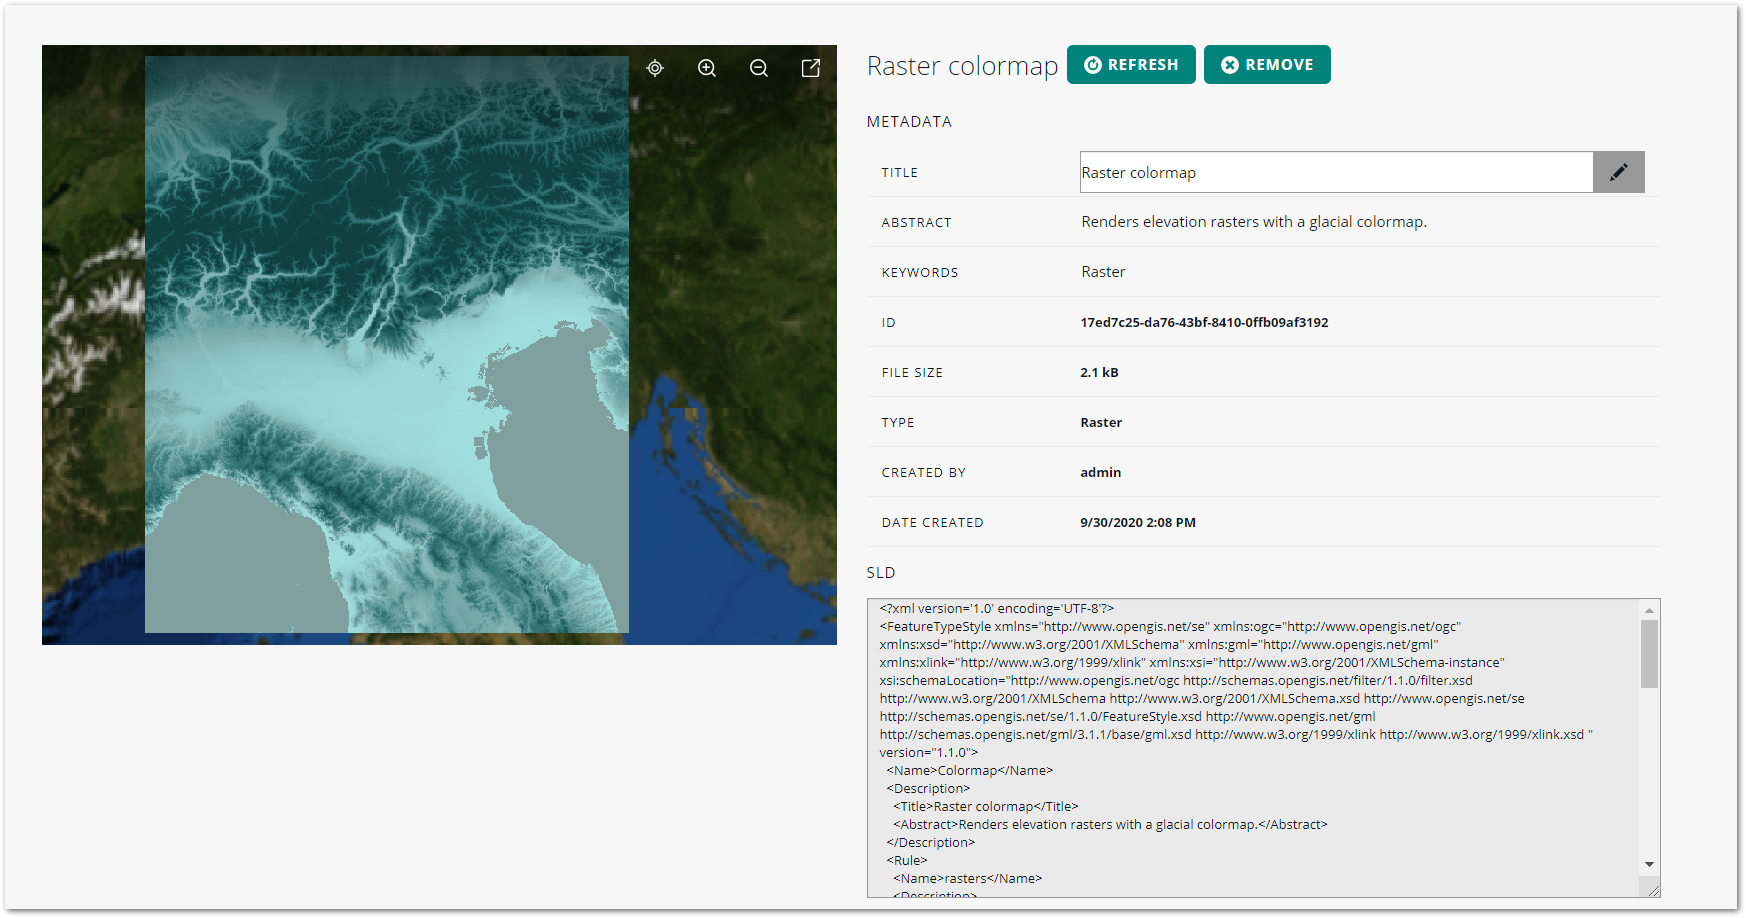
This user guide describes how you can manage and publish your geospatial data in the LuciadFusion Studio web application. For more background information about LuciadFusion and LuciadFusion Studio, see Learn more about LuciadFusion Studio.
Installing and starting the LuciadFusion Studio server and web application
-
Install LuciadFusion from the zip files, or run the automatic installer
install.jar. -
In the LuciadFusion installation folder, run the
FusionServer.bator.shscript. -
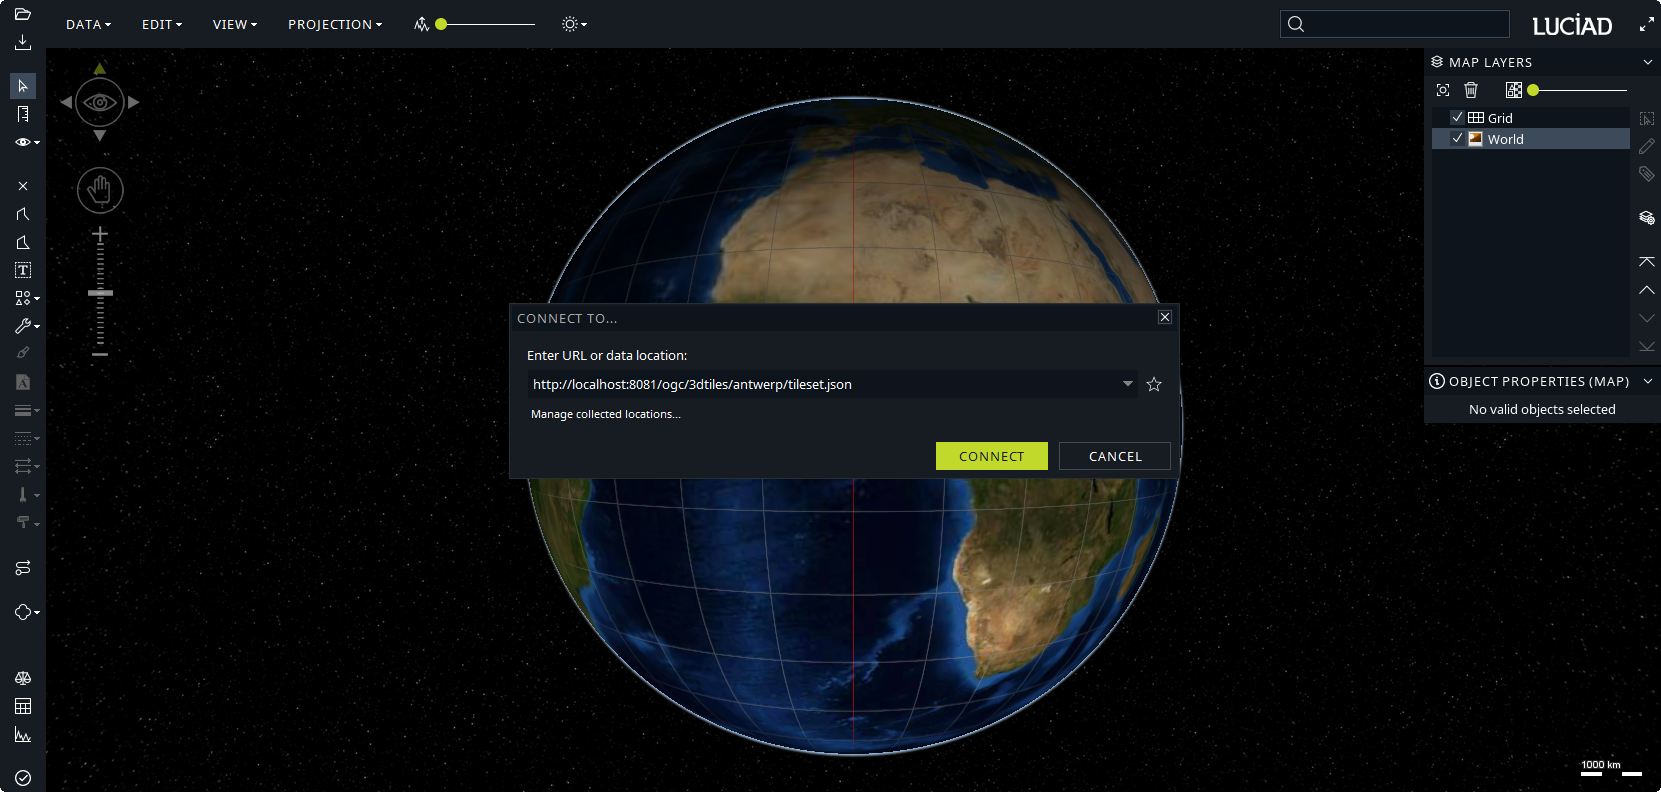
Go to
http://localhost:8081in your Internet browser of choice, and log in to LuciadFusion Studio with the default credentials:-
Username: admin
-
Password: admin
-
|
Configuring LuciadFusion for production
You can manage all the default parameters, such as authentication managers, users, server port, and so on, in configuration
files.
You can find the configuration files in the |
Quickstart: Instantly load and publish new data
If you want to publish fresh data as quickly as possible, without any custom styling, data integration, or any other kind of extra packaging, you can simply add a single file containing the data to LuciadFusion Studio, and create a service for it.
To quick-publish your data:
-
On the main LuciadFusion Studio page, click upload some data.
-
On the Data page, click Upload, and follow the instructions in the dialog box to select and upload the file.
-
Find the dataset in the list on the Data tab, and select it.
-
Click the Create service button.
-
In the Create service dialog box, enter a service title and a service name.
The service name determines the endpoint URL for the service.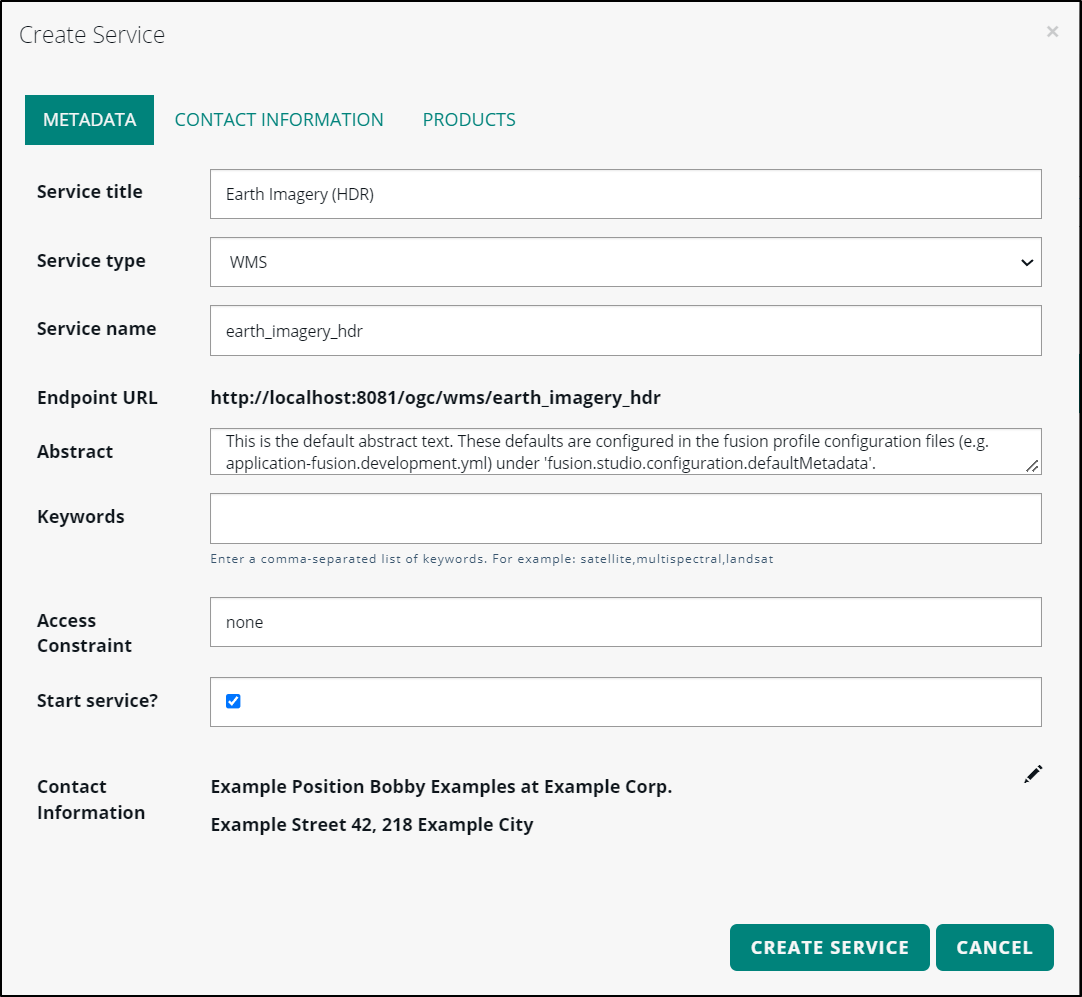
-
Select a service from the Service type drop-down menu.
You will be notified if the selected service type is not compatible with the data you want to publish. -
Click the Create Service button.
The Create Service dialog box tells you that the service was successfully created. From there, you can simply close the dialog box by clicking the x or CANCEL button, or you can view all the information about the running service by clicking the GO TO SERVICE button.
You can now access the data from an appropriate service client by pointing the client to the service endpoint URL.
Learn more about LuciadFusion Studio
The LuciadFusion Studio web application provides a graphical interface for a data and service management framework in the browser. It allows you to manage and organize your geospatial data and publish it as service.
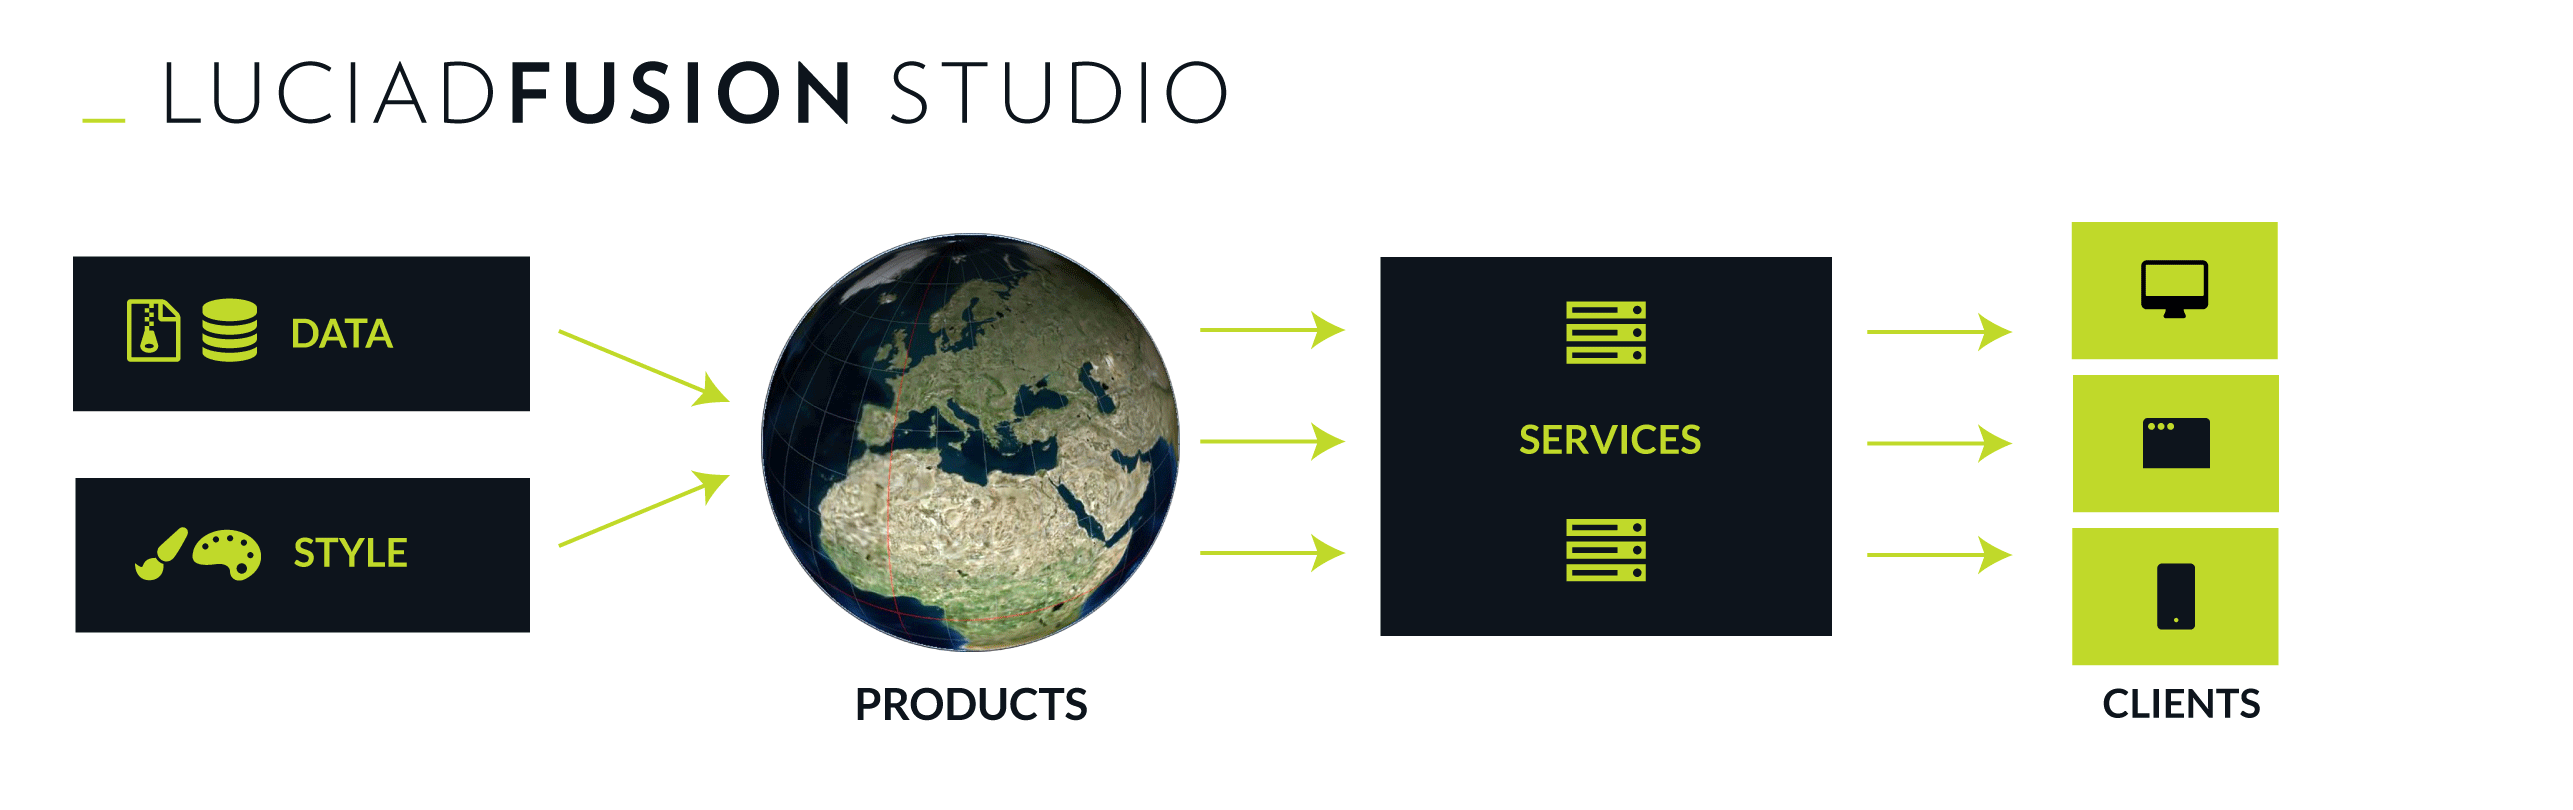
Behind the scenes, the LuciadFusion Platform is at work. It consists of a framework of LuciadFusion services, such as:
-
WxS services, to make data available through several OGC services, such as WMS, WFS, and so on.
-
3D Tile Service (OGC3DTILES), to make point cloud and mesh data available through the 3D Tiles protocol
-
Luciad Tile Services (LTS), to make data available through Luciad’s own service for tiled data
-
Catalog Service for the Web (CSW), to publish a catalog of data.
Managing and publishing data in LuciadFusion Studio
You can add your folders or tables of geospatial data to LuciadFusion Studio by identifying them as data roots. LuciadFusion Studio also allows you to directly add your geospatial data by identifying a data source, such as a file.
Alternatively, you can upload a dataset.
From there, you can immediately proceed to data publication on a LuciadFusion web service, or you can bundle the data with other data and styles before you publish it.
What are data roots?
If you have large amounts of geospatial data, you will typically have them stored on a remote file server or a database. By turning such a storage location into LuciadFusion Studio data root, you can manage the geospatial data from LuciadFusion Studio. Data roots are paths relative to your server that contain geospatial data in any of the supported formats of LuciadFusion Studio.
Think of it as the electronic music library on your computer or smartphone, but with geospatial information instead of music. Once you select the storage location as a data root, LuciadFusion Studio will crawl the data in there: it will search and index the data, and generate metadata for it. The result of the crawl is a LuciadFusion Studio catalog from which you can easily search, manage and publish your geospatial data.
What kind of metadata does LuciadFusion Studio support?
Metadata provides more information about the data you are adding to LuciadFusion Studio. The metadata can consist of the georeference of the data, bounding box (bounds) information/coordinates for the data, time of data capture, a data description, creator and publisher information, and so on.
The geospatial community has defined standards for the metadata provided with geospatial information. LuciadFusion provides metadata that complies with the standard ISO 19115 and OGC CSW.
Publishing LuciadFusion Studio data on web services
LuciadFusion web services can serve geospatial data to potentially thousands of operators through the following services:
-
Web Map Service (WMS): serves data as map images. A WMS provides a map as a visual representation of geospatial data.
-
Web Map Tile Service (WMTS): serve data as tiled map images. A WMTS provides a map as a visual representation of geospatial data.
-
Web Feature Service (WFS): serves raw vector data. WFS clients still allow you to process or transform the data, by filtering or styling it for instance.
-
Web Coverage Service (WCS): serves raw raster data. WCS clients still allow you to process or transform the data, by performing calculations on it, for instance.
-
3D Tiles Service (OGC3DTILES): serves point cloud and mesh data as multi-leveled tilesets.
-
Luciad Tile Services (LTS): serves data as multi-leveled tilesets, also called coverages. Bands and dimensions are preserved for further analysis during and after visualization.
LuciadFusion coverages generated by the Data Connectivity Manager (DCM) are saved to a default location in the LuciadFusion folder structure:
samples/resources/Data/LuciadFusion/Coverages. LuciadFusion Studio contains a data root that points to that default location. This means that LuciadFusion Studio will discover new coverages during a crawling job, and display it under the Data tab. You can then preview or publish this coverage like other data sets. -
File Server (FILESERVER): allows downloading the files of a geospatial data set over HTTP using a browser. Alternatively, you could directly open a geospatial dataset over HTTP in a client that supports this.
-
Panoramic Image Service (PANORAMICS): serves panoramic image data as multi-leveled, tiled cubemaps.
-
Hexagon Smart Point Cloud (HSPC) Service: serves tiled and multi-leveled point cloud data which can be loaded and visualized natively by LuciadRIA. HSPC is a proprietary Hexagon format, describing a 3D tiles hierarchy.
-
Enhanced Compressed Wavelet Protocol (ECWP) Service: serves ECW and JPEG2000 data to ECWP clients. The ECW Protocol is a streaming protocol for sending ECW and JPEG2000 images over a network.
Adding your data
You add your data by pointing LuciadFusion to the location of the geospatial data. LuciadFusion Studio uses the available metadata to crawl, or analyze all its contents, and turn it into a data root for you. You can also add geospatial data to Studio one data source at a time.
|
Sample data root available
LuciadFusion comes with sample data in the |
What kind of data can you import?
LuciadFusion accepts and supports most data types without pre-processing or loss of information: vector data, raster data, mesh data, tiled multi-level data such as LuciadFusion coverages, and data with multiple bands or dimensions, such as satellite imagery and weather data. In addition, LuciadFusion accepts raw point cloud data, automatically pre-processing it into a spatially indexed multi-level file database.
Adding a data root
To add a data root, you need to tell LuciadFusion Studio to crawl a data location.
|
What is crawling?
Crawling is the process of content discovery. To discover content, LuciadFusion Studio captures metadata about the geospatial information in a data location, and uses it creates an index. Because searching an index is faster than searching the content itself, LuciadFusion Studio users will be able to search through the content more quickly as a result of the data crawling. Although the crawling itself can take a while, you will have extremely fast data access once it is done. |
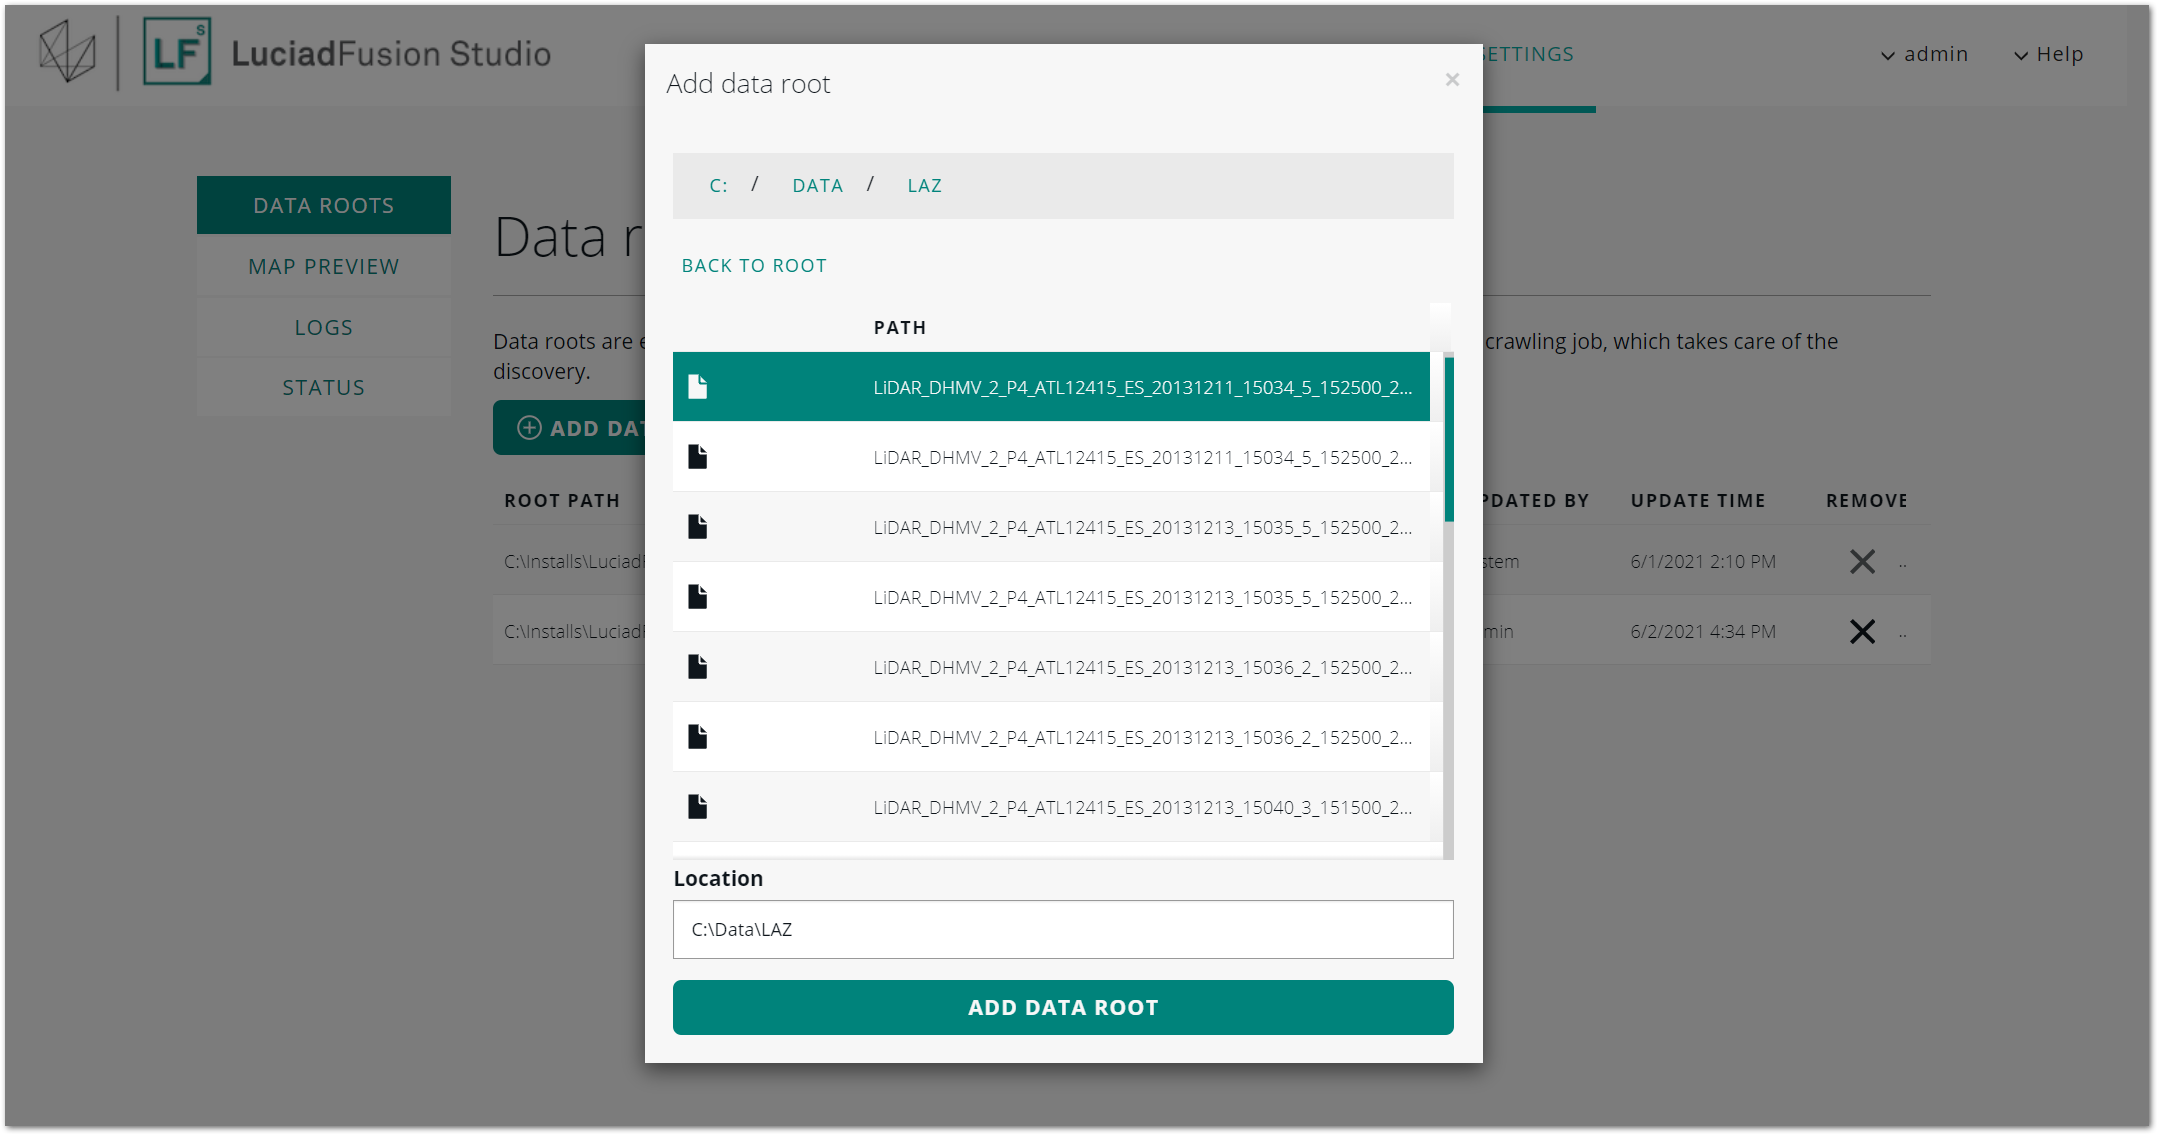
To add a data root to LuciadFusion Studio:
-
On the main LuciadFusion Studio screen, click data roots.
-Or-
Click the SETTINGS tab in the top navigation bar. -
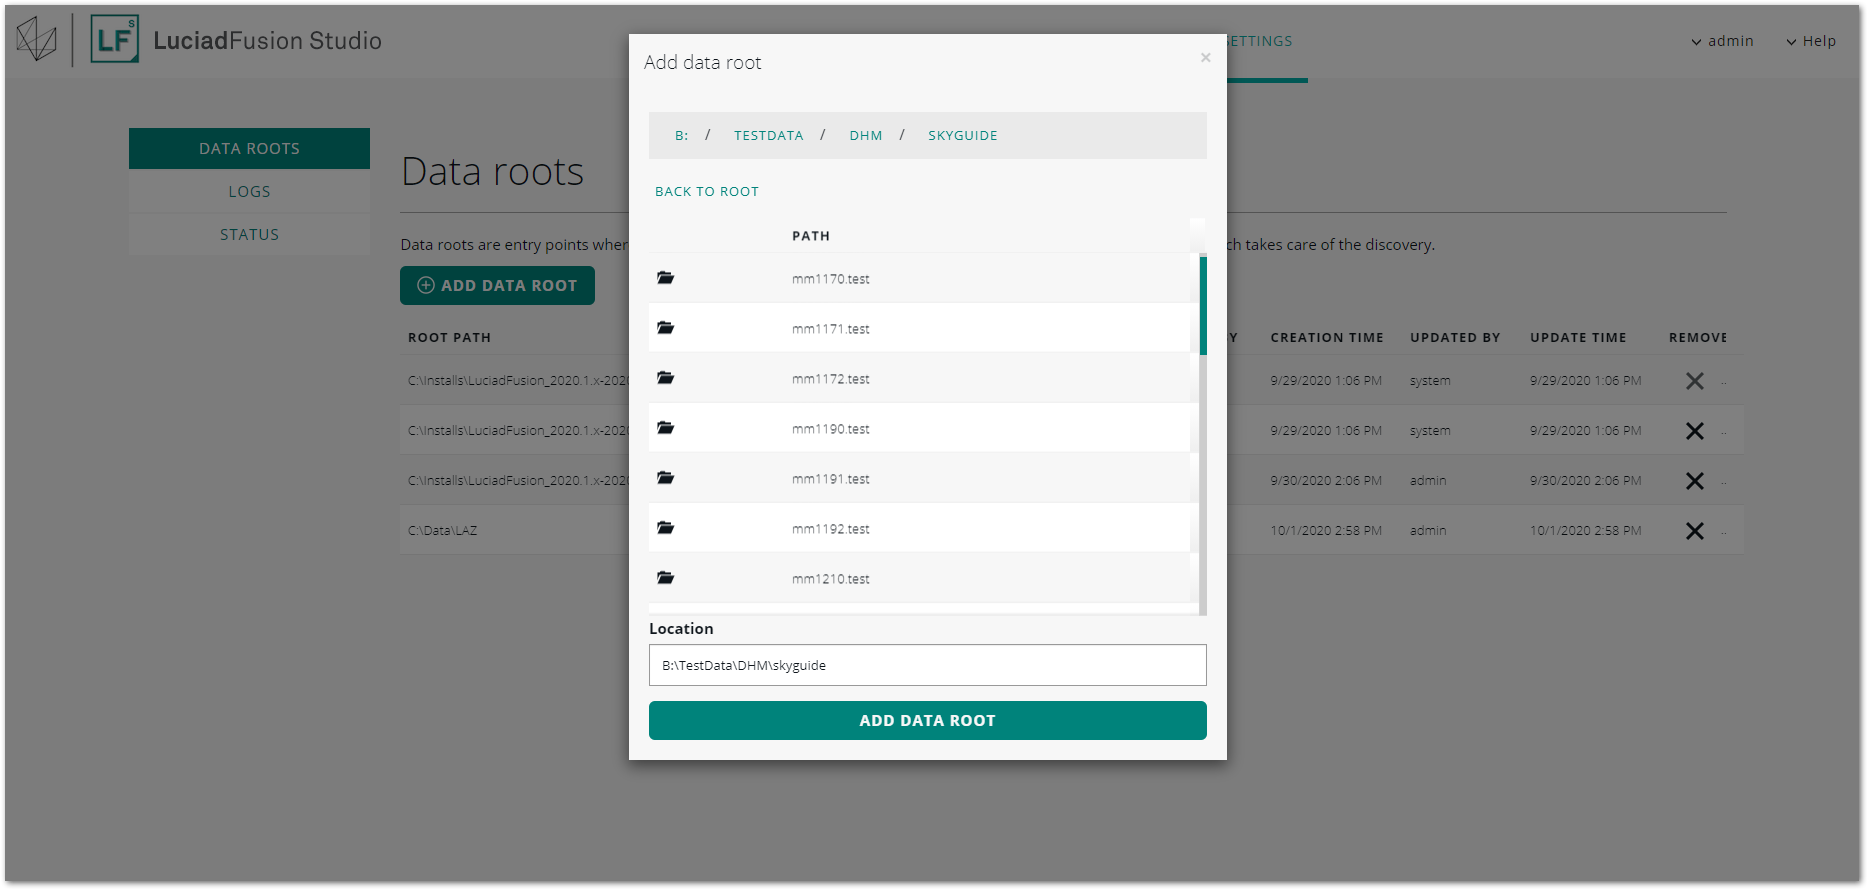
Click the ADD DATA ROOT button.
-
In the Add data root dialog box, browse to the geospatial data repository on your file server, or enter the path in the Data root field.
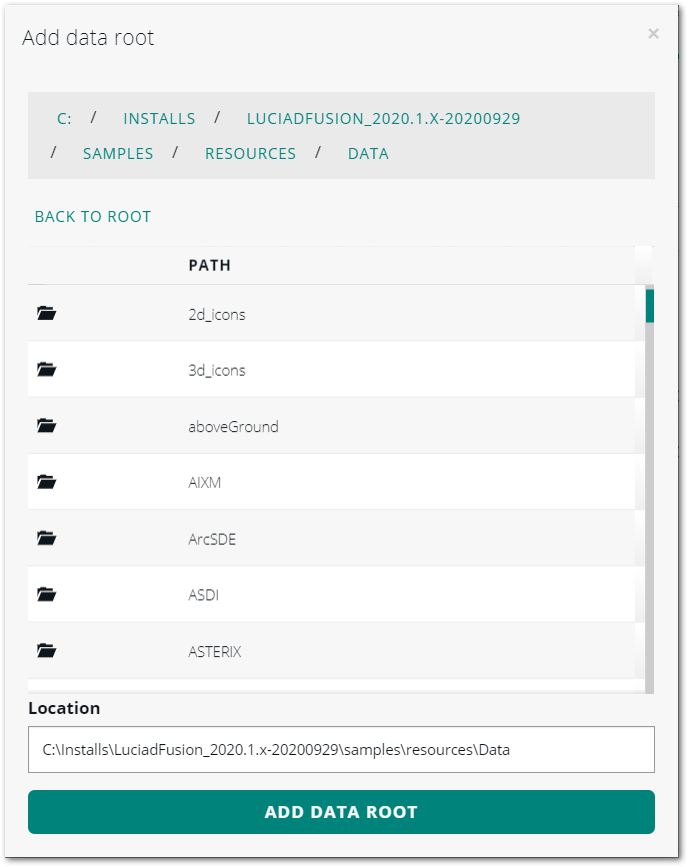 Figure 2. Adding a data root
 -
Click Add data root.
LuciadFusion Studio crawls the data in the folder, and converts it into a data root. Depending on the amount of data in the folder, the crawling may take a while. You can continue working in LuciadFusion Studio in the mean time. The new data root is added to the list of data roots on the SETTINGS tab.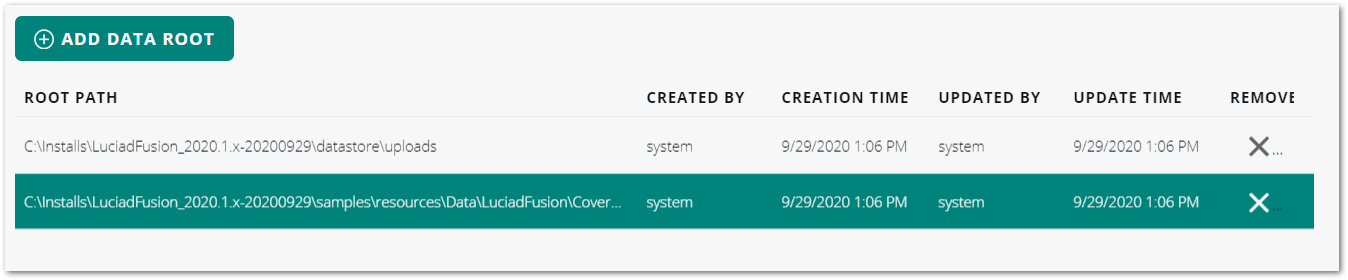 Figure 3. List of data roots
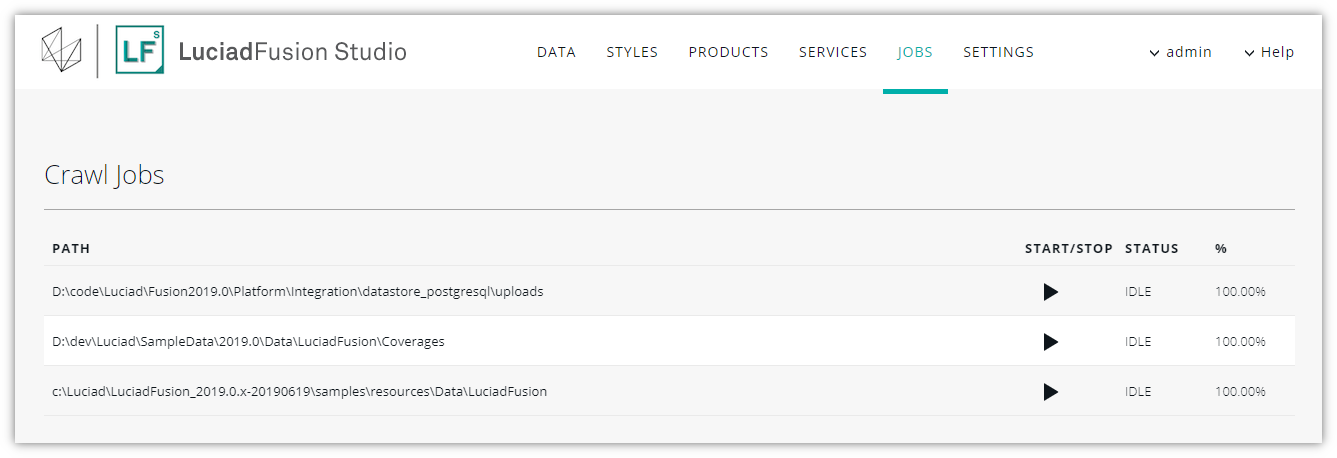
To track crawling progress, go to the JOBS tab. The top entry on the JOBS tab shows the status and a progress bar for the crawling job you started most recently.
LuciadFusion Studio displays a browser notification when it has finished crawling the data location.
To view details about the files encountered during the crawl, open the job details screen by clicking the link provided in the PATH column on the JOBS tab. For more information, see Viewing crawled file details.
|
Explore the Sample data
LuciadFusion includes a highly diverse collection of sample data in one of its folders. It is recommended to set that folder
up as a data root while you are exploring LuciadFusion and LuciadFusion Studio functionality. To set the sample data up as
a data root, select the |
Aside from the data roots you define yourself, there also is a system data root. File servers and databases are user-defined data roots, while data you upload to LuciadFusion is stored in the system data root.
Updating the DATA tab during a crawling job
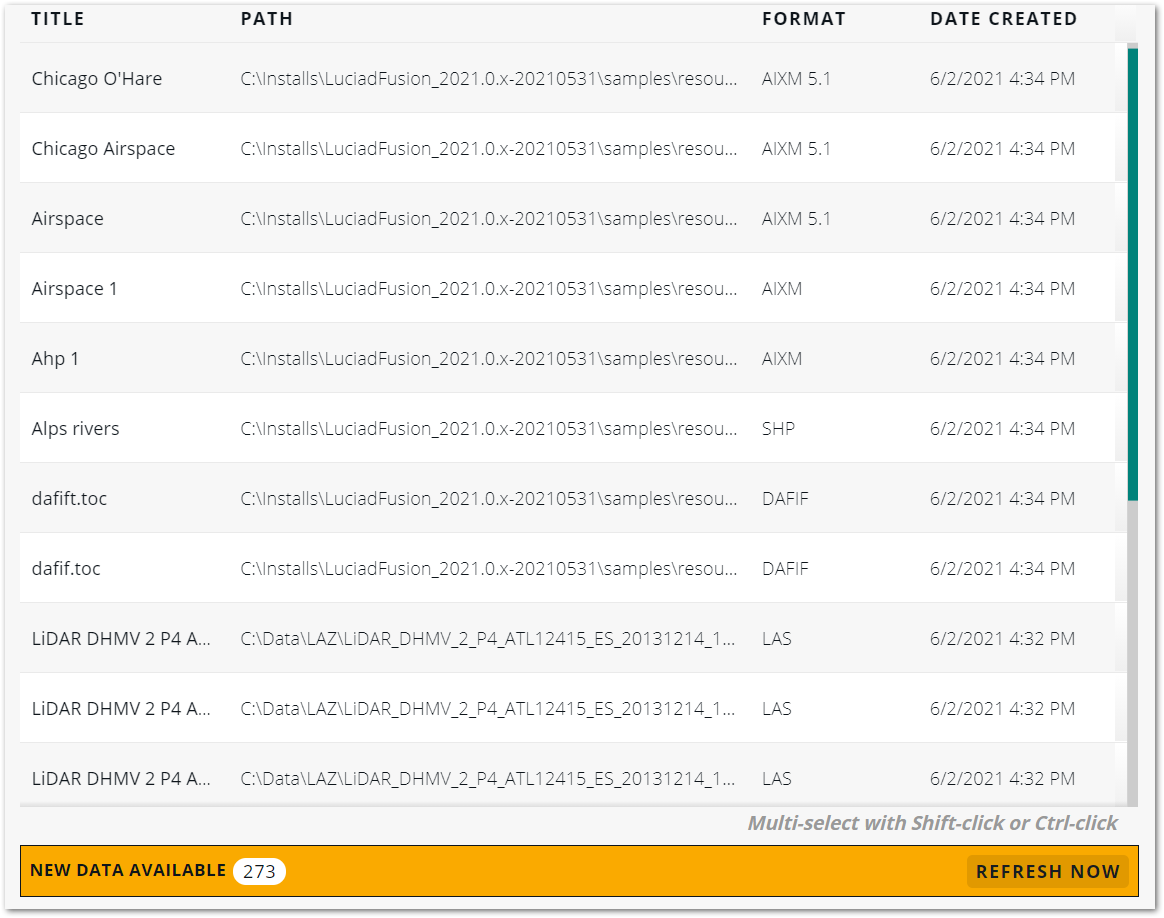
LuciadFusion Studio adds an indication to the DATA tab when new data has become available. To update the DATA tab with the new data during a lengthy crawling job, click the REFRESH NOW button in the New data available bar below the data table.
Updating a data root
If the data root contains new or updated data, you need to re-crawl it to analyze the new information, and add it to LuciadFusion.
To re-crawl a data root:
-
Go to the JOBS tab.
-
Find the crawling job that matches your data root directory, and select it in the list.
-
Click the START button at the right to crawl that data root again.
If the data root regularly receives new data or data updates, you can schedule an automatic crawling job that regularly re-scans the data root for changes. To learn more about scheduling LuciadFusion Studio crawl jobs, see Scheduling and monitoring automatic crawling.
LuciadFusion can also be configured to detect when data has been removed from a data root. See Detecting deleted files during crawling for more information on this.
Deleting a data root
|
Deleting a data root also removes all its data from LuciadFusion.
Each data and style file originating from the data root will be removed from LuciadFusion Studio, even if it is included in products, or published on services. The data will not be removed from disk, however. |
To remove a data root and all its data from LuciadFusion Studio:
-
Go to the SETTINGS tab.
-
Find the data root you want to delete in the list of data roots.
-
Click the X displayed in the REMOVE column with the data root entry.
-
Click the REMOVE DATA ROOT button in the dialog box to confirm that you want to remove the data.
Uploading data to LuciadFusion Studio
Instead of adding the location of your data as a data root, you can choose to just import the files with geospatial data into LuciadFusion. LuciadFusion adds the data in the files to an internal data root, and makes the geospatial information searchable by crawling the metadata that comes with the data.
You can upload data by uploading separate files, or by uploading a compressed zip file. Studio unzips all zip files automatically and stores the content as individual data entries. As a result, you can use zip files to upload folder structures, if that is required by your data format.
|
Uploading folders
Currently, it is not possible to upload folders due to browser limitations. If you want to upload a folder, first compress it to a zip file, and upload the zip file to Studio. |
|
Why upload data instead of adding it in a data root?
Uploading data instead of adding the data location as a data root is recommended when the LuciadFusion server cannot access the data location directly. |
How to upload data?
-
Go to the DATA tab, and click the UPLOAD button.
-
From the pop-up dialog box, click ADD NEW FILES, and select one or more files from the file explorer.
The dialog box displays the selected files in an upload list. You can still remove files from the list by clicking the adjacent X icons.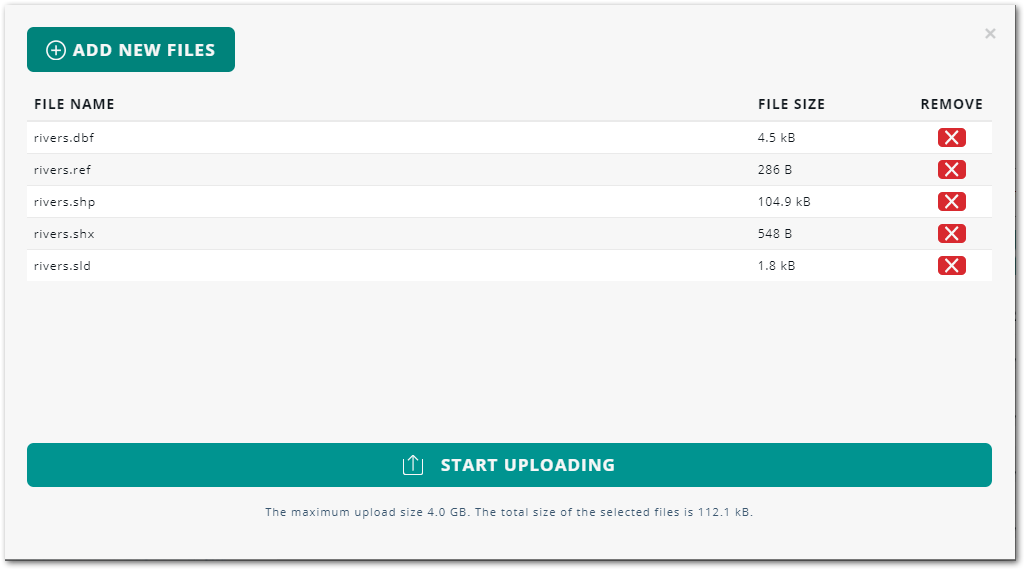 Figure 5. Upload of companion files
 -
Click the START UPLOADING button.
The dialog box adds check marks to the file names to show that the upload is finished. -
You can continue uploading files by clicking START A NEW UPLOAD, or close the dialog box to go back to the main view.
|
Companion files
Several geospatial data formats require companion files. For example a |
|
Drag and drop
You can also upload files by simply dragging and dropping them into LuciadFusion Studio. |
|
Where does LuciadFusion Studio store the uploaded files?
LuciadFusion Studio stores uploaded files in a dedicated data root, automatically set by the system. You cannot point the root path to a different location, nor can you remove it. |
Adding data directly
Instead of using a data root, you can also add your data directly to Studio. Adding data directly means that you point LuciadFusion
to a file instead of a directory or database. That file may be an entry point file for an entire data set consisting of many
supporting files. For instance, an OGC 3D Tiles dataset typically has a tileset.json file as the entry point for the supporting files.
The distinction between adding data directly and uploading files is that you don’t store the files in a local data root when you add them directly. The file is left in place. The distinction with a data root is that LuciadFusion just interprets the file you are adding, and does not go on to discover and index all the underlying files. The data in the underlying files is accessible through the entry point file from LuciadFusion Studio.
To add data directly:
-
Go to the DATA tab, and click the ADD DATA button.
-
Enter the file path for the data you want to add.Note that this path needs to be local to the server. To select a file using the file navigator, click the folder icon.
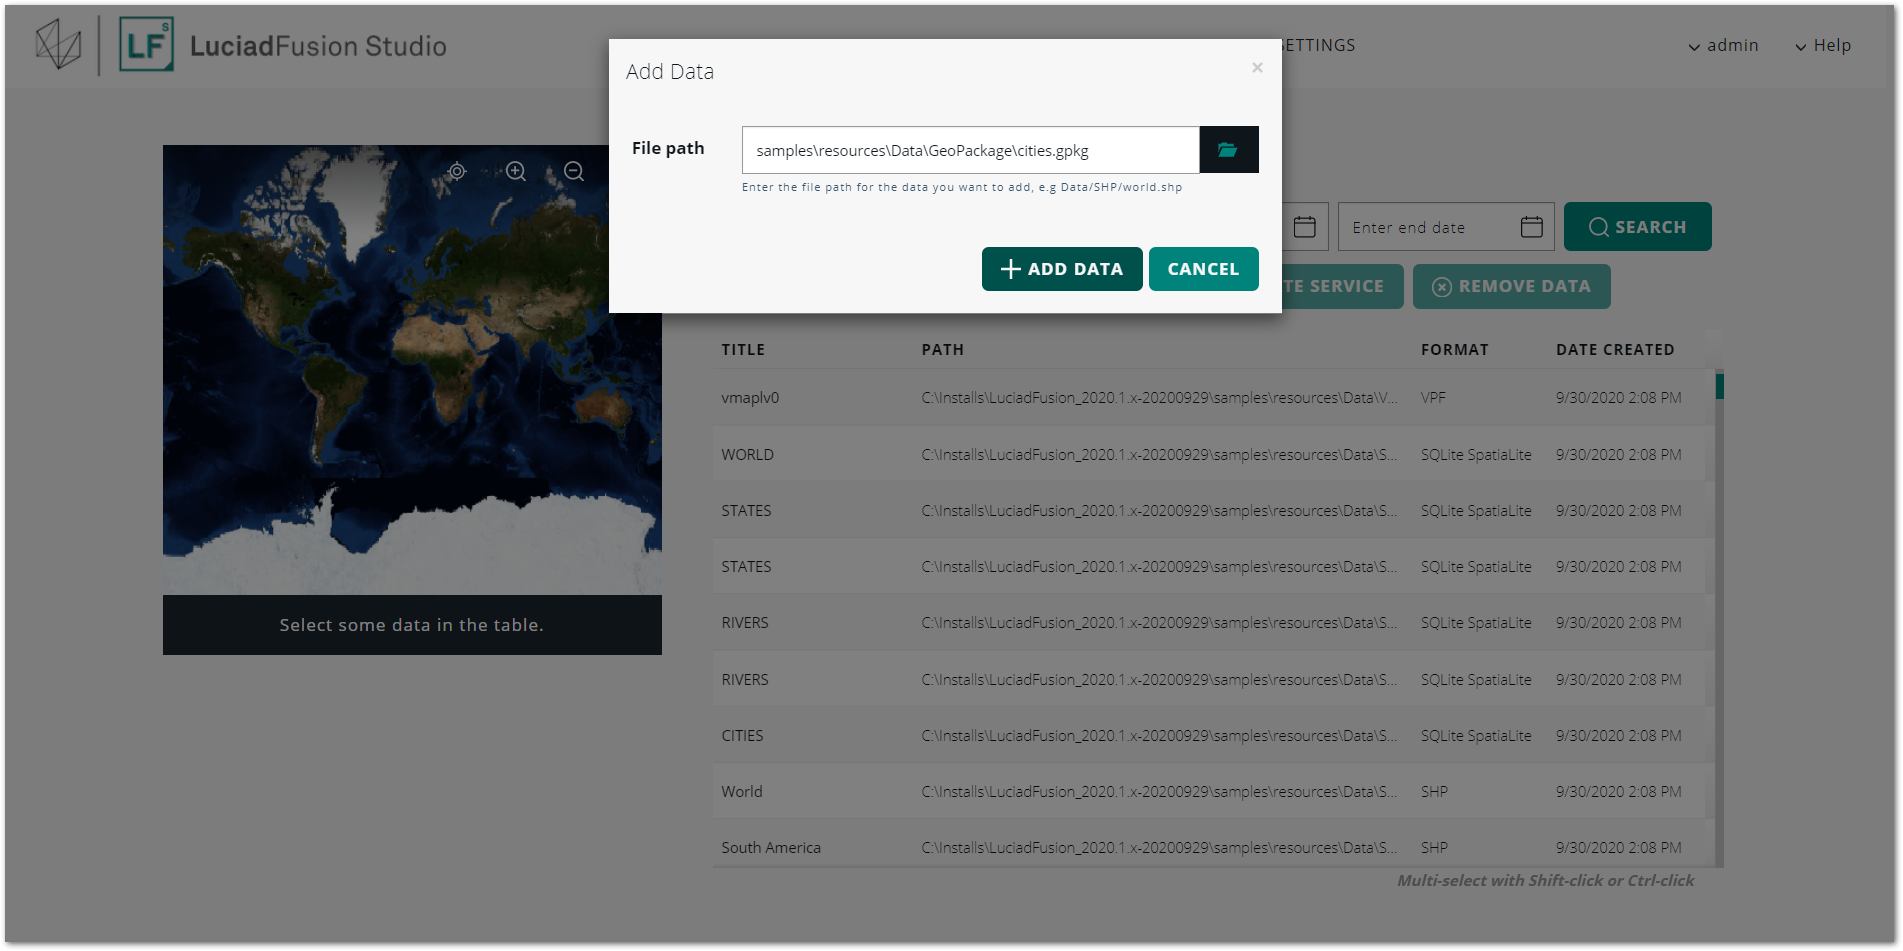 Figure 6. Providing a file to add as data
 -
Click ADD DATA.
The list of data shows the data you just added.
You can also add styles directly by going to the STYLES tab, and clicking the ADD STYLE button.
|
Performance
If you’re adding data that has many supporting files, such as OCG 3D Tiles, adding data directly can be much faster than crawling. When LuciadFusion crawls a directory, it must crawl all those supporting files. That is not the case when you add the data directly. For more information about choosing between the two methods, see Choosing between using a data root or adding data directly. |
|
Data not in the file system
If the server is configured to support other kinds of storage besides the local file system, you can enter locations for that storage as well. |
Quick-publishing one data set
-
On the DATA tab, find the data set in the list, and click on its title.
-
Click the CREATE SERVICE button on the data detail view.
-
Enter a service title and name in the Create service dialog box, and select a service type.
-
Click CREATE SERVICE.
A second dialog box notifies you that the service has been created successfully.
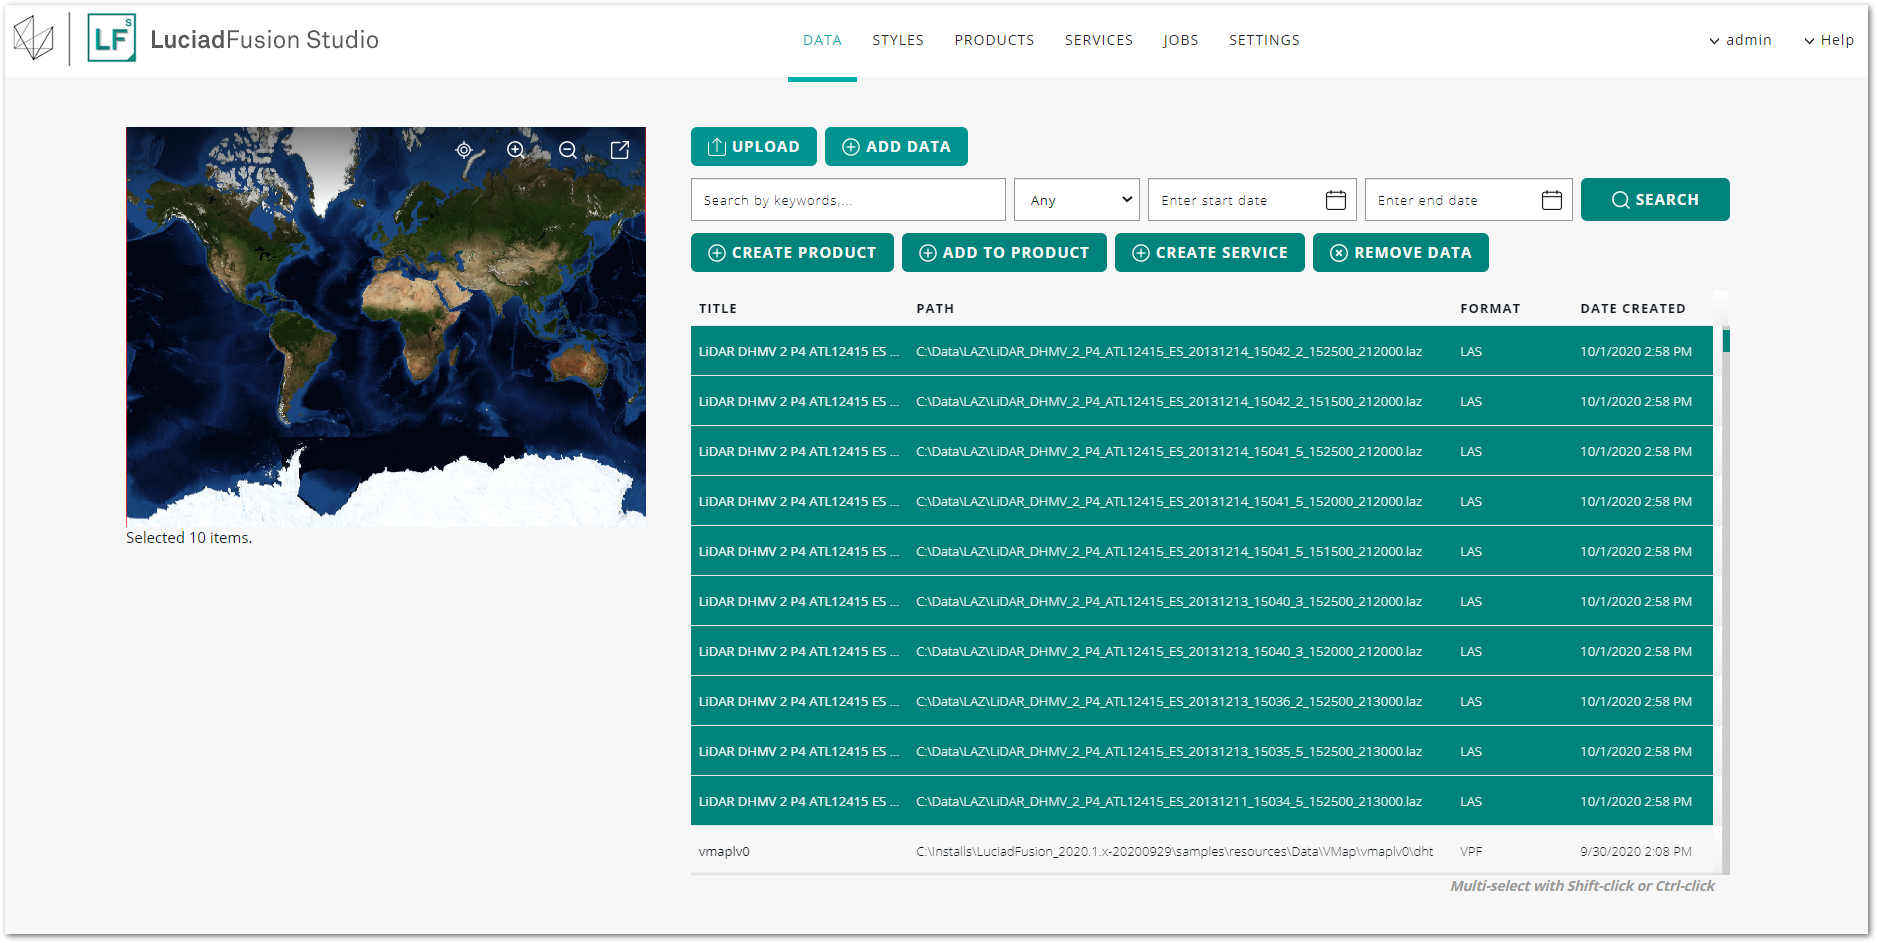
Managing your data
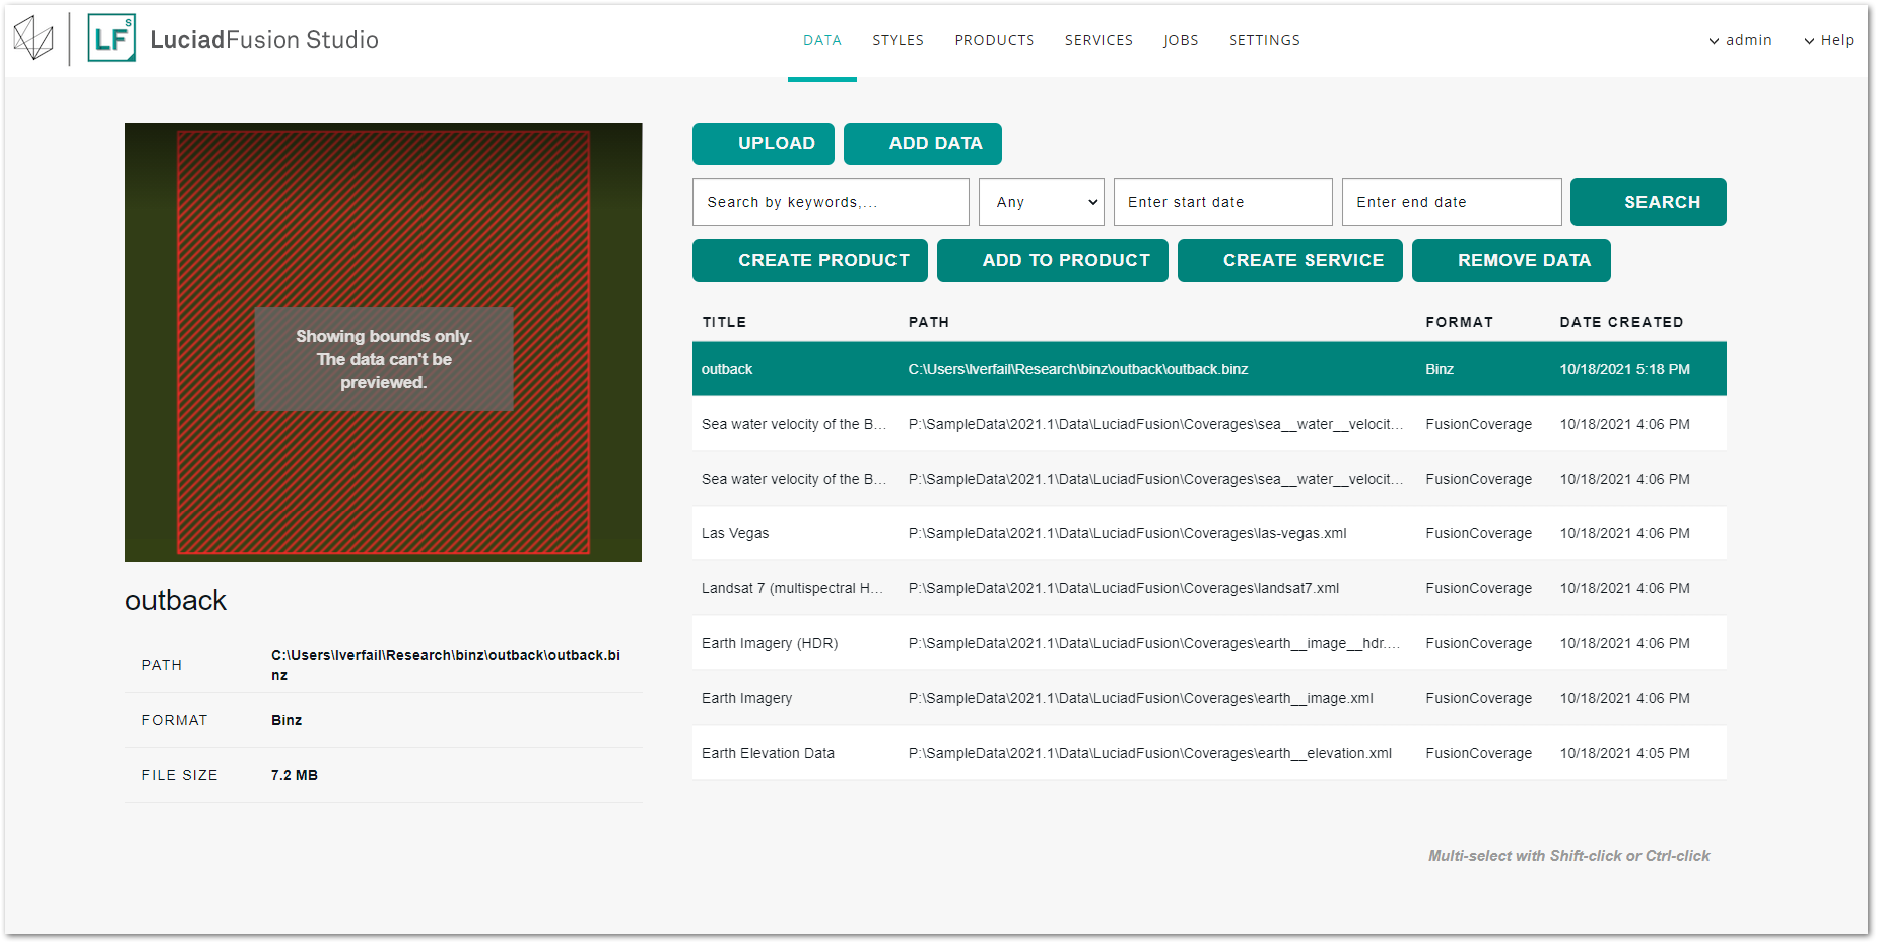
The DATA tab is your starting point for finding and inspecting data, adding data to products, publishing data as a service, and removing data.
To quickly retrieve a data set from the list, you can use the Search bar on top of the data list. For more information about how you can efficiently use search, see Appendix D, LuciadFusion Studio search capabilities.
To preview a data set on a map, select a line in the list of data.The preview and basic information about the data are displayed to the left of the list. Raster data will be previewed automatically but the server may only render its bounds with a hash fill if the image density is too high, in which case you can simply zoom in to see the actual image. See the related developer article for more. For vector data, only the bounds will be added to the map by default and you will be asked to click on the map to load the vector data if you wish to preview it. This is to prevent overloading the server with drawing a lot of vector data at a small scale. All other data, such as point cloud and 3D mesh data, cannot be previewed and only the bounds will be added to the map.
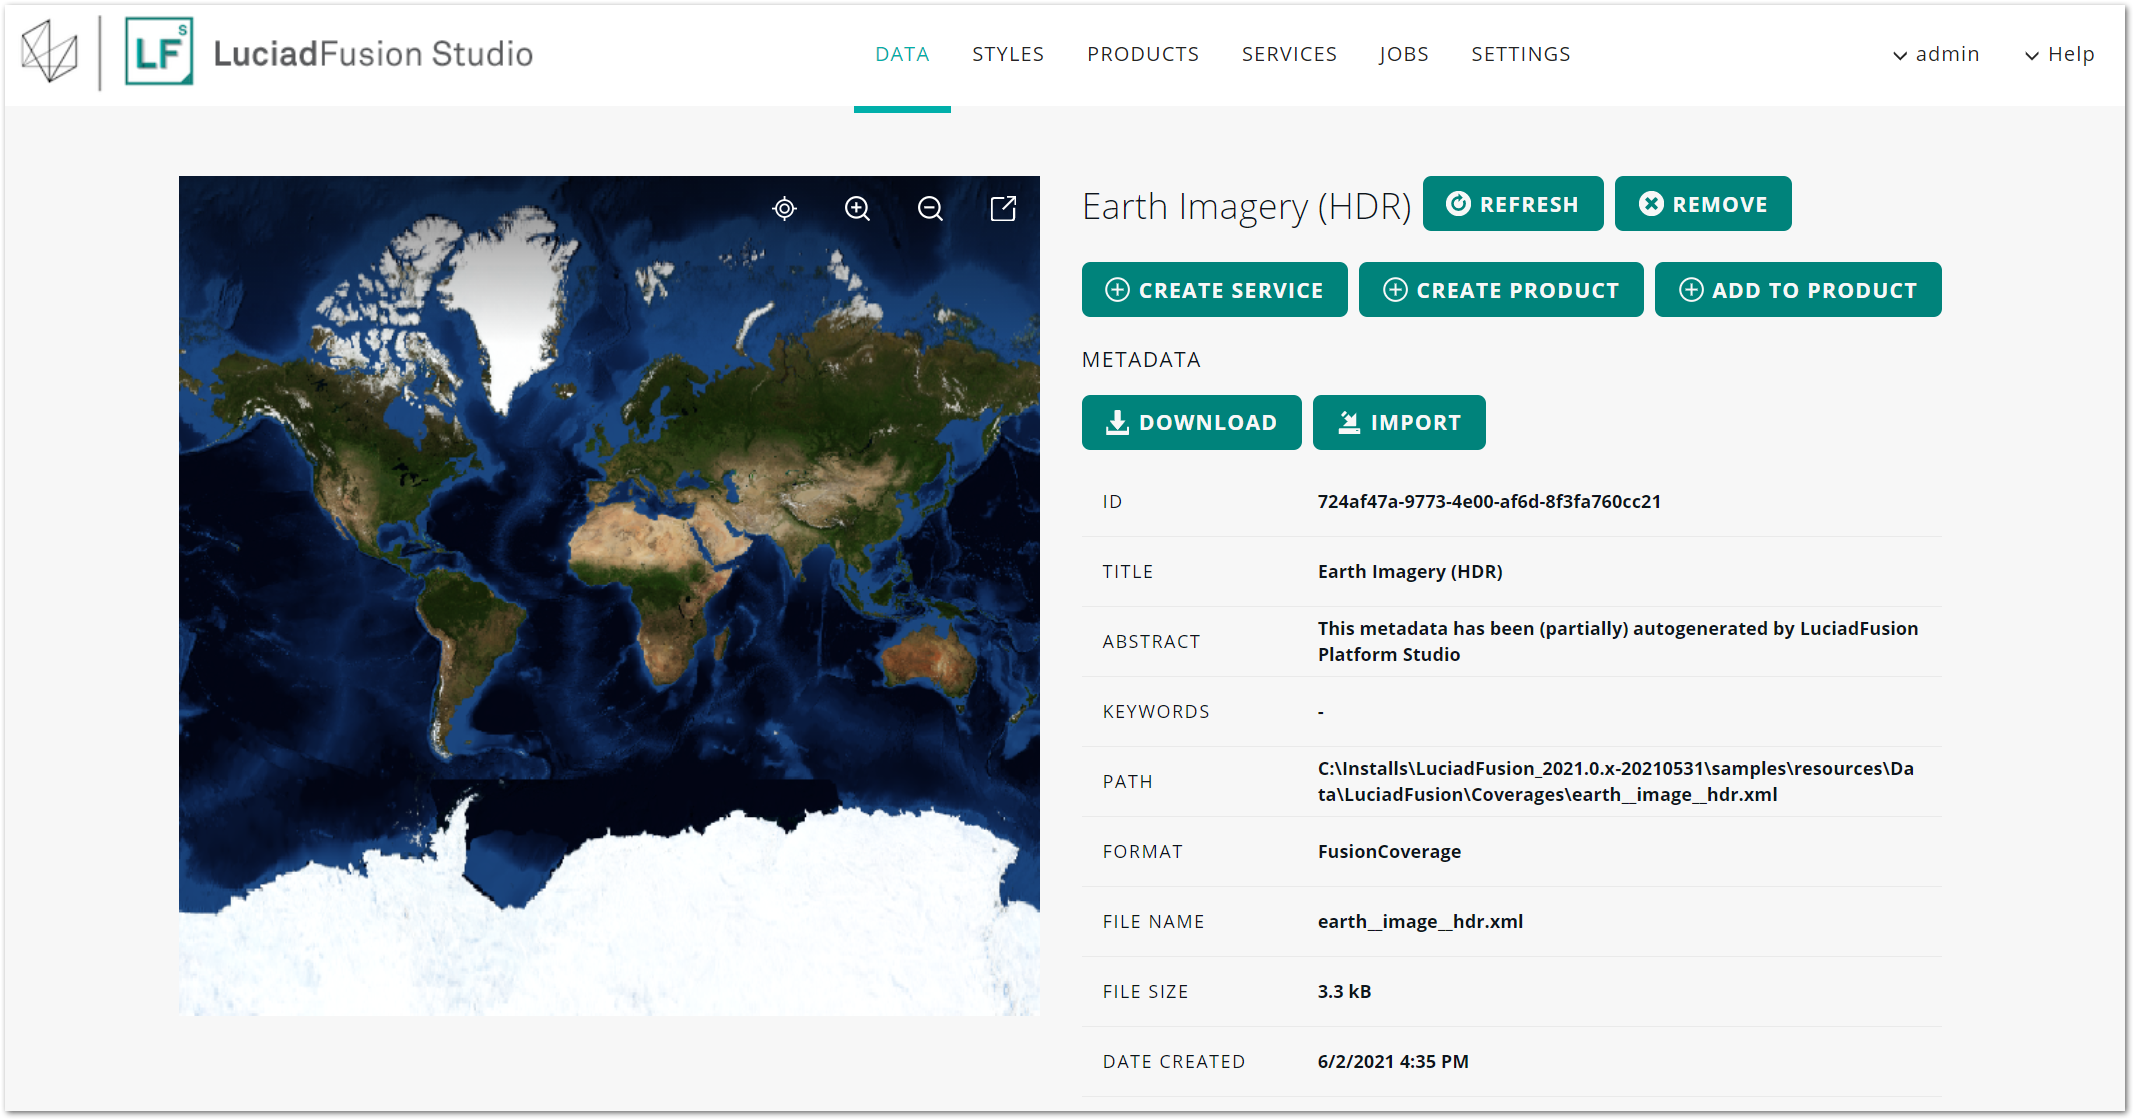
To see all the available details about a data set, click the title in its data list entry. From the data detail view, you can proceed straight to data publication, or import and download metadata files.
|
Choosing a base layer for your preview
If you want your map preview to display different background imagery, go to the SETTINGS page, select MAP PREVIEW, and click the Change button to choose a different file. |
Refreshing data
If data has changed on disk, you can refresh the data in LuciadFusion Studio to see the updates.
To refresh data:
-
Click the title of the data in the data list of the DATA tab.
-
From the data detail view, click the REFRESH button.
-
In the pop-up box, click the REFRESH DATA button . Once the refresh is complete, the data detail view displays the updates.
You can also refresh styles by going to the STYLES tab, clicking the title of a style and clicking the REFRESH button.
|
Refreshing crawled data.
For data that was crawled, it is recommended that you re-crawl the data for updates instead of using the REFRESH button. For larger data sets, refreshing might take some time. See Updating a data root to learn how you can re-crawl data. |
Removing data
To remove data in LuciadFusion Studio:
-
Select the data you want to remove in the DATA or STYLES tab.
-
Click the REMOVE button.
-
In the confirmation dialog box, review the warnings, and click REMOVE DATA or REMOVE STYLE to go ahead with the removal.
|
Removing data also removes it from products.
If you remove data from the DATA tab, LuciadFusion Studio also removes it from any product it belongs to. Once you removed the data, you cannot undo the operation. |
|
Removing uploaded data deletes corresponding files.
If you remove uploaded data, LuciadFusion Studio deletes the corresponding uploaded files from the LuciadFusion Studio data store. |
|
Removing crawled data does not equal removal from disk
If you remove crawled data, LuciadFusion Studio does not delete the corresponding files from disk. This means that the data will appear again on the next run of the crawl job, if the source files are still available on disk. |
To remove crawled data from LuciadFusion Studio, you can configure crawl jobs to detect when files are removed from a data root. As a result, you can remove the files from disk first, and make LuciadFusion Studio automatically remove its corresponding data. See Detecting deleted files during crawling for more information.
Uploading and downloading metadata
You can choose to download metadata about a particular data set, or upload metadata for that data set. The only prerequisite is that imported metadata must comply with the ISO 19115 specification.
To obtain the metadata captured about a particular data set in an XML file:
-
On the DATA tab, find the data set in the list, and click on its title.
A detailed data view shows the metadata about the data. -
Click the DOWNLOAD button below the METADATA title.
A metadata file with the name of the data set and an.xmlextension is downloaded in the browser.
To upload a metadata file with additional information about a data set:
-
On the DATA tab, find the data set in the list, and click on its title.
A detailed data view shows the metadata about the data. -
Click the IMPORT button below the METADATA title.
-
In the dialog box, click the ADD NEW FILES button, and select the metadata XML file from your file system.
Your file is added to a file overview in the dialog box. -
If you want to add more metadata files, click ADD NEW FILES again.
-
When you have finished adding metadata files, click the START UPLOADING button.
A pop-up box indicates that the upload has finished. -
Close the pop-up box when you are done. To upload more metadata files, click START A NEW UPLOAD.
Combining data and styles into a product
To get the data in LuciadFusion Studio to your users, you must publish it on a web service. You can publish geospatial data in several ways:
-
Publish a single data set straight from the data source.
-
Integrate the data set with other data types to publish a more complex map.
-
Offer several data sets alongside each other on a running service.
LuciadFusion products allow you to set up combined publications. You can:
-
Combine a data set with other data sets and publish them as layers in an integrated map view.
-
Apply styling and filtering to your data, so that you can show the users of your web service the data you want, in the colors and lines you want.
-
Differentiate the styling of a data set according to the target audience or web service.
Define styling for your data
You can determine how your data will look on the map by adding OGC SLD/SE style files.
The easiest way to change the styling of particular datasets is to upload an OGC SLD/SE style file to LuciadFusion Studio. Then, create a product that contains both the data sets and the style file.
To switch styling according to target service or audience, you can create several products, each of which contains the same data set but a distinct style file.
|
About OGC SLD and SE
SLD - Styled Layer Descriptor - is an XML-based styling language developed by OGC. It is used to style images offered by OGC Web Map Services (WMS). The WMS SLD profile defines the XML for the application of styling in the context of a WMS. The SE - Symbology Encoding - standard is the SLD subset that specifically defines the data styling features. There is no coupling between SE and WMS. SE can therefore be used independently as a generic styling language, also in non-WMS contexts. The SLD and SE standards allows you to define uniform styling for geospatial data, and store a comprehensive model for that styling information. For more information, see the OGC SLD and SE documentation. |
Adding and managing style files
The STYLES tab allows you to upload and manage style files. It displays all the style files found in the data roots.
To quickly retrieve a style from the list, you can use the Search bar on top of the style list. For more information about how you can efficiently use search, see Appendix D, LuciadFusion Studio search capabilities.
To add more style files:
-
Click the UPLOAD button.
-
From the pop-up dialog box, click ADD NEW FILES, and select one or more style files from the file explorer.
The dialog box displays the selected style files in an upload list.You can still remove files from the list by clicking the adjacent X icons. -
Click the START UPLOADING button.
The dialog box adds check marks to the file names to show that the upload is finished. -
You can continue uploading files by clicking START A NEW UPLOAD, or close the dialog box to go back to the main screen.
As an alternative to a file upload, you can also add a style directly: click ADD STYLE, enter a file location for the style file or select the file, and click CHOOSE FILE.
To preview a styling, select the appropriate file in the list of styles. The preview and basic information about the style file are displayed on the left.
To see all the available style details, including the contents of the style file, click the title in its style list entry.
Combining data and styles into products
From the available data, you can integrate data sets and style files into products.
|
Choose the product properties carefully. The values you enter here may be visible to consumers of your product. For more information, see Appendix C, Where do my service and product properties end up?. |
Defining products from the PRODUCTS tab
To create a product from the PRODUCTS tab:
-
Make sure that the data you need for the product is already available in LuciadFusion Studio, either in a data root or through a data upload.
-
On the PRODUCTS tab, click CREATE PRODUCT.
-
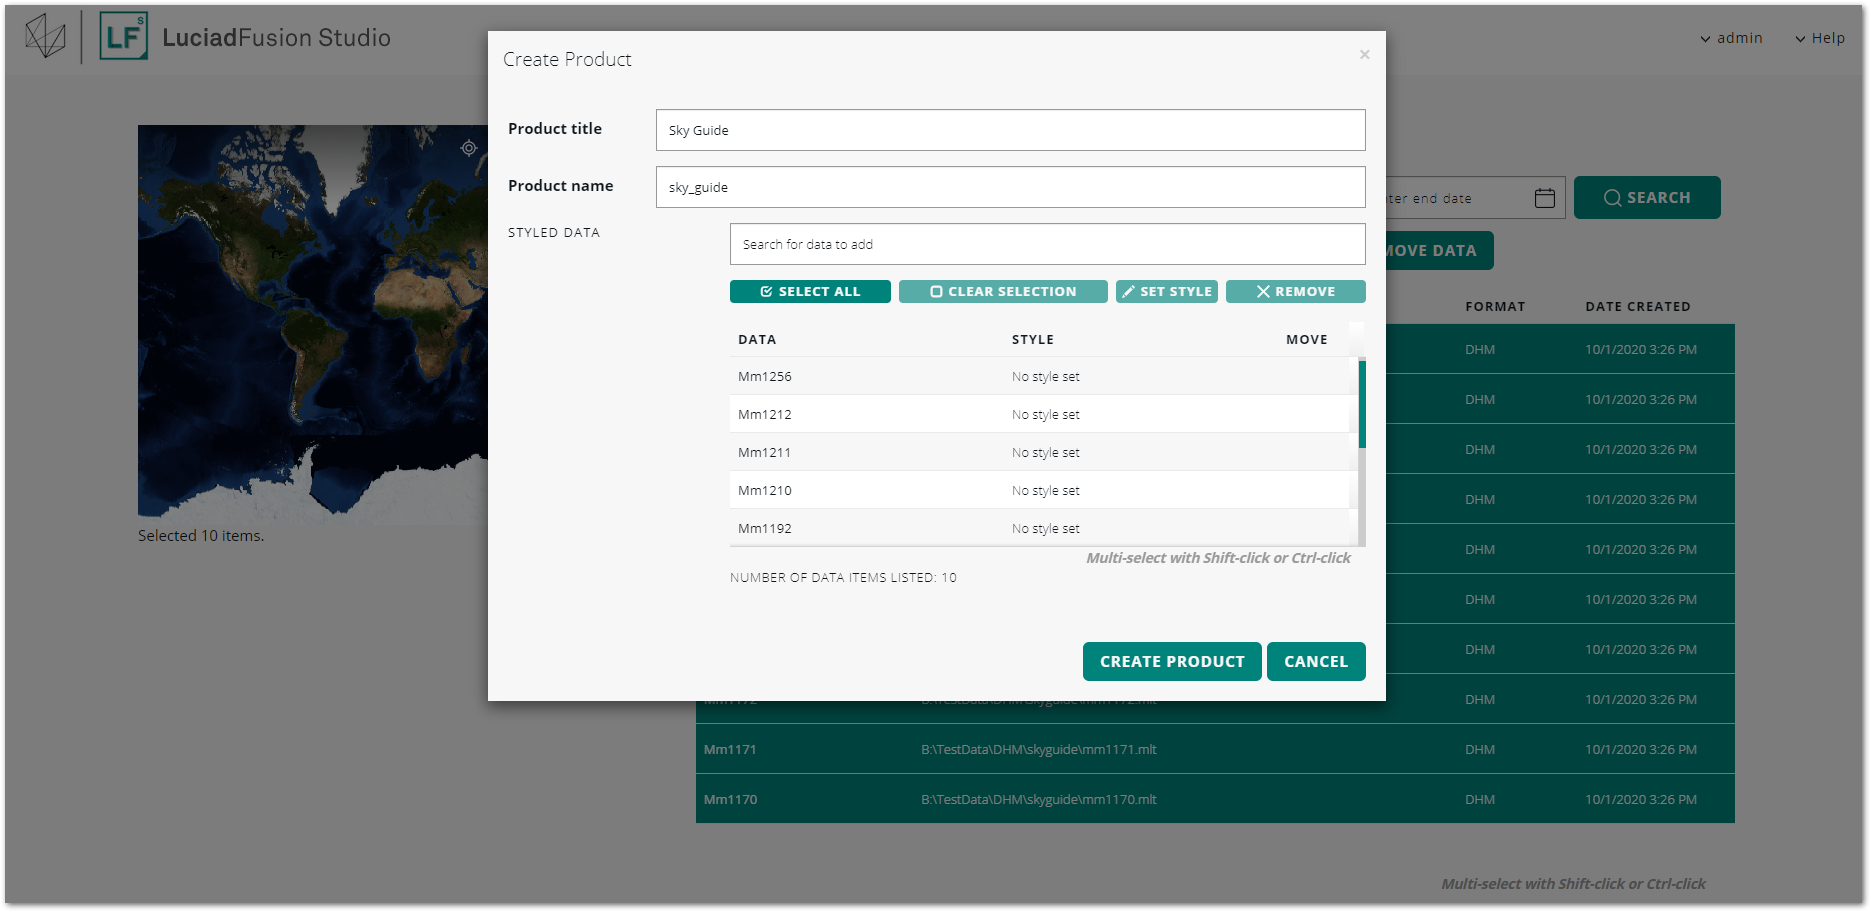
In the Create Product dialog box, enter a title for your product in the Product title field.
-
In the Product name field, enter a name for your product. LuciadFusion Studio automatically generates a product name from the product title, but you can change it.
-
In the STYLED DATA field, search for the data set you want to add. You can find it quickly by typing a data ID or keyword.
-
Select the data set from the search results in the drop-down menu.
The dialog box creates a list of data entries in the space below the DATA field.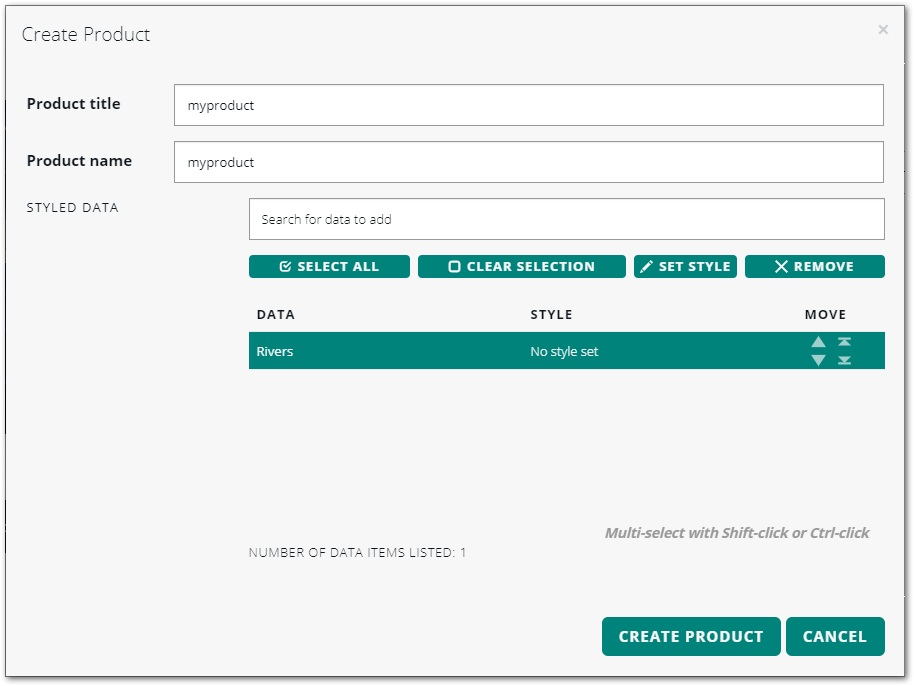 Figure 9. Creating a product
 -
Select the data set you just added, and click the SET STYLE button.
Setting a style for the data set in a product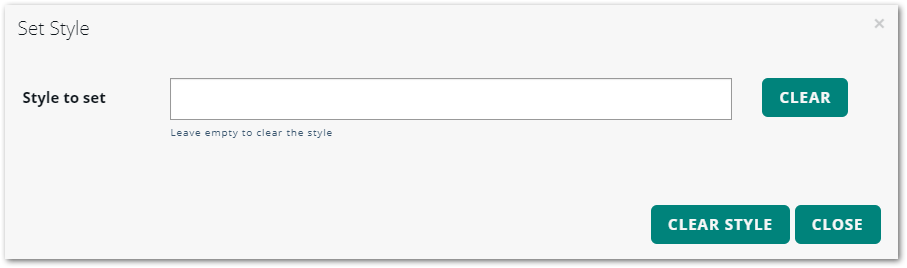
-
In the Set Style dialog box, start typing in the Style to set field to find and select a style file to the data, and click SET STYLE.
A dialog box confirms that the style has been added to the data set. You can click CLOSE to return to the Create Product dialog box. -
Continue selecting and adding data and styles until your product is complete.
If necessary, you can change the ordering of data layers in the product with the arrows in the MOVE column. -
Click CREATE PRODUCT to add the product to LuciadFusion Studio.
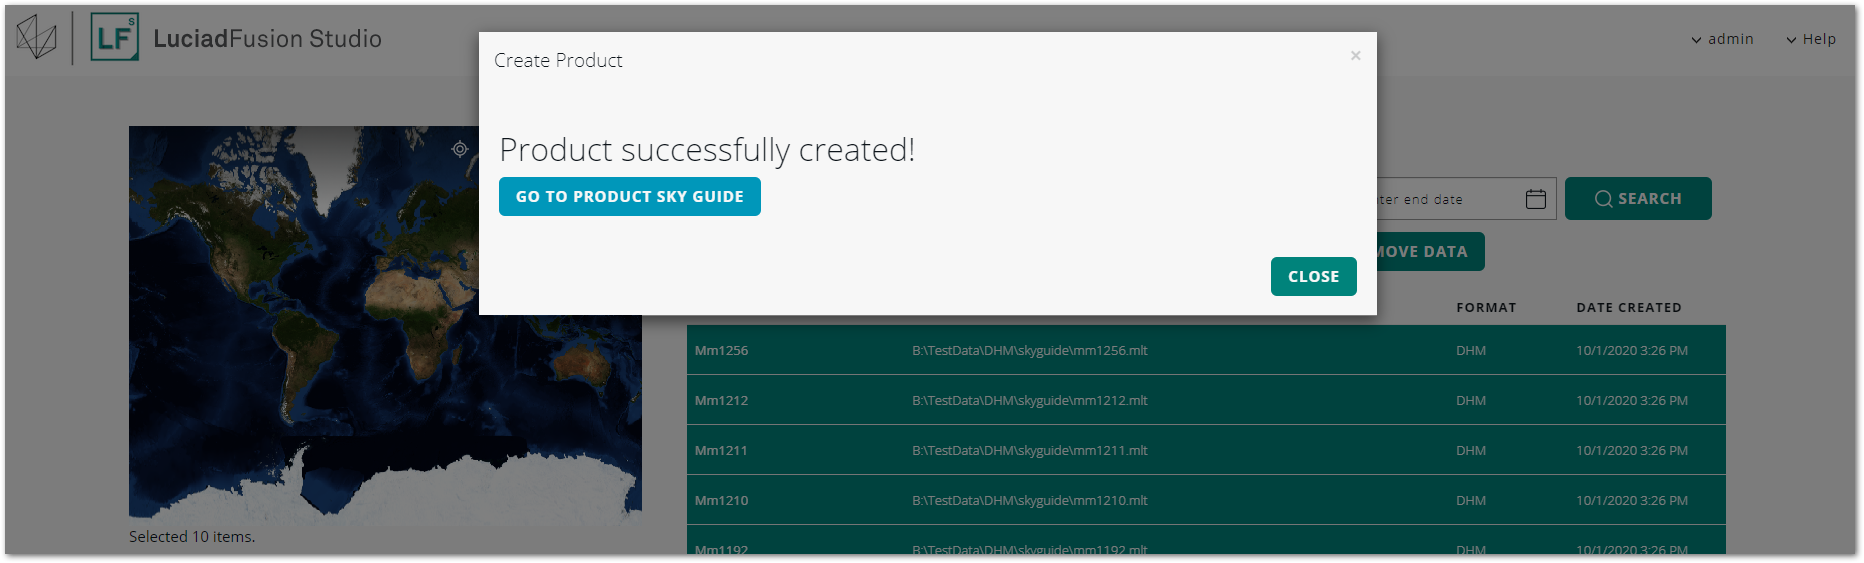
A dialog box notifies you that the product is created successfully. You can click GO TO PRODUCT to see and edit the product details, or close the dialog box.
Defining products from the Data tab
You can also start from the DATA tab for the creation of products:
-
Select the data you want to add to the product, and click the CREATE PRODUCT button.
-
From there, you can proceed with the definition of your product on the Create product screen.
To add data to an existing product:
-
Select the data, and click ADD TO PRODUCT.
-
On the Add to Product screen, find and select the product in the SELECT PRODUCT screen.
-
You can choose to add more data in the SELECT DATA field, and select styling for the product data through the SET STYLE button.
-
Click ADD TO PRODUCT.
A dialog box notifies you that the product was updated successfully. -
Click GO TO PRODUCT to see and edit the product details, or simply close the dialog box.
Managing products
The Products tab allows you to manage your products. It displays all the products created so far in a list.
To quickly retrieve a product from the list, you can use the Search bar on top of the product list. For more information about how you can efficiently use search, see Appendix D, LuciadFusion Studio search capabilities.
To see a product preview and basic product details, select the product from the list. The map preview and product details are displayed on the left. The restrictions described for previewing data also apply to previewing products, see Managing your data for details.
To see all product details and the data added to the product, click the title of the product list entry.
The UPLOAD button on the PRODUCTS tab allows you to add more data and style files to LuciadFusion Studio.
Publishing your data on services
You make geospatial data available by publishing it as a web service.
In LuciadFusion Studio, data services come in various shapes and sizes. They can publish vector data, imagery, point clouds, meshes, and tiled raster data. The LuciadFusion services comply with the OGC web service standards WMS, WCS, WFS, and WMTS. They can also publish data in a highly efficient tiled form, by means of the 3DTiles protocol and the Luciad Tiling Service.
In addition to data services, LuciadFusion Studio also runs a catalog service. The Studio Catalogue Service makes metadata about the data in LuciadFusion Studio available to clients in the form of Dublin Core, ISO 19115, or ATOM feeds. The service is compliant with the OGC Catalogue Service for the Web (CSW) specification.
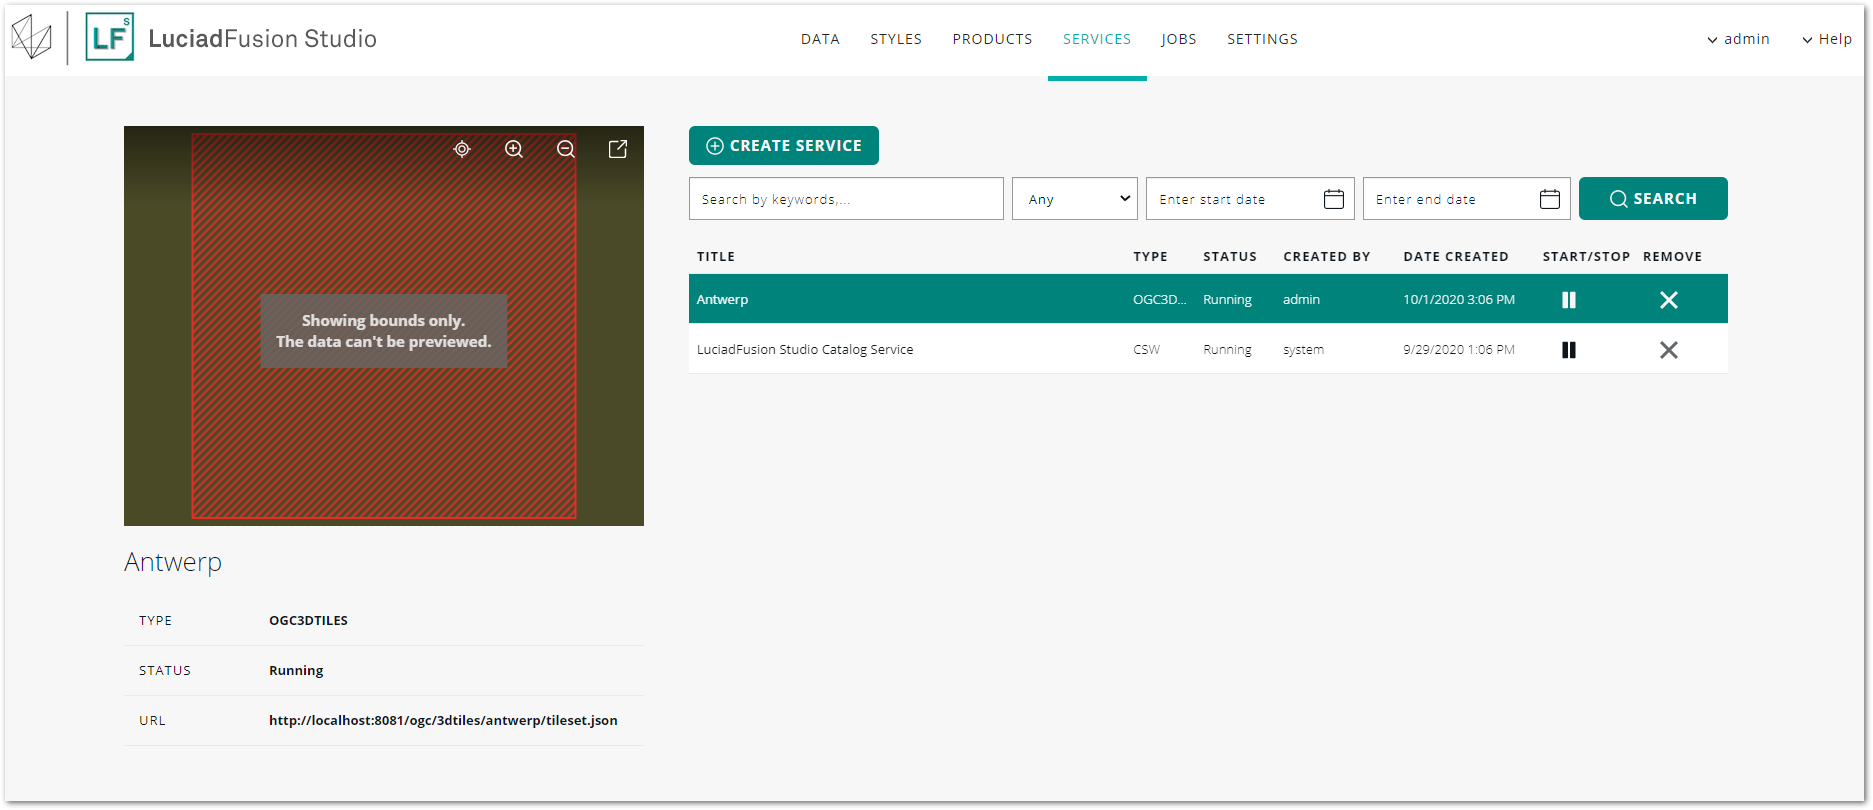
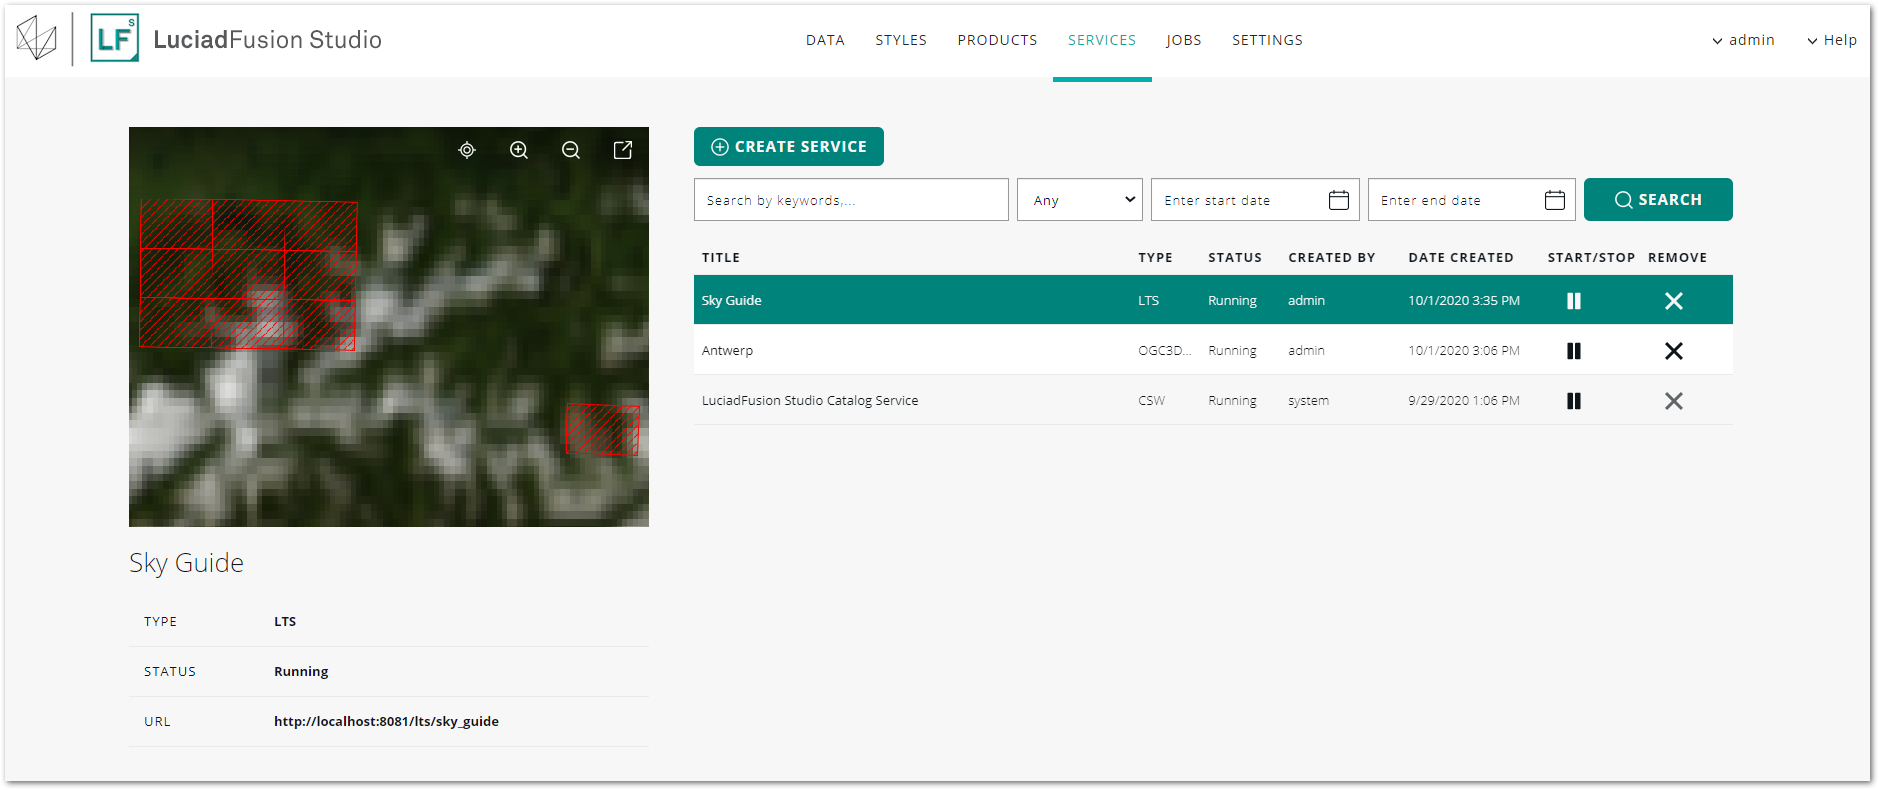
Managing your services
The SERVICES tab allows you to manage all services from an overview. You can search for services, create and delete them, and start or stop them from the list of services.
The Studio Catalogue Service is permanently listed in the SERVICES overview. You can stop the catalog service, but you cannot delete it. You cannot create a second catalog service either.
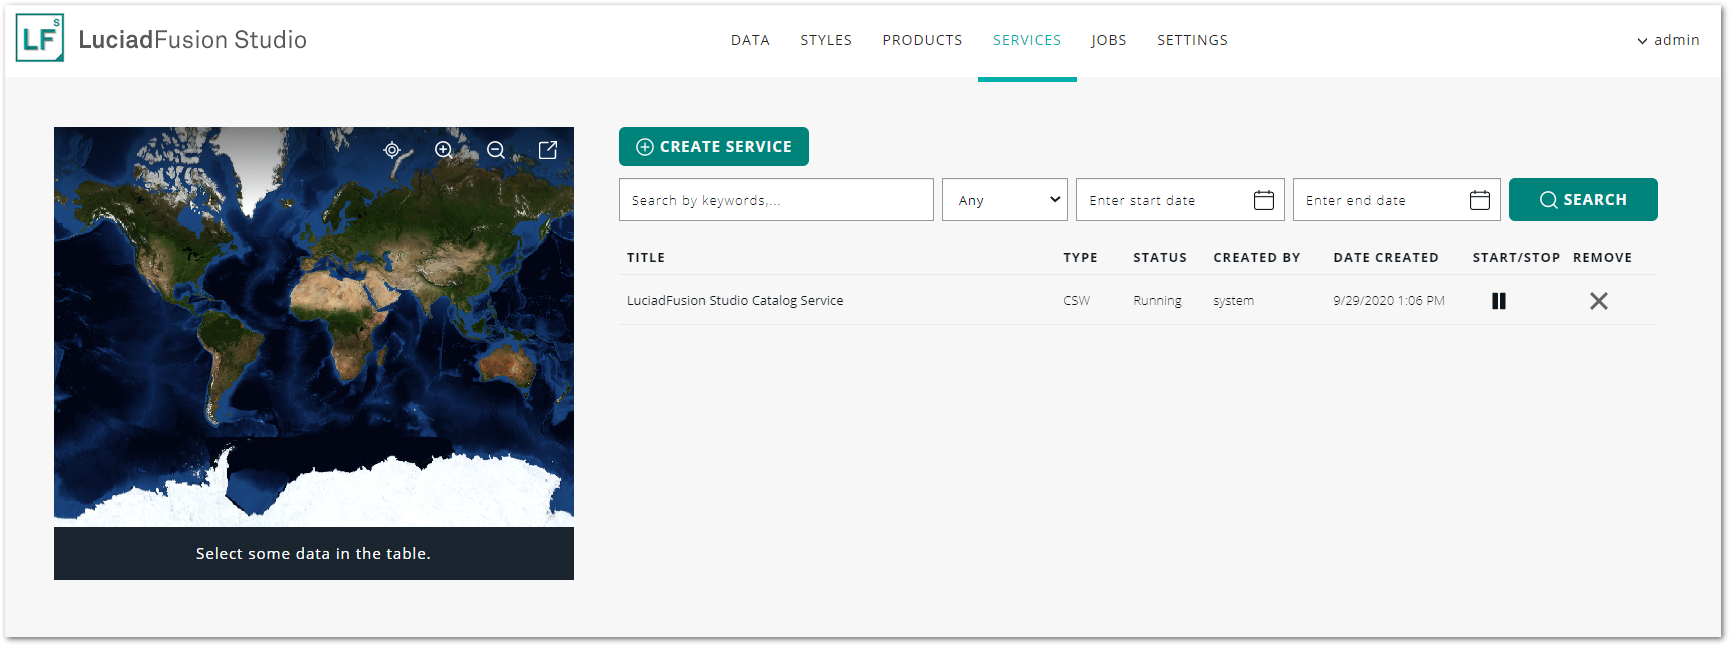
To quickly retrieve a service from the list, you can use the Search bar on top of the service list. For more information about how you can efficiently use search, see Appendix D, LuciadFusion Studio search capabilities.
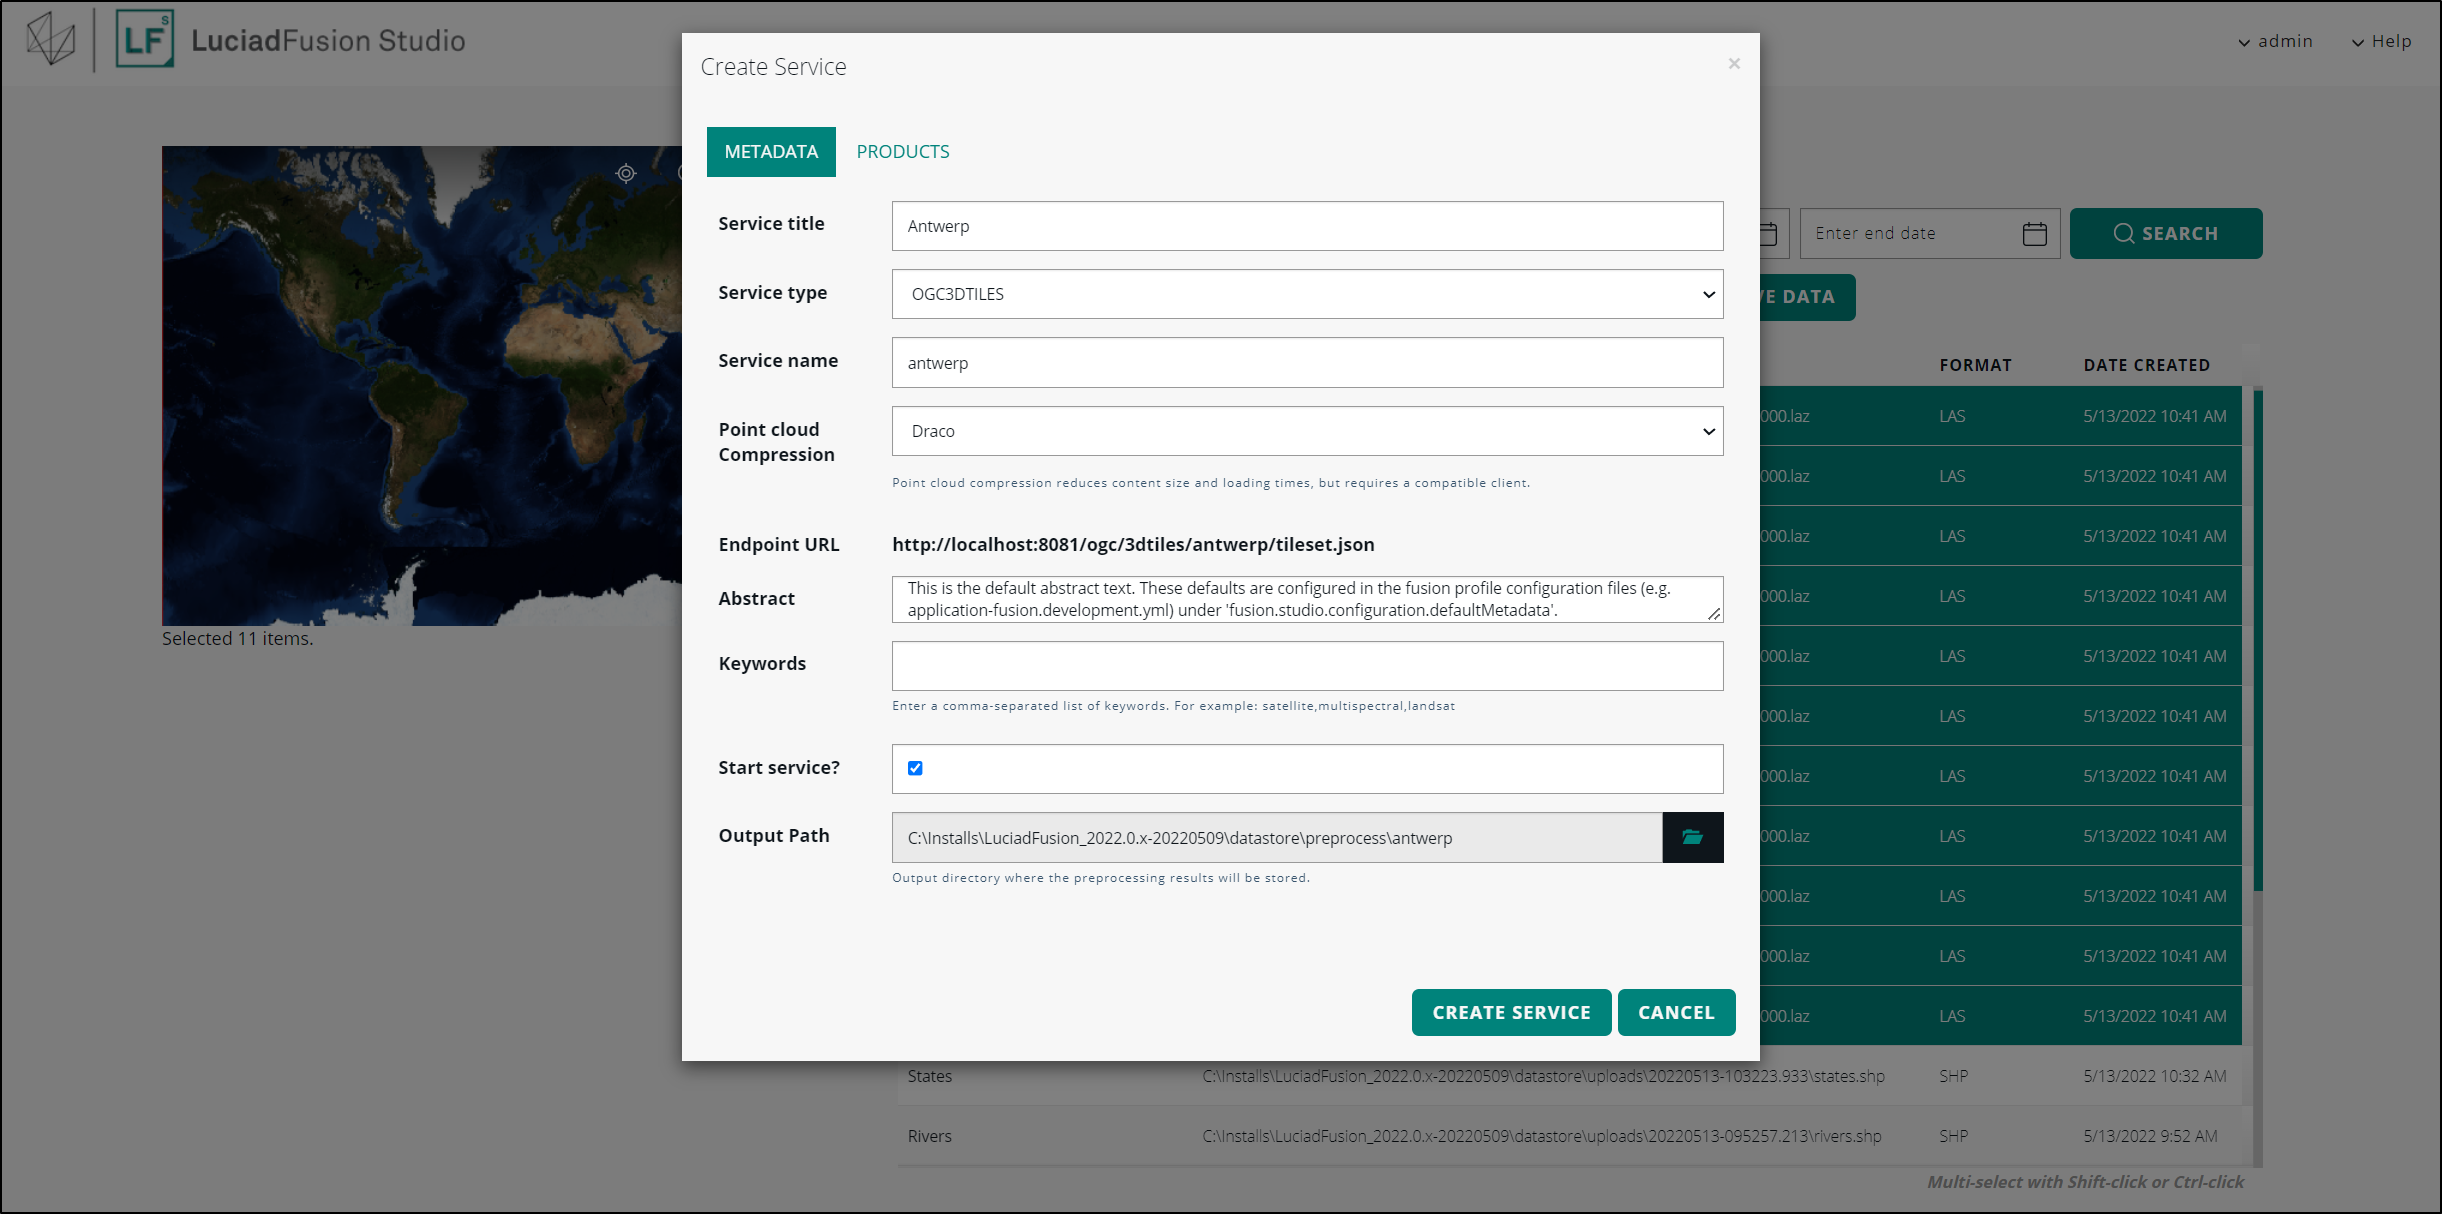
Creating a new service
|
Choose the service properties carefully. The values you enter here may be visible to consumers of your service. For more information, see Appendix C, Where do my service and product properties end up?. |
-
Go to the SERVICES tab, and click Create Service.
-
On the Create Service dialog, fill in a title for the service, and select the service type.
The endpoint URL of the service automatically adapts to the service name and type you provided. The entry fields in this dialog also adapt to the service type you selected.
Figure 11. Creating a new OGC service -
Enter an abstract in the Abstract field if you want a service abstract that is different from the default abstract defined in the profile configuration files.
-
Enter a descriptive list of keywords separated by commas.
-
If an access constraint applies to your OGC service, enter it in the Access constraint field.
Unclassified,restricted,confidential,secret,topSecretare examples of access constraints. -
Select the Start service check box if you want the service to start running immediately after you created it.
-
If you want to change the default contact information for your OGC service in the Contact information field, click the Edit icon to the right of the contact information.
On the CONTACT INFORMATION tab, enter the preferred contact information in the appropriate fields.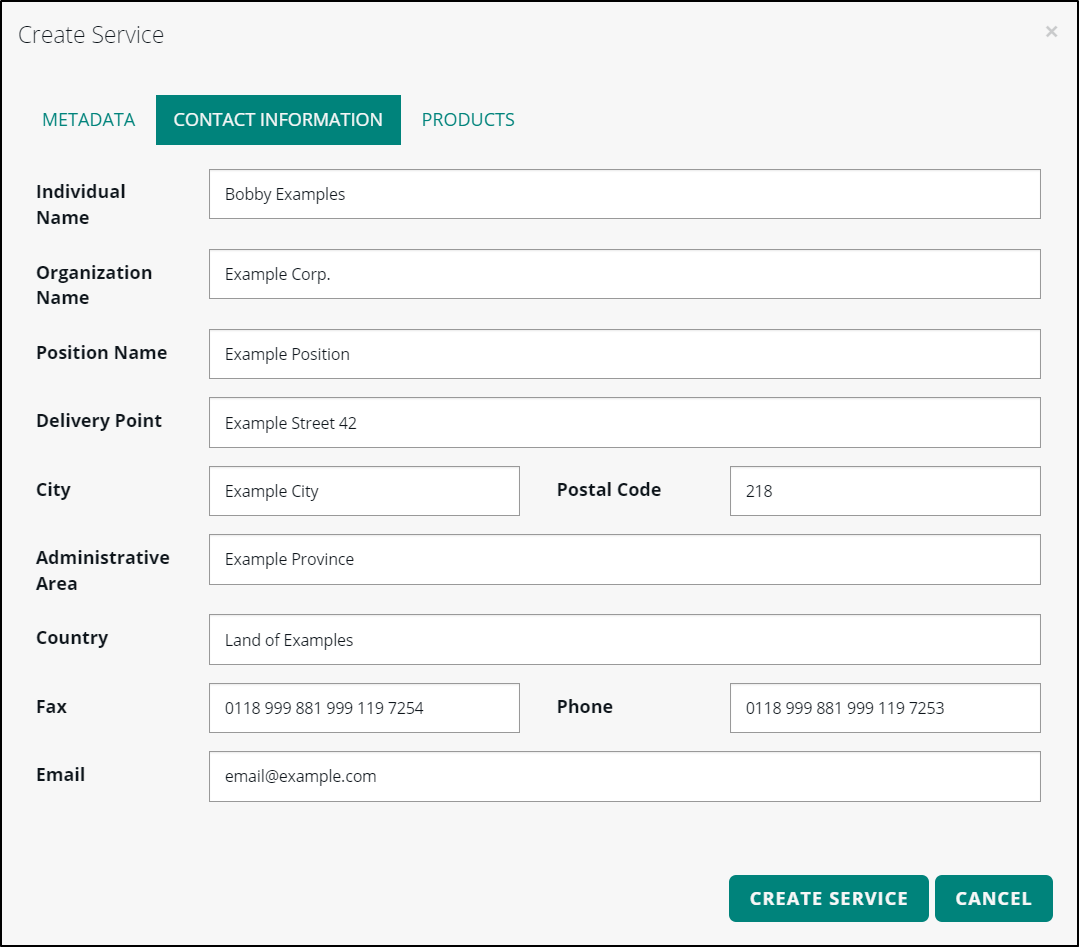 Figure 12. Changing contact information for an OGC service
 -
If you want to add products to the service, start typing in the search field on the PRODUCTS tab to find and add products.
-
Click CREATE SERVICE.
The service is added to the list on the SERVICES tab. If you selected the Start service checkbox, it is already running. Otherwise, you can select it from the list, and click the Start icon in the START/STOP column.
|
You can stop a running service by simply clicking the Pause icon in the START/STOP column on the appropriate line on the SERVICES tab. |
|
To serve OSGB 3D mesh and LIDAR point cloud data sets, select the OGC3DTILES service type. LuciadFusion will proceed to tile and multi-level the data in a pre-processing step. The service status remains PENDING until the pre-processing job has finished. At that point, the service starts automatically. To monitor the status of the pre-processing job, go to the JOBS tab. For a full scenario that demonstrates the serving of point cloud data as OGC 3D Tiles, see Appendix A, Serving point clouds. |
|
To serve elevation data to LuciadRIA, select the LTS service type. LuciadFusion creates a LuciadFusion elevation coverage optimized for LuciadRIA in a pre-processing step. The service status remains PENDING until the pre-processing job has finished. At that point, the service starts automatically. To monitor the status of the pre-processing job, go to the JOBS tab. For a more detailed explanation of this functionality, see Appendix B, Serving elevation data to LuciadRIA. |
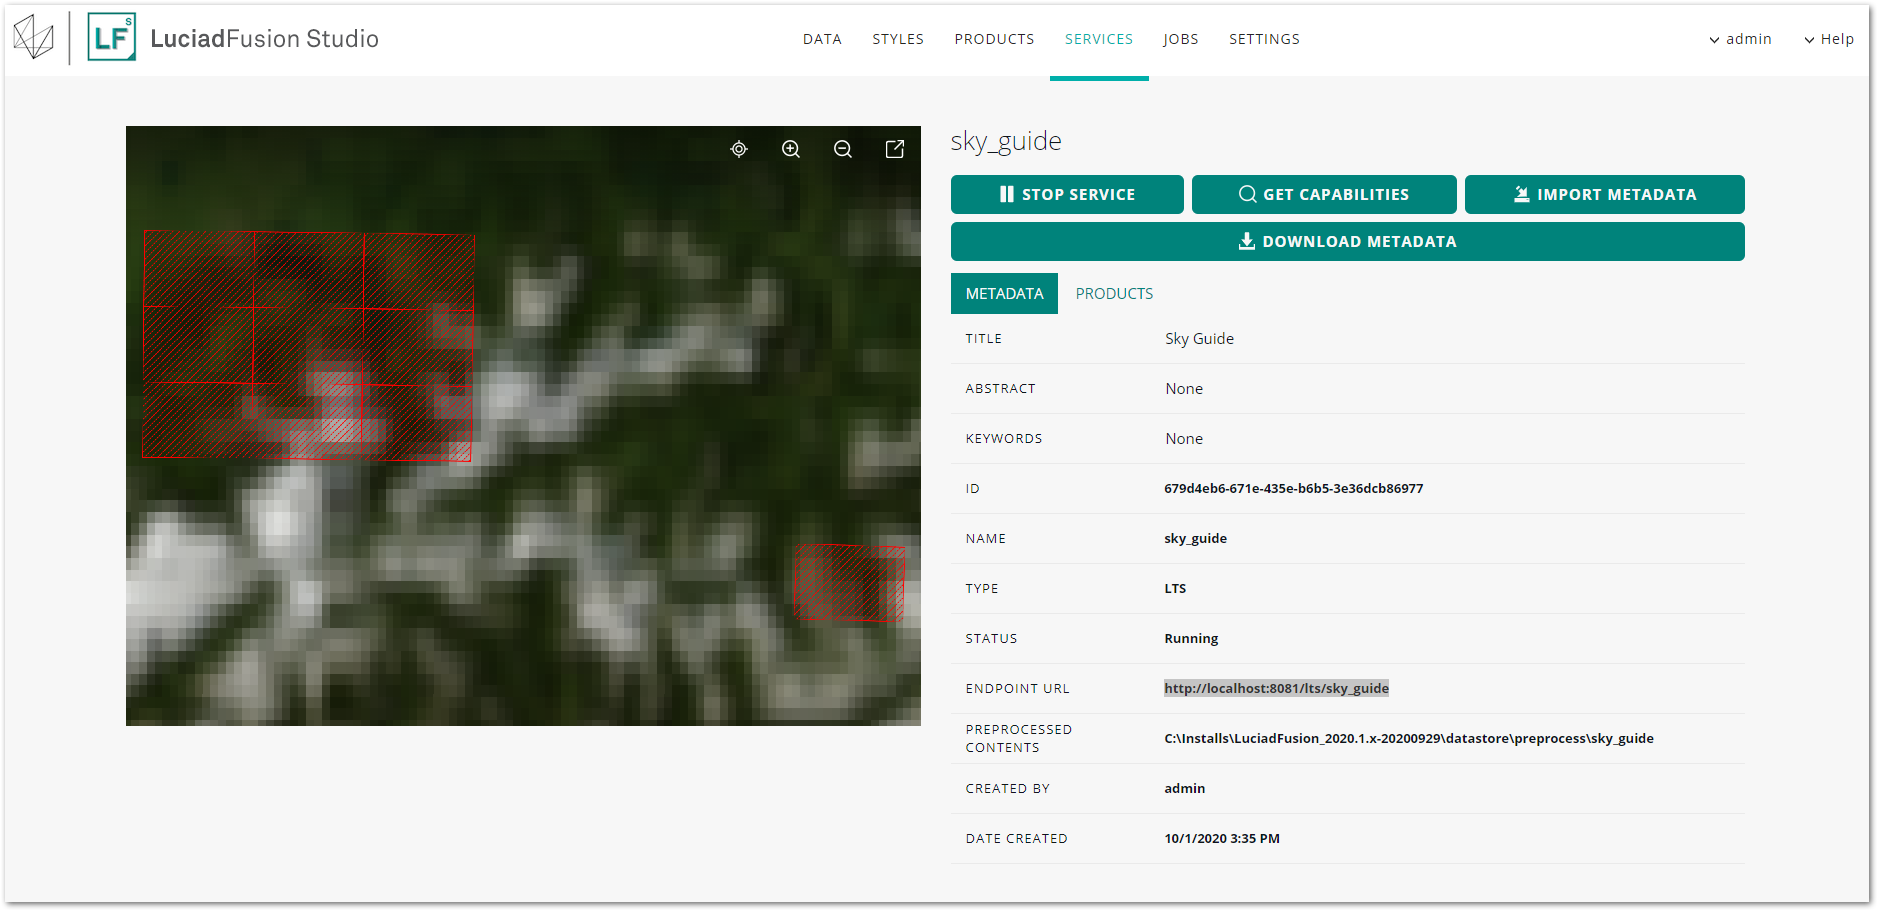
Inspecting and changing a service from the service detail screen
To see more detail about a particular service, double-click its title. From the services detail view, you can:
-
Start or stop the service by clicking the START SERVICE or STOP SERVICE button.
-
Send a GetCapabilities request by clicking the GET CAPABILITIES button.
-
Import and download files containing service metadata using the IMPORT and DOWNLOAD buttons.
To edit the service metadata, go to the METADATA tab below the button rows.

On the CONTACT INFORMATION tab, you can edit the contact information that comes with OGC services. Click the Edit icon to the right of the fields, and enter the new contact information.
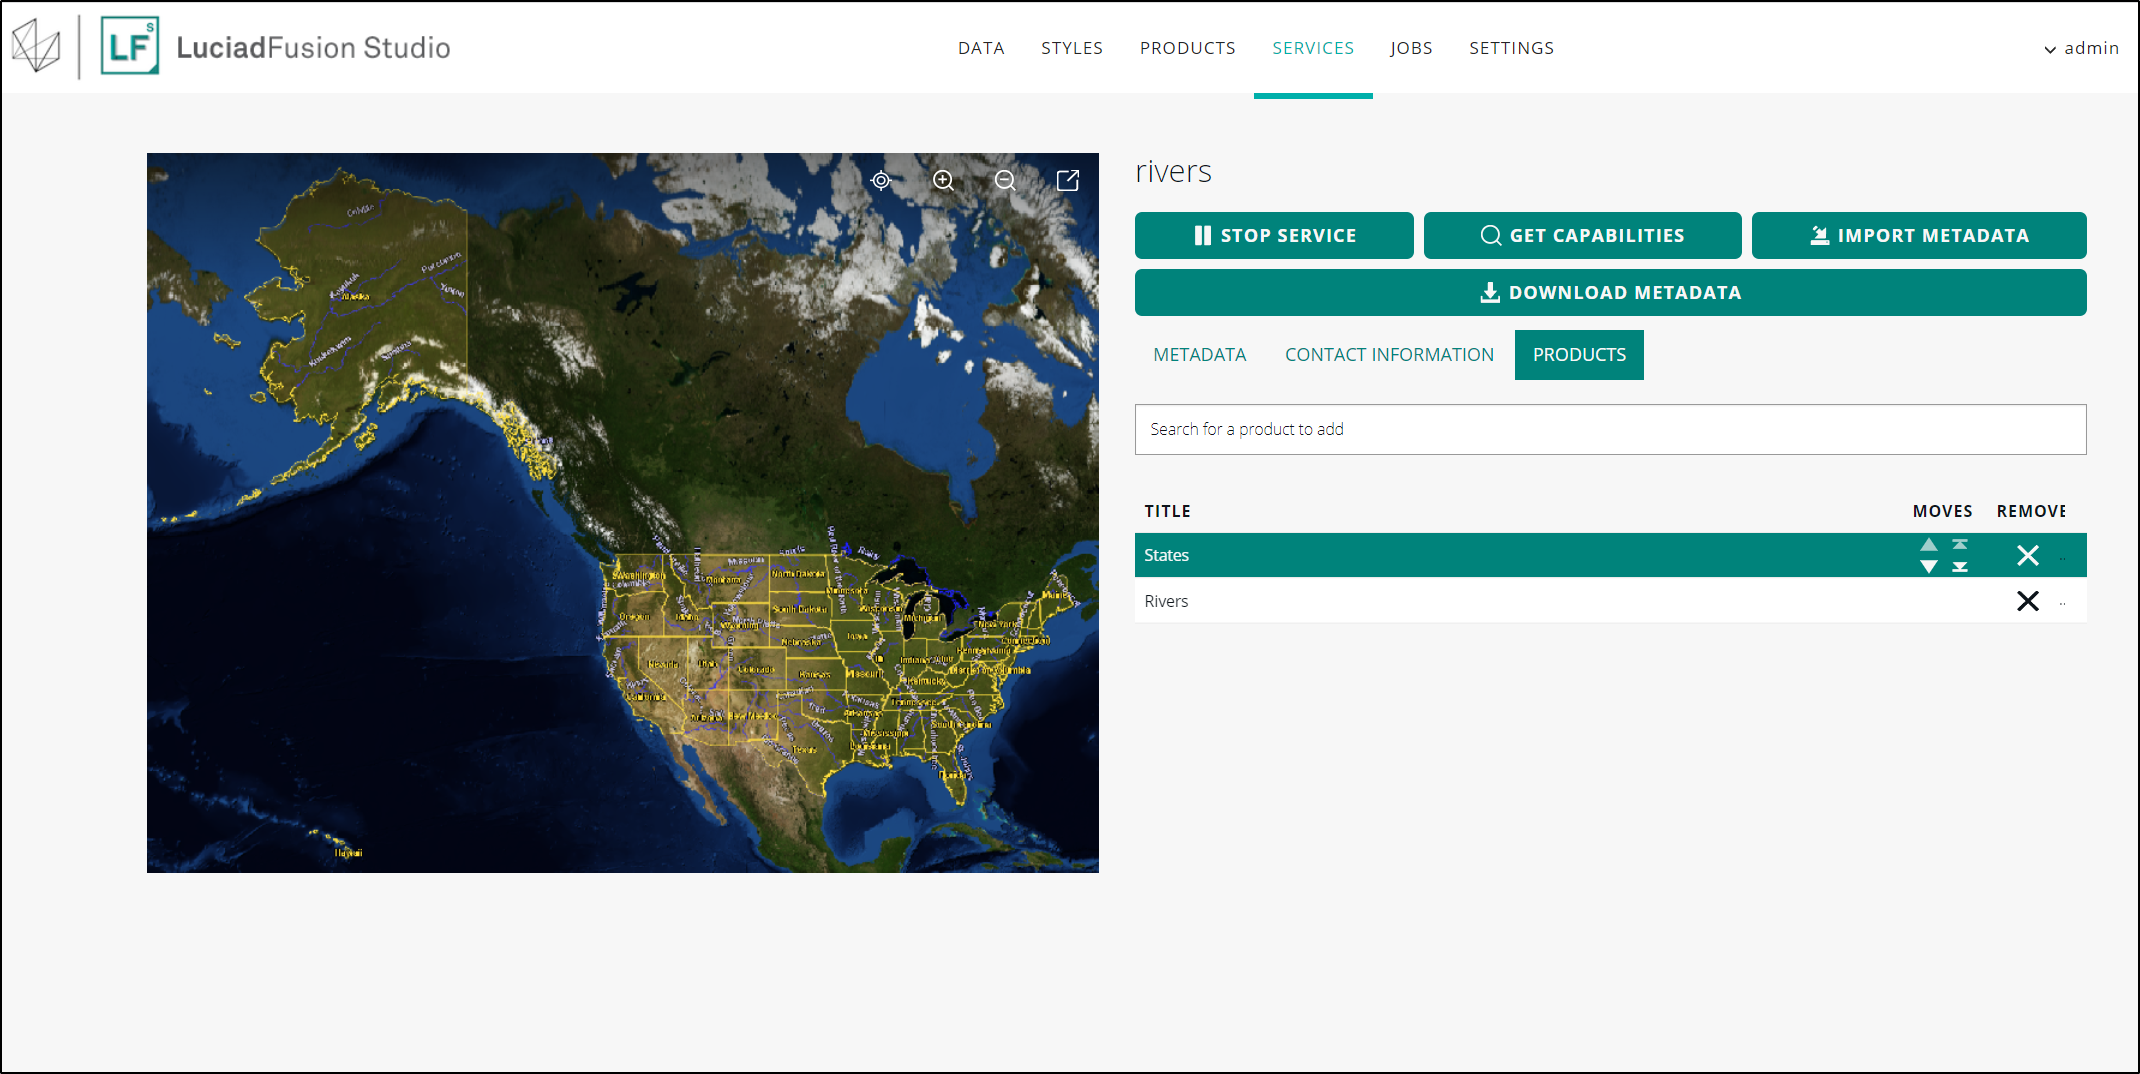
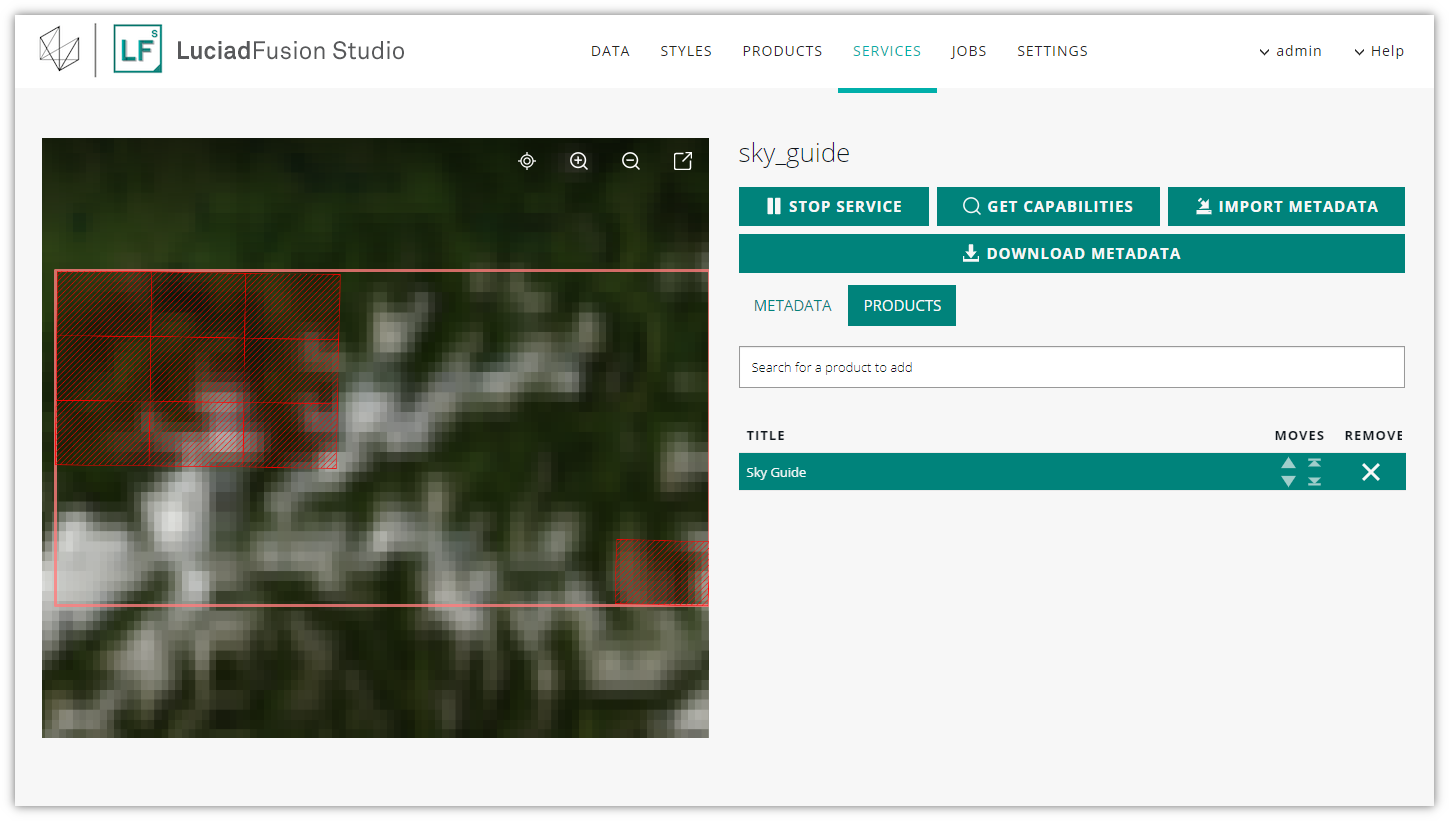
On the PRODUCTS tab, you can:
-
Add additional products to the service: search for the product you want to add by typing in the search field, and select the extra product.
-
Change the layering order of the products: select the product in the list, and use the arrows in the MOVES column to get the product to the required layer position. The layering order is reflected in the map preview.
-
Remove products from the service: select the product in the list, and click the X displayed in the REMOVE column with the product entry.
Get endpoint URLs and download files from a FILESERVER service
The FILESERVER service detail view allows you to get more information about the served files and their companion files. You can also download the files.
To find out the endpoint URL for a file, go to the PRODUCTS tab. Click COPY URL next to the relevant product to copy-paste the endpoint URL.
+
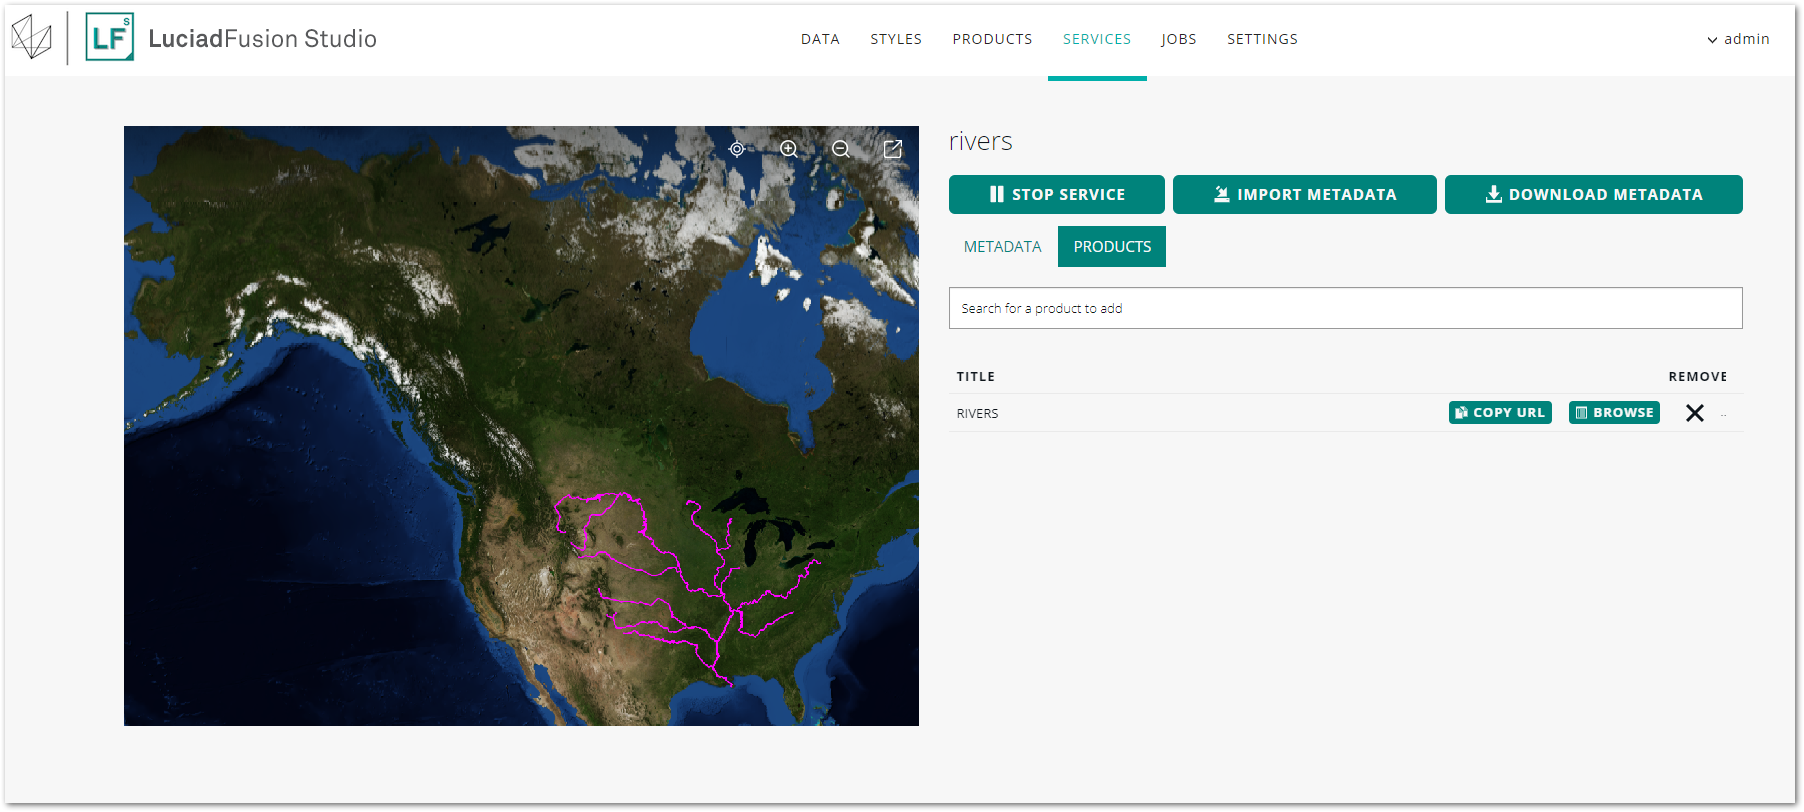
To download a file directly from LuciadFusion Studio:
-
Click the BROWSE button next to the relevant data set in the product list.
LuciadFusion Studio shows the list of related data sources within the Product in the Data source screen. -
In the Download column, click the download icon next to the data sources you want to download them straight from the browser.
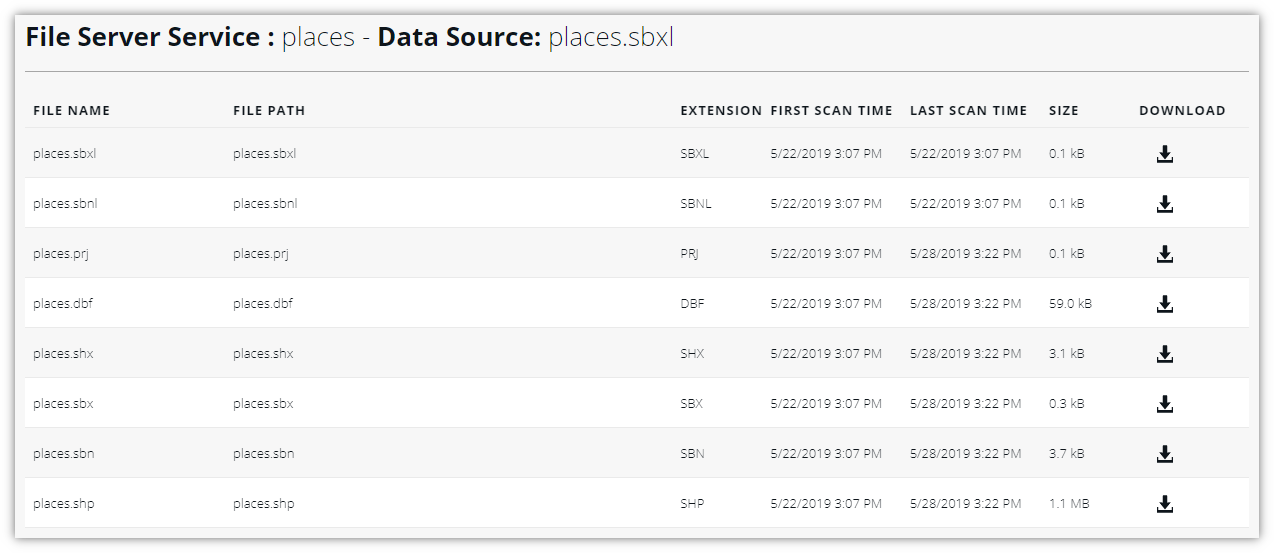 Figure 16. Downloading data sources
|
The endpoint URLs provided in the service detail screen only offer the main geodata file for download. To download potential companion files such as files containing georeference information for the data, click BROWSE in the product list, and download the companion files from the Data Source screen. |
Adding data and products to new services
You can follow several routes to publish your data on services. Both the DATA and the PRODUCT tabs offer options to publish data in new services:
-
On the DATA tab, select the data sets you want to publish, and click the CREATE SERVICE button.
Your data sets are automatically turned into products when you publish them on a service. -
On the PRODUCTS tab, select the products you want to publish, and click the CREATE SERVICE button.
In both cases, you can proceed to add the necessary service information on the Create service dialog box. See Creating a new service for more information.
How to add your data to an existing service
To add data to an existing service, you first need to package it as a product. Next, you can add it to a service in two ways:
-
Select the product in the list on the PRODUCTS tab, and click ADD TO SERVICE.
Find and select the service in the Add to service dialog box, and click ADD TO SERVICE. -
On the Services screen, find the required service in the list, and click its title.
On the service detail screen, find and select the products in the Products field.
|
Keep services up and running
You do not need to stop a service before adding data to it. New data will be published on-the-fly while the service is running. |
Updating data in a running service
If you want to swap outdated data with new data in a running service, you can do so without any action required on the client side. Service clients can maintain their connection to the same layer ID served by the same service URL as before.
To swap data in a running service:
-
Upload the new data.
-
Create a product for the new data. LuciadFusion automatically generates a name for the product. That name is unique, and serves as the layer identifier in any service it gets added to.
-
Find the service on the SERVICES tab, and remove the product with the outdated data from the service.
-
Find the outdated product on the PRODUCTS tab, and take note of its name.
-
Remove the outdated product.
-
Open the new product, and change the name in the NAME field to the name of the outdated product.
-
Add the new product to the running service. The updated data is now available in the service under the same layer ID as before.
Administering LuciadFusion Studio from the web application
Scheduling and monitoring automatic crawling
LuciadFusion Studio allows you to regularly re-crawl data roots for changes.
Once you have created a data root, LuciadFusion Studio sets up and executes a one-time crawling job to discover and register the data. That job is your starting point for re-running a crawling job, and for the future scheduling of automatic crawling jobs. You can choose to set up a simple crawling schedule based on frequency, or a more complex schedule based on a Cron expression.
Starting and stopping crawling jobs
If you want to repeat a crawling job, or run a scheduled inactive job right now, select the job in the Crawl jobs section on the JOBS tab, and click the START button on the right.
You can also open the job details screen by clicking the link provided in the PATH column on the JOBS tab, and click the START JOB button from there.
If you want to interrupt a running crawling job, select it on the JOBS tab, and click the STOP button further on the right.
Scheduling automatic crawling based on frequency
-
Go to the JOBS tab, and find the job that was used to crawl your data root for the first time.
-
Click the link provided in the PATH column to open the job details screen.
-
Select the Simple radio button in the SCHEDULE section.
-
In the Every drop-down menu, specify whether you want to run the job every minute, hourly, daily, weekly, or yearly, and supply more details about the starting time of the automatic job.
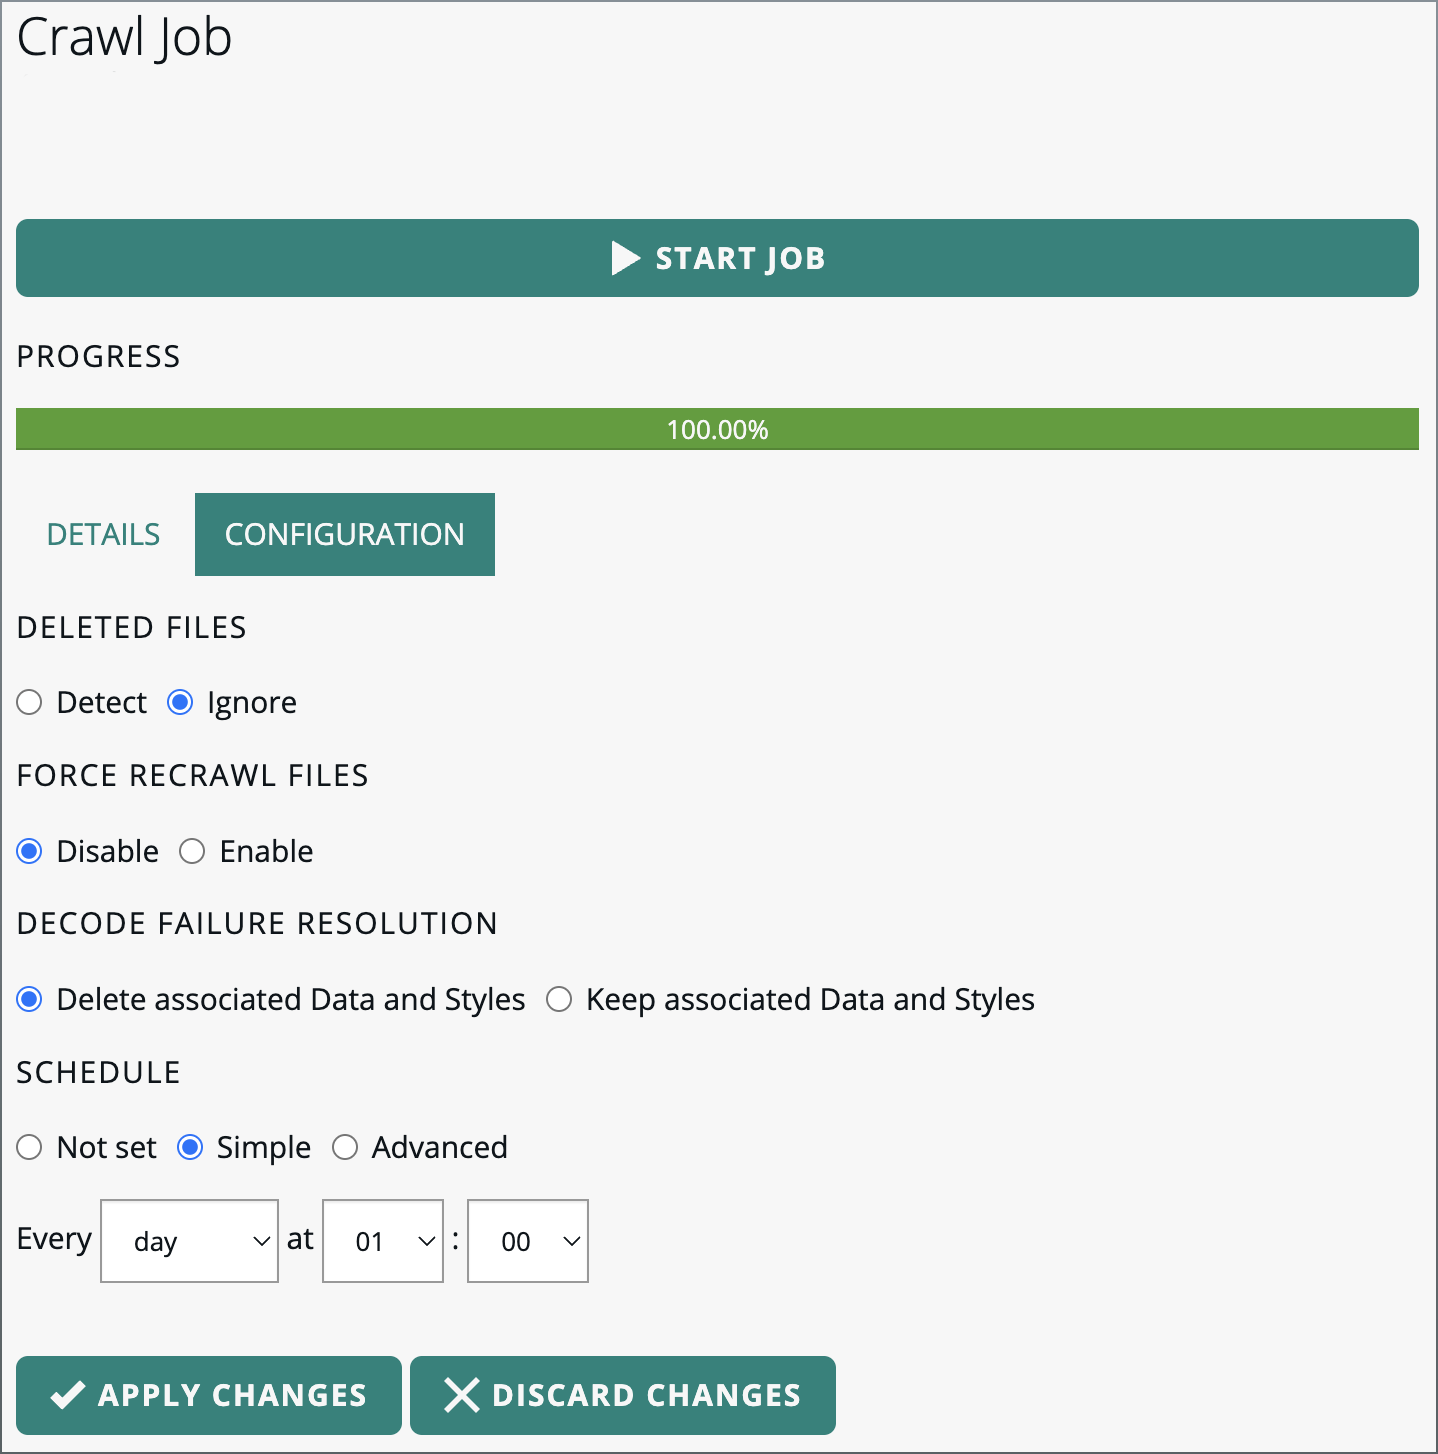 Figure 18. Scheduling a simple automatic crawling job
 -
Click APPLY CHANGES.
The data root is now regularly crawled, based on the crawling schedule you have set.
Scheduling automatic crawling based on a Cron expression
If you have very detailed requirements for your crawling schedule, you can specify those in an advanced Cron expression.
A Cron expression is a string that describe individual details of the schedule. In LuciadFusion Studio, it must consist of
at least six fields separated by whitespaces. For instance, the CRON expression 0 30 10 ? * MON-FRI indicates that a job will run at 10:30 AM on each day from Monday to Friday.
-
Go to the JOBS tab, and find the job that was used to crawl your data root for the first time.
-
Click the link provided in the PATH column to open the job details screen.
-
Select the Advanced radio button in the SCHEDULE section.
-
Specify a Cron string, and let LuciadFusion Studio validate it. Correct the expression if necessary.
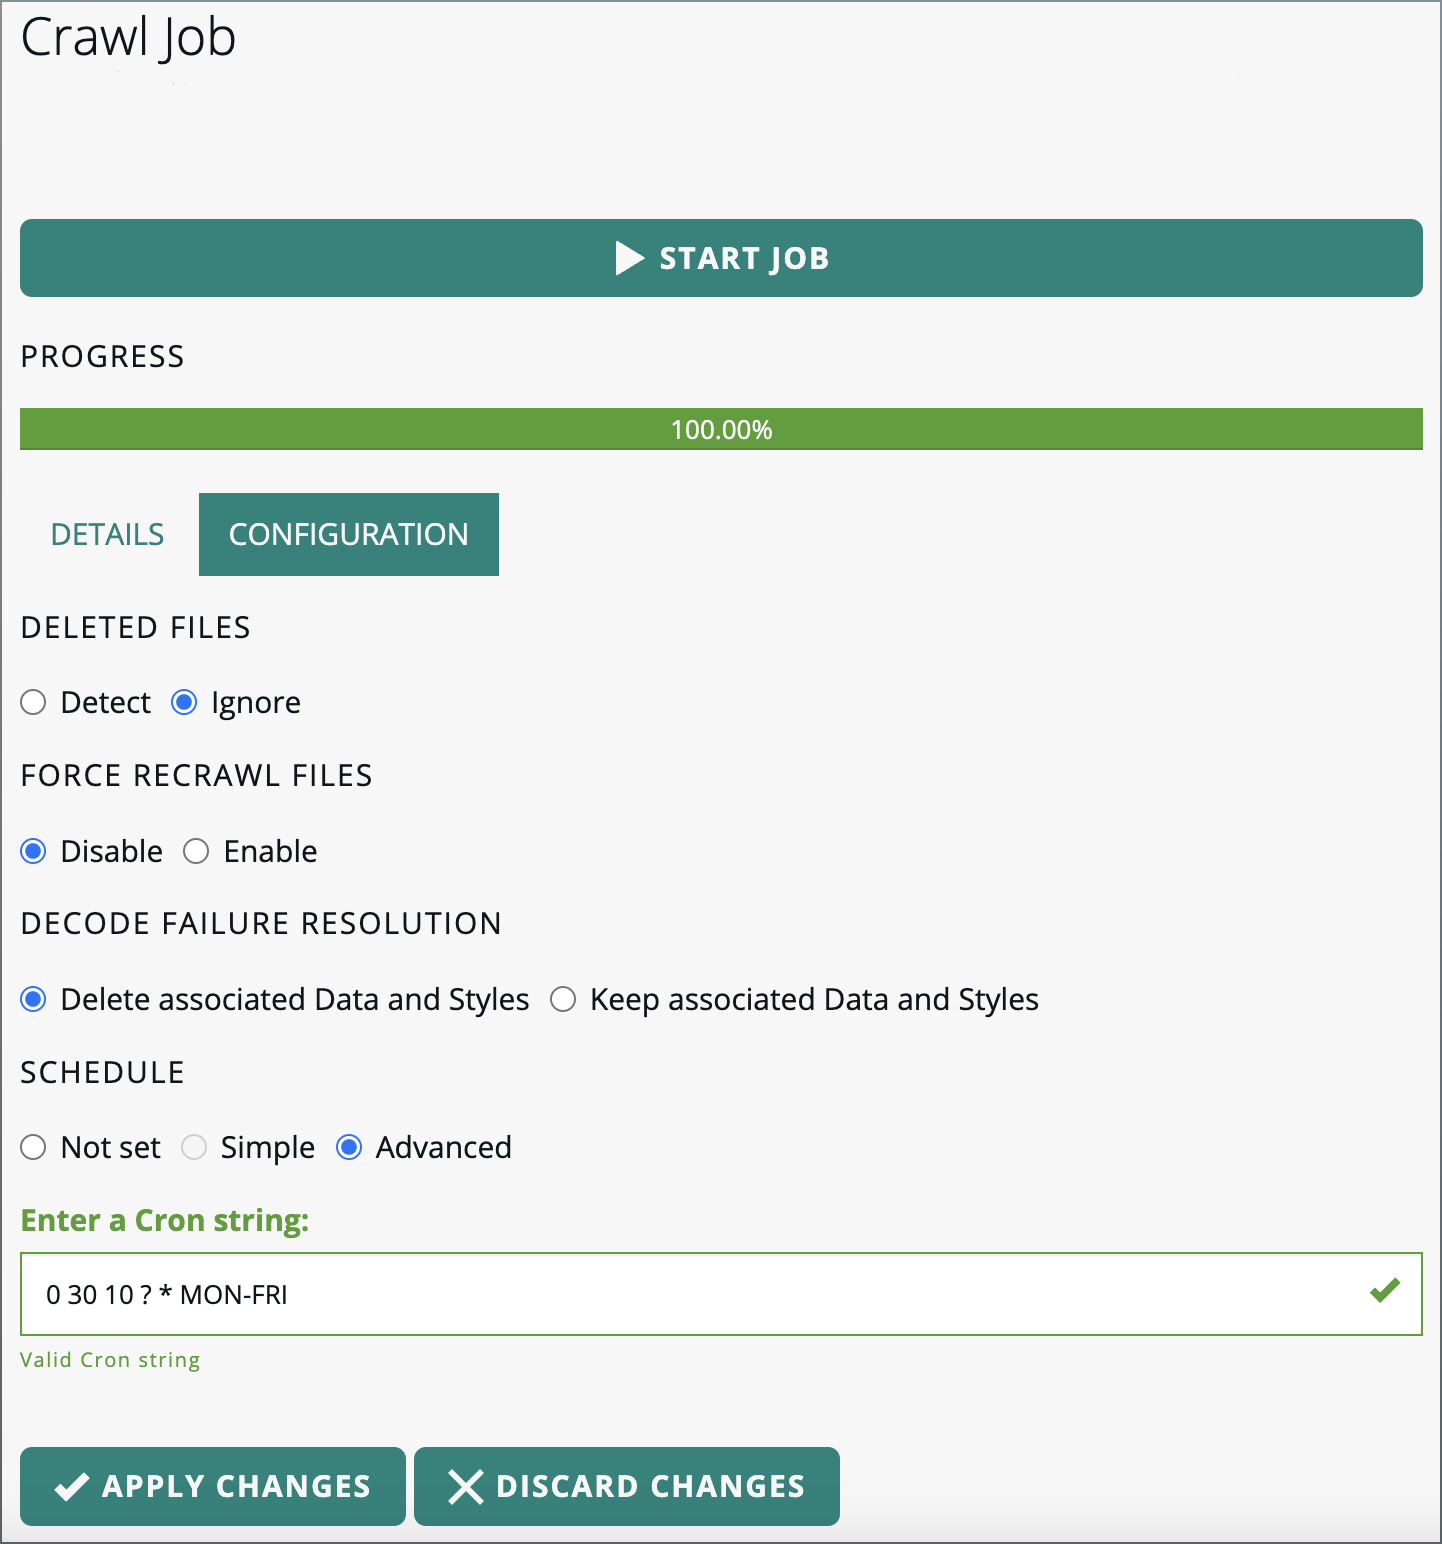 Figure 19. Scheduling a complex automatic crawling job with a Cron expression.
 -
Click APPLY CHANGES.
The data root is now scheduled for regular crawling based on your Cron expression.
Detecting deleted files during crawling
You can configure a crawl job to detect if files were deleted from a data root since the previous run of the crawl job. If you enable this configuration, the crawl job removes the corresponding data from LuciadFusion Studio if it detects deleted files in the data root.
-
Go to the JOBS tab, and find the job that was used to crawl your data root for the first time.
-
Click the link provided in the PATH column to open the job details screen.
-
Click on the CONFIGURATION tab.
-
Select the Detect radio button in the DELETED FILES section.
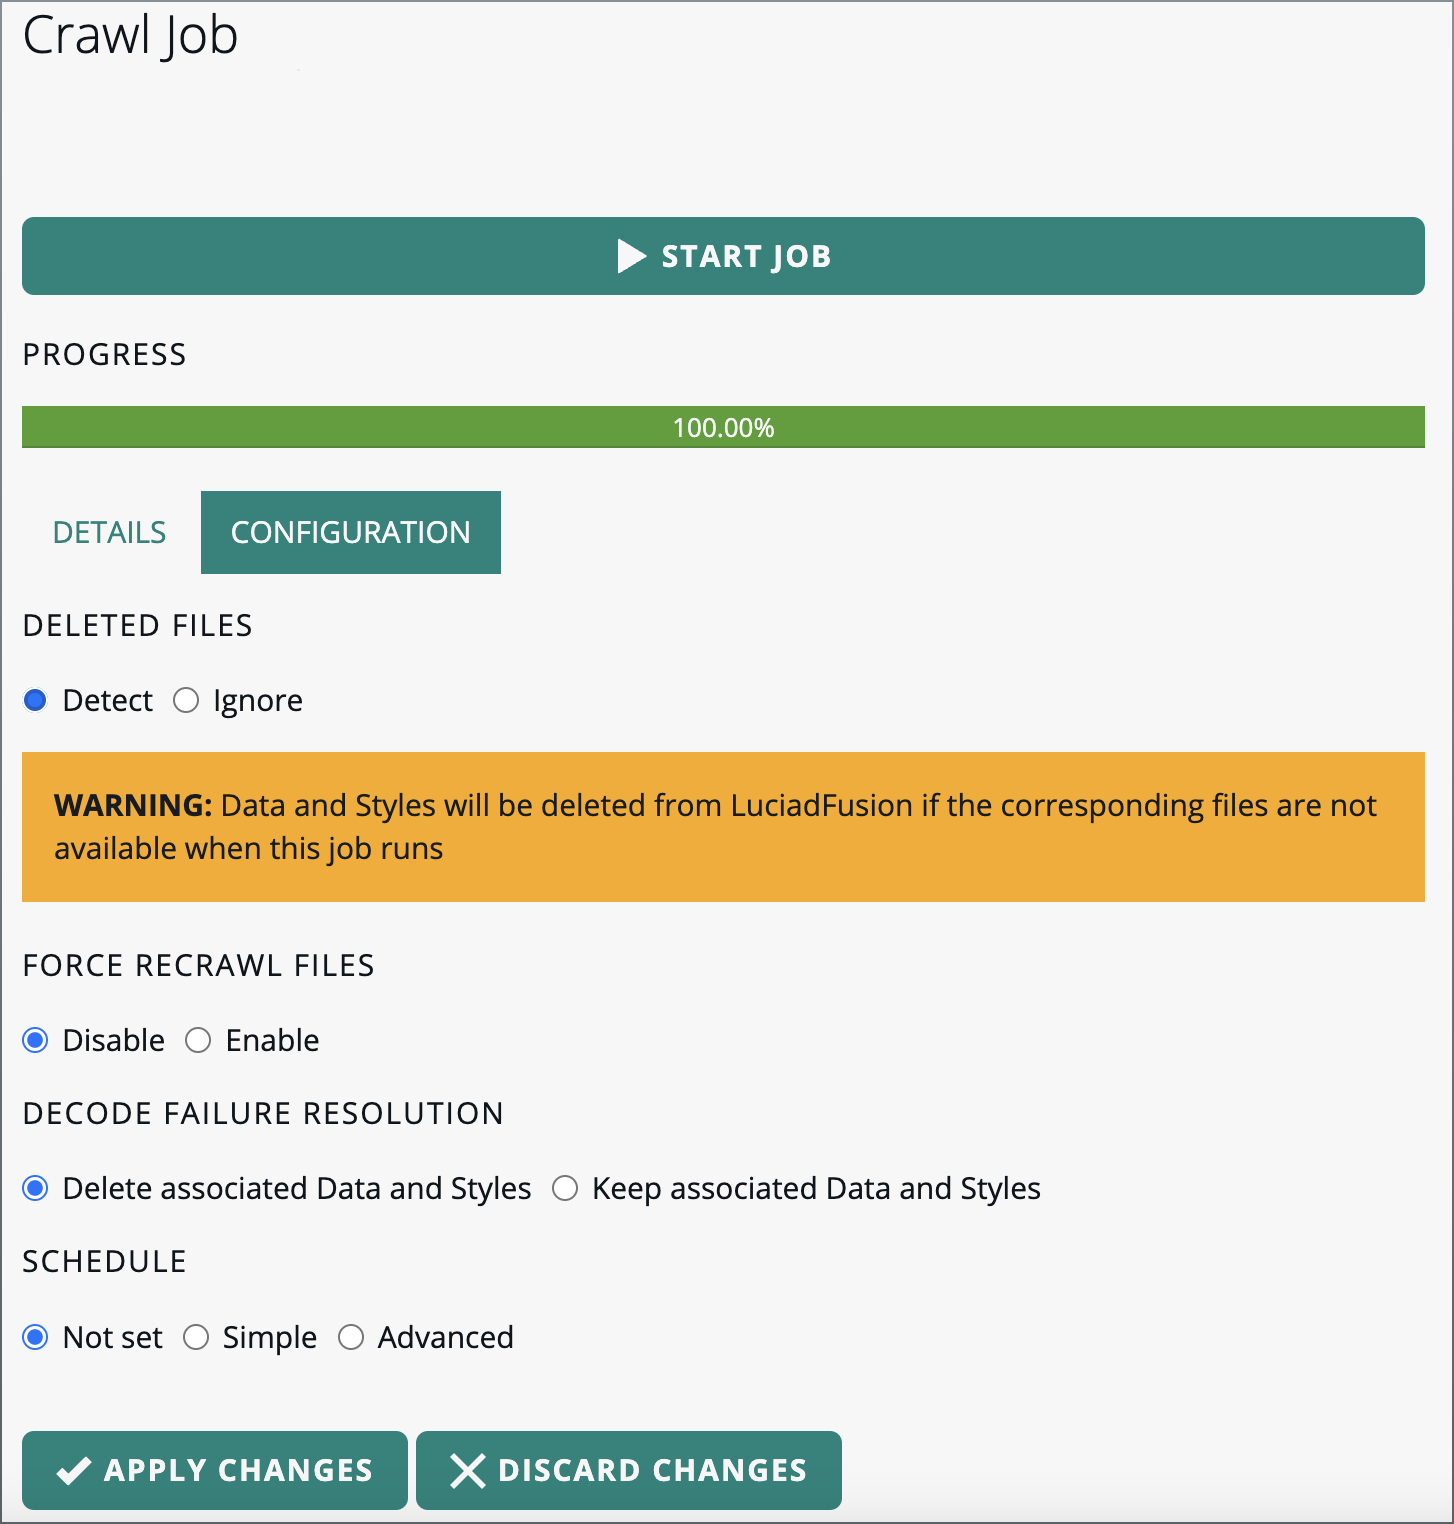 Figure 20. Enabling deleted files detection
 -
Click APPLY CHANGES.
The next time you run the crawl job, it detects deleted files, and removes the corresponding data from LuciadFusion Studio.
If you want to turn this off again, select the Ignore radio button and click APPLY CHANGES.
|
Detecting deleted files removes data from existing products.
If you enable deleted files detection, you remove Data and Styles from LuciadFusion if the corresponding files are unavailable when the crawl job runs. The Data and Styles are also removed from any products they belong to. |
|
LuciadFusion will not remove any data if the data root folder for the crawl job has been deleted. If you want to remove all data in a data root, consider removing the data root instead. See Deleting a data root to learn more. |
Force the re-crawl of all files
You can configure a crawl job to re-crawl all files, even if they were recognized before and the files did not change. If you enable this configuration, the crawl job will crawl all files in the data root. Note that it will take longer to complete the file crawl if the crawl job needs to re-process all files.
-
Go to the JOBS tab and find the job that you want to run again.
-
Click the link provided in the PATH column to open the job details screen.
-
Click on the CONFIGURATION tab.
-
Select the Enable radio button in the FORCE RECRAWL FILES section.
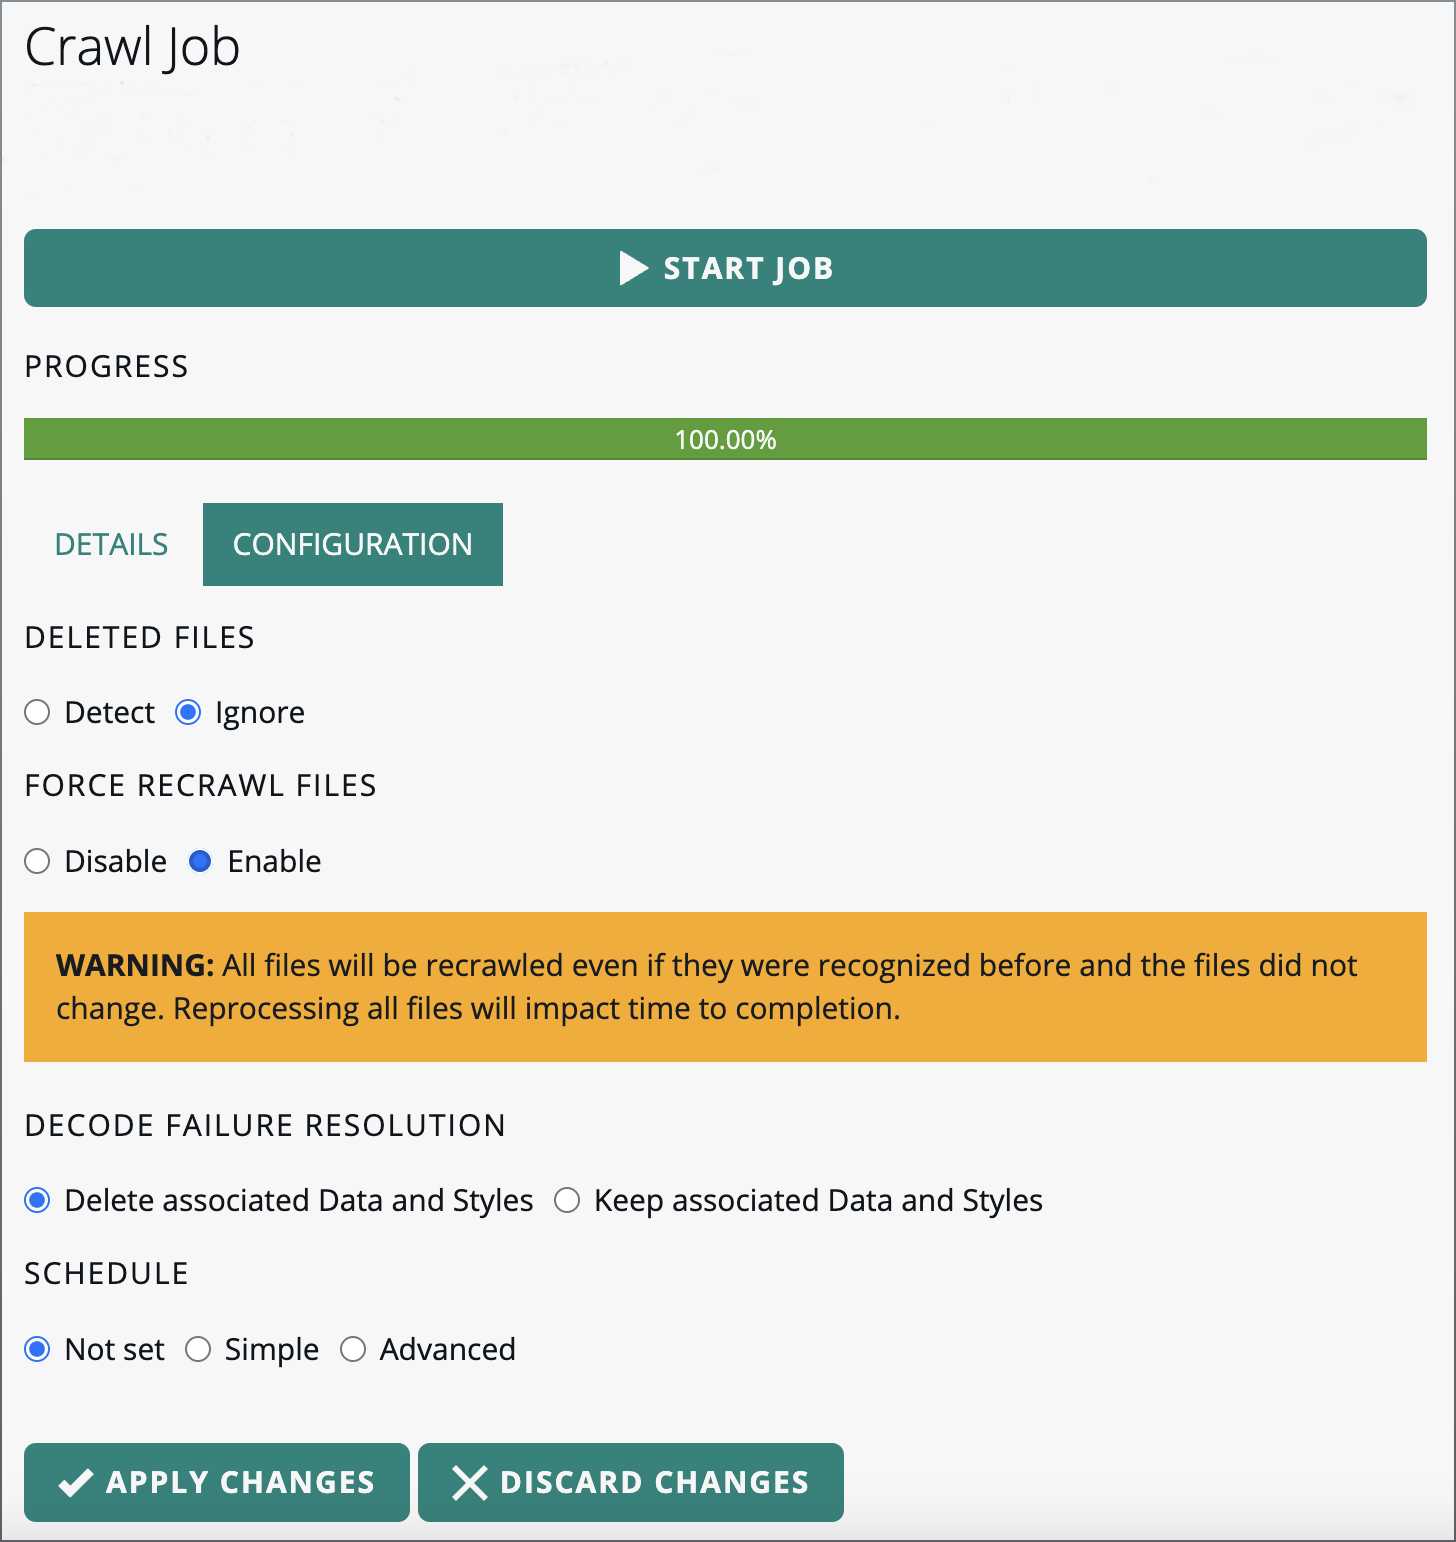 Figure 21. Enabling the force recrawl of files option
 -
Click APPLY CHANGES.
The next time you run the crawl job, it re-crawls all files, even if they were recognized before and the files did not change.
|
Re-processing all files may take a long time, so enable this option only if you notice that some file changes haven’t been picked up. |
Handle decoding failures during a re-crawl
You can configure a crawl job to keep or delete previously crawled data or styles if the files associated with the data or styles have failed to decode during a re-crawl. By default, those data and styles are deleted from LuciadFusion.
Possible causes for a failure to decode are:
-
A data or style file with malformed content.
-
Temporary network issues. These are likely to happen if it takes a long time to decode a large file stored on a network drive.
-
No read permissions for the files that must be decoded.
If you enable the configuration option Keep associated Data and Styles, the crawl job keeps the data and styles associated with files that were inaccessible or corrupt during a re-crawl.
This also means that the associated Products and Services keep those data and styles.
If valid data and styles are accessible again at a later time, users can access and visualize them normally as before when
they request them through an associated OGC service.
To keep data and styles in LuciadFusion after a re-crawl decoding failure:
-
Go to the JOBS tab and find the job that you want to run again.
-
Click the link provided in the PATH column to open the job details screen.
-
Click on the CONFIGURATION tab.
-
Select the Keep associated Data and Styles radio button in the DECODE FAILURE RESOLUTION section.
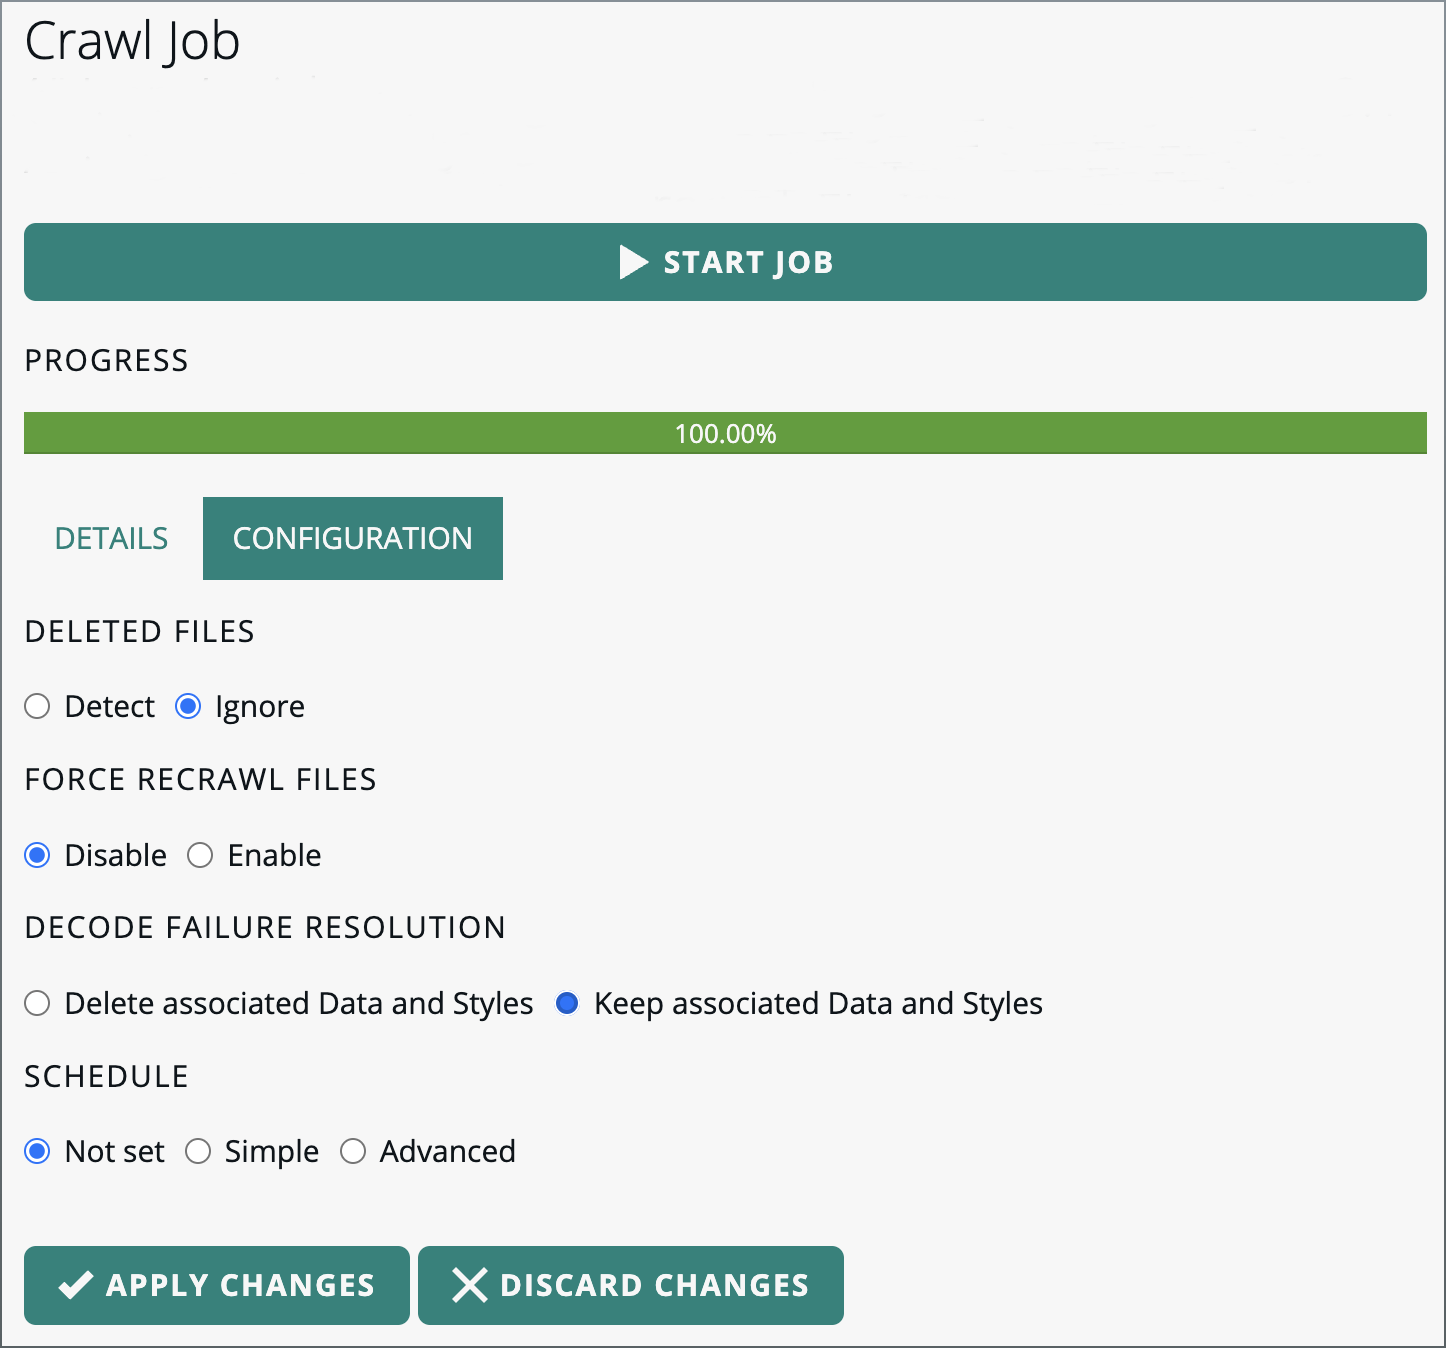 Figure 22. Enabling the Keep associated Data and Styles option
 -
Click APPLY CHANGES.
The next time you run the crawl job, it will retain inaccessible or corrupt data/styles in associatedProductsandServices.
|
The Keep associated Data and Styles option affects re-crawls only. If you select this option for the initial crawl of new data, it has no effect for files that are inaccessible or corrupt. The crawl job doesn’t add such data to LuciadFusion. |
To remove inaccessible or corrupt data and styles from LuciadFusion during a re-crawl, leave the default configuration option
Delete associated Data and Styles enabled. The crawl job then removes the data and styles from LuciadFusion, but not from the file system.
This means that the inaccessible or corrupt data and styles are also removed from associated Products and Services during a re-crawl.
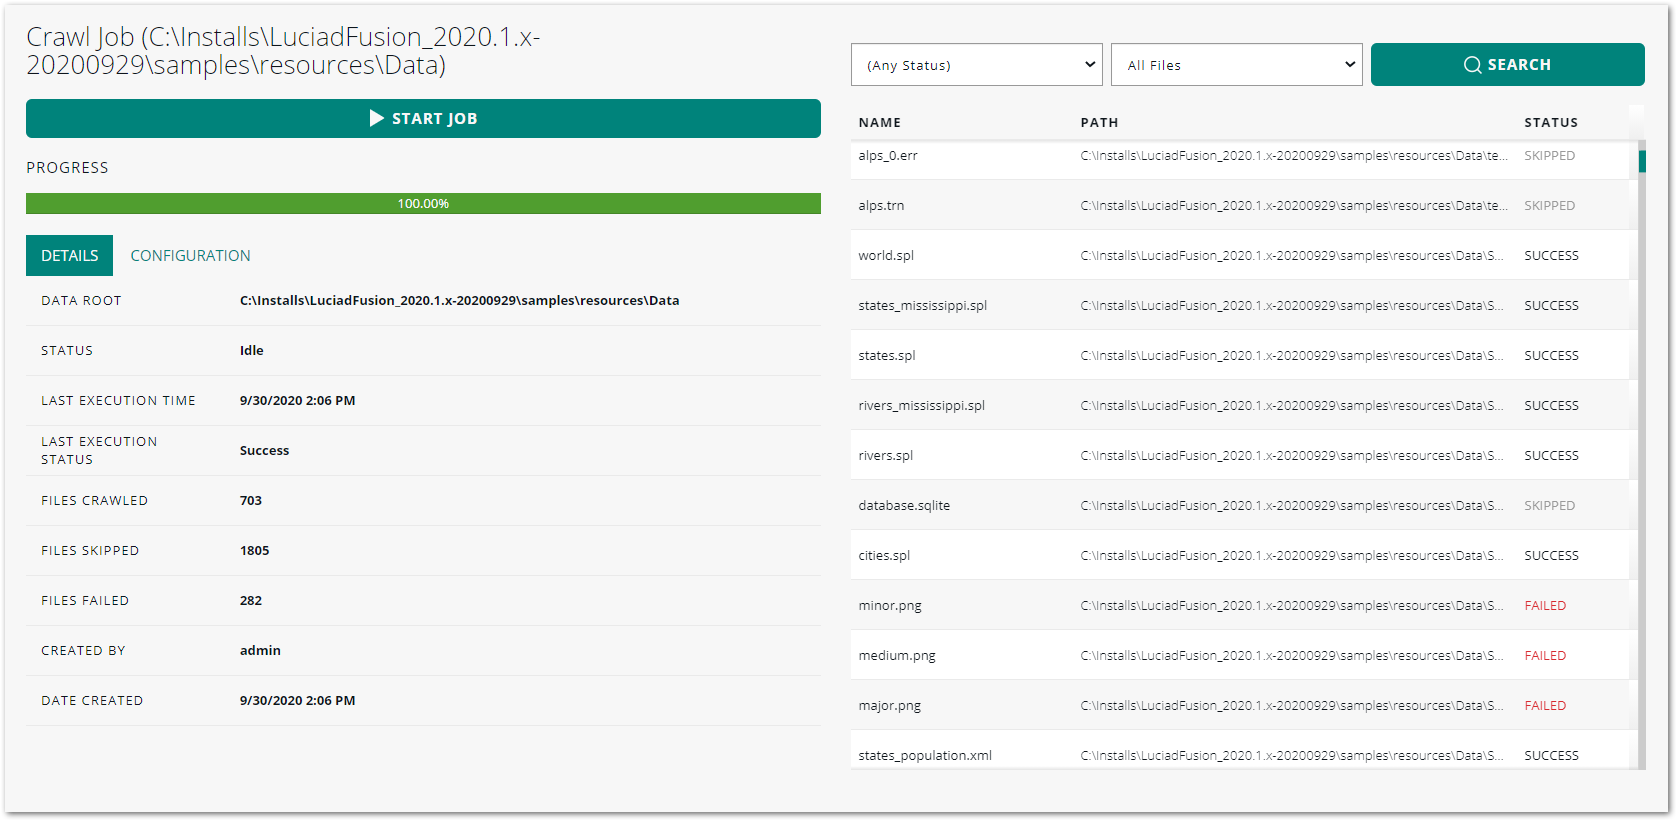
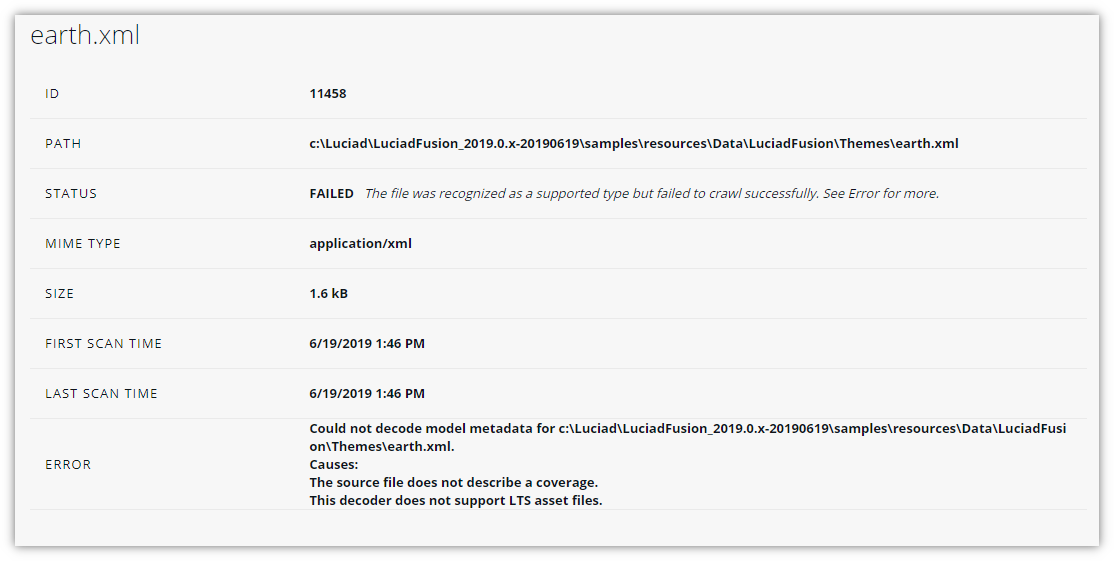
Viewing crawled file details
To view details of how each file was handled during a crawl job, you can consult the details page of the crawl job.
-
Go to the JOBS tab, and find the crawl job.
-
Click the link provided in the PATH column to open the job details screen.
The crawl job DETAILS section shows general file statistics for the job. The file statistics show how many files were crawled successfully, how many were skipped, and how many files failed to process.
The possible status values are:
-
SUCCESS: The file was successfully crawled into LuciadFusion.
-
SKIPPED: The file was not recognized as a supported file type.
-
FAILED: The file was recognized as a supported file type, but LuciadFusion failed to crawl the file successfully. Go to the file detail screen for more information, as explained in Find out more about the file status.
On the right, there is a searchable file list. The file list shows the file name, path, and status. You can filter the list by status by selecting a specific status from the first drop-down menu.
To show only those files added during the last run of the crawl job, select Last Run Only from the second drop-down menu.
Find out more about the file status
To browse to the file detail view for a file, click on the file name or status in the file list.
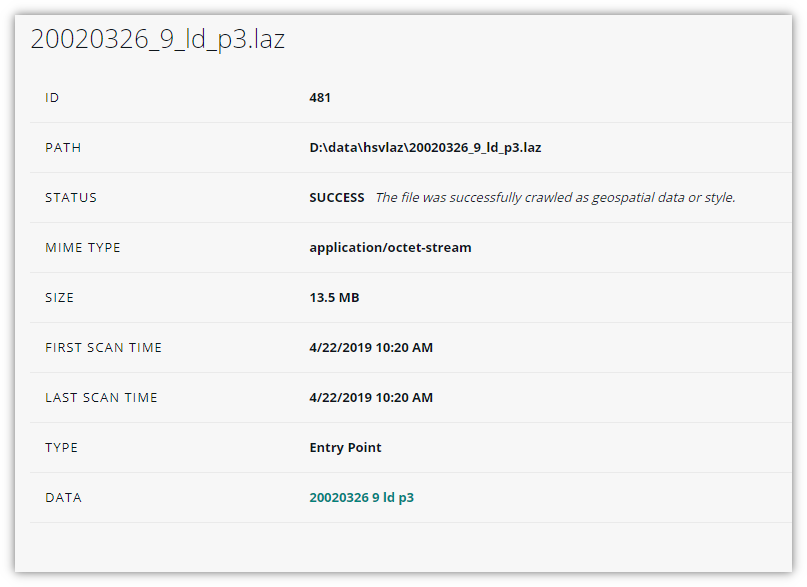
If the file was crawled successfully with a SUCCESS status, the file detail view shows the TYPE and DATA or STYLE fields.
The TYPE field indicates how the file was treated by LuciadFusion:
-
Entry Point: A file of type entry point was recognized as the main file of a data set
-
Support: A support file is related to a data set, but is not the main data set file, for example a PRJ file related to a SHP file
-
ISO 19115 Metadata: An ISO XML metadata file related to a data set
-
Style: An SLD style file
The DATA or STYLE field offers a link to the imported Data or Style item that this file is related to, if there is any.
If the file failed to crawl with a FAILED status, the file detail view contains an ERROR field that shows any error message generated by the decoding process. The error message may help in determining why the data was not crawled.
Monitoring pre-processing jobs
OSGB 3D meshes and LIDAR point clouds are typically served as OGC 3D Tiles, an efficient multi-leveled data structure for those types of files. Similarly, elevation data is served as a more efficient LuciadFusion coverage. Turning mesh and point cloud data into OGC 3D Tiles or elevation data into a coverage may take LuciadFusion Studio a while, depending on the size of the data sets.
To monitor the progress of those kinds of jobs, go to the Preprocessing jobs section in the lower half of the JOBS tab.
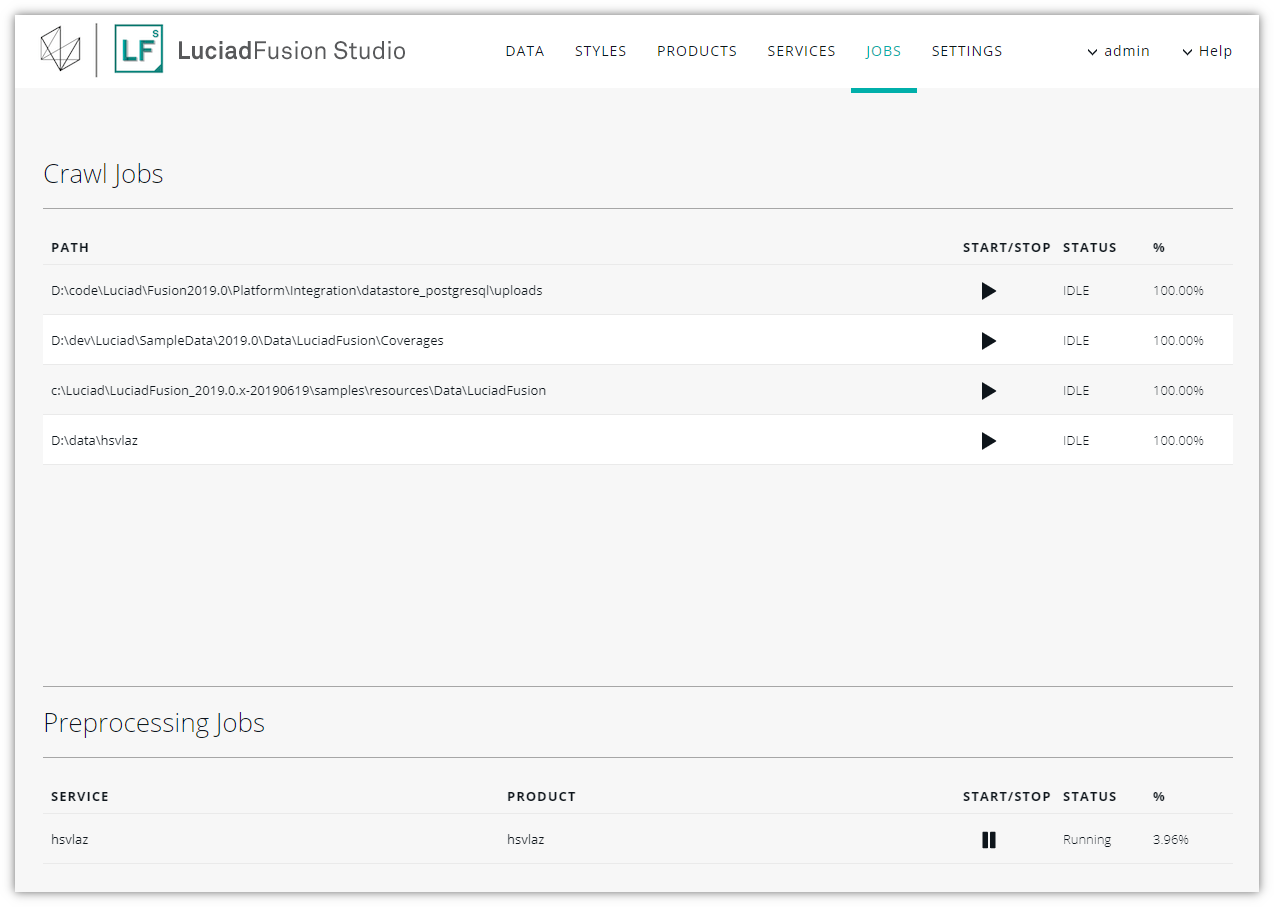
If you want to pause or stop the job, click the Stop/Pause button further on the right.
To see more job details, click the service name in the SERVICE column. You can also re-start and stop the pre-processing job from the job details screen.
Changing the background of the map previews
You can change the background imagery in the map previews displayed on the DATA, STYLES, PRODUCTS, and SERVICES tabs.
-
Go to the SETTINGS tab, and select MAP PREVIEW from the side navigation bar.
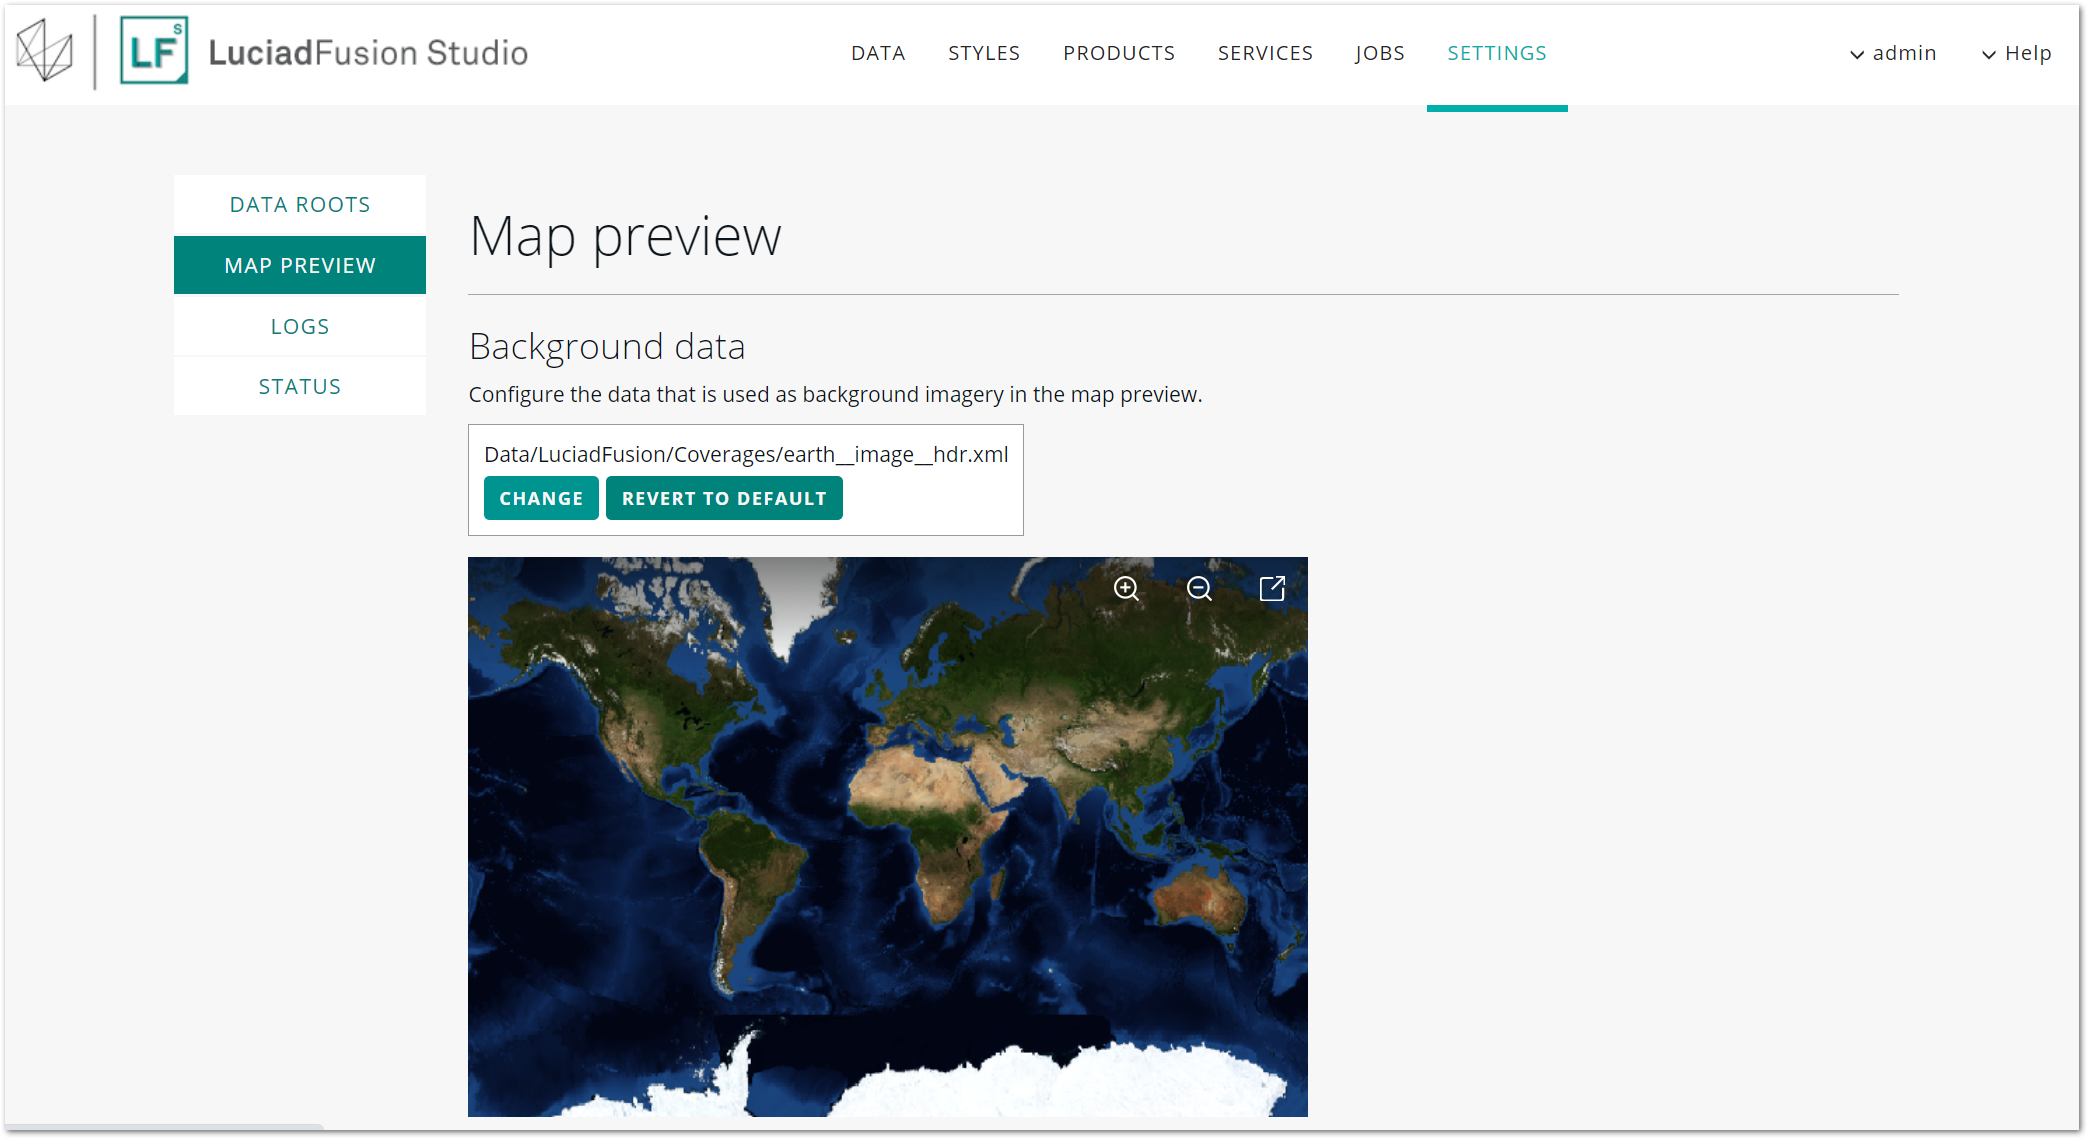 Figure 27. Changing the map preview image.
 -
Click the CHANGE button above the map preview.
-
In the Change background data dialog box, browse for the new background image file, and click CHOOSE FILE.
The map preview now displays the new background image.
To restore the original LuciadFusion Studio background image for the map preview:
-
Click REVERT TO DEFAULT.
-
In the Revert background data dialog box, confirm that you want to restore the original image by clicking REVERT TO DEFAULT.
Checking the logs
You can monitor the log output produced by the LuciadFusion Platform server.
Go to the SETTINGS tab, and select LOGS from the side navigation bar.
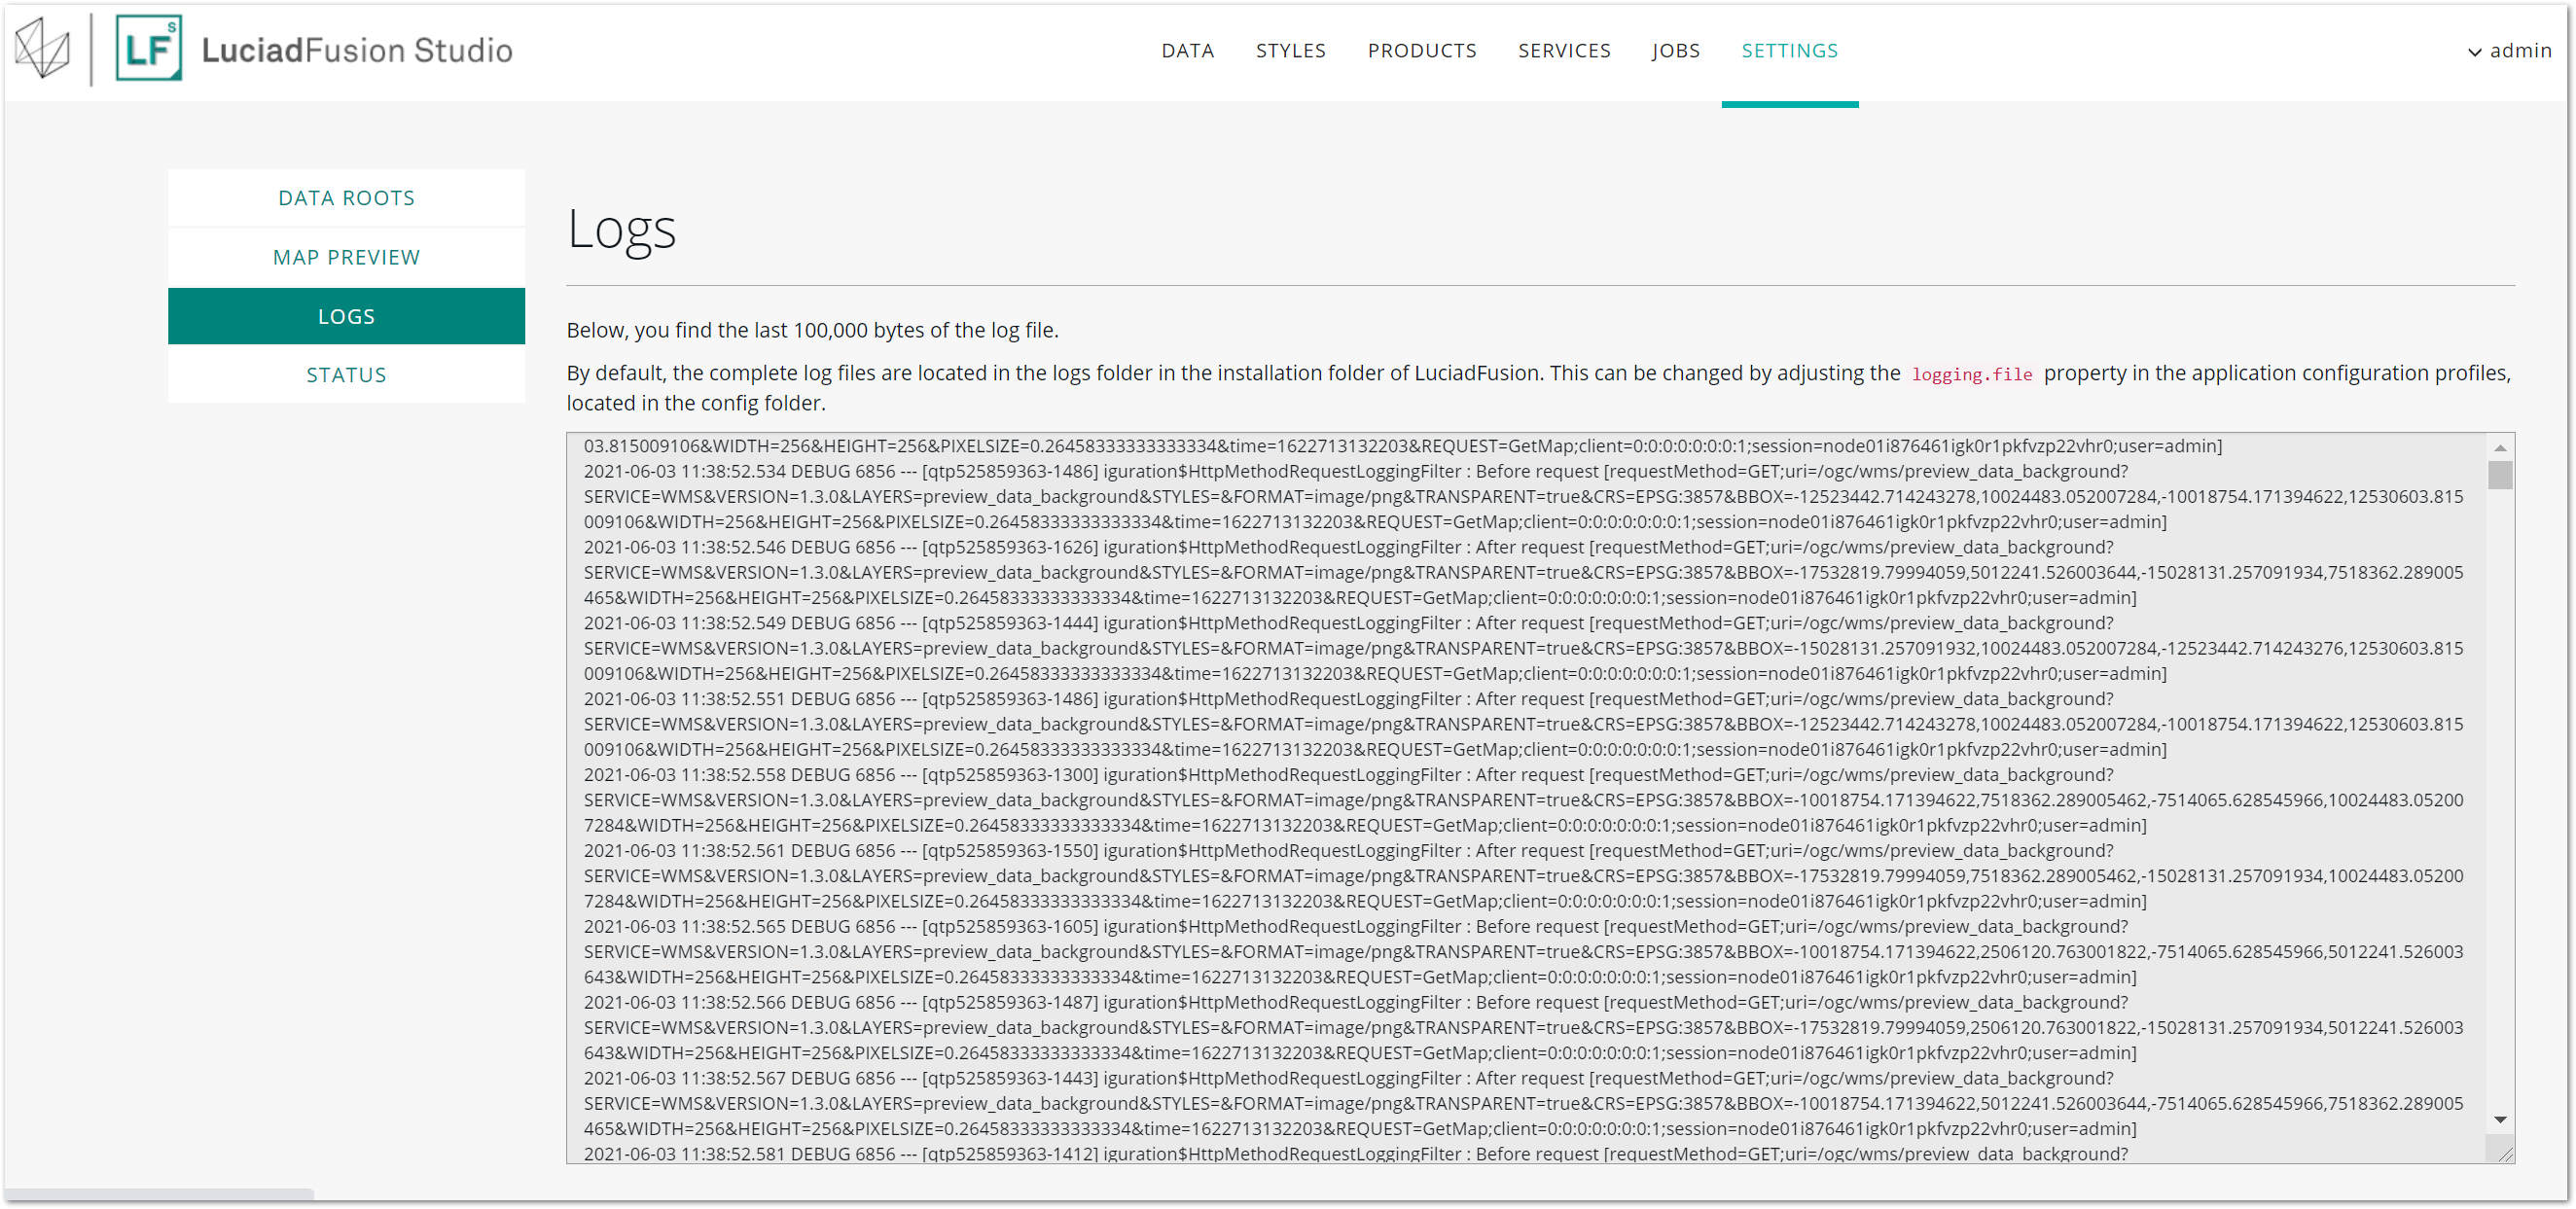
The LOGS section allows you to scroll through the most recent LuciadFusion server logs stored in the server log file. For the full
server log, go to the logs/fusion.log file in your LuciadFusion installation folder.
Monitoring memory usage
The LuciadFusion Studio allows you to monitor how much main memory, heap and non-heap memory is consumed by the LuciadFusion server.
To check memory usage, go to the SETTINGS tab, and select STATUS from the side navigation bar.
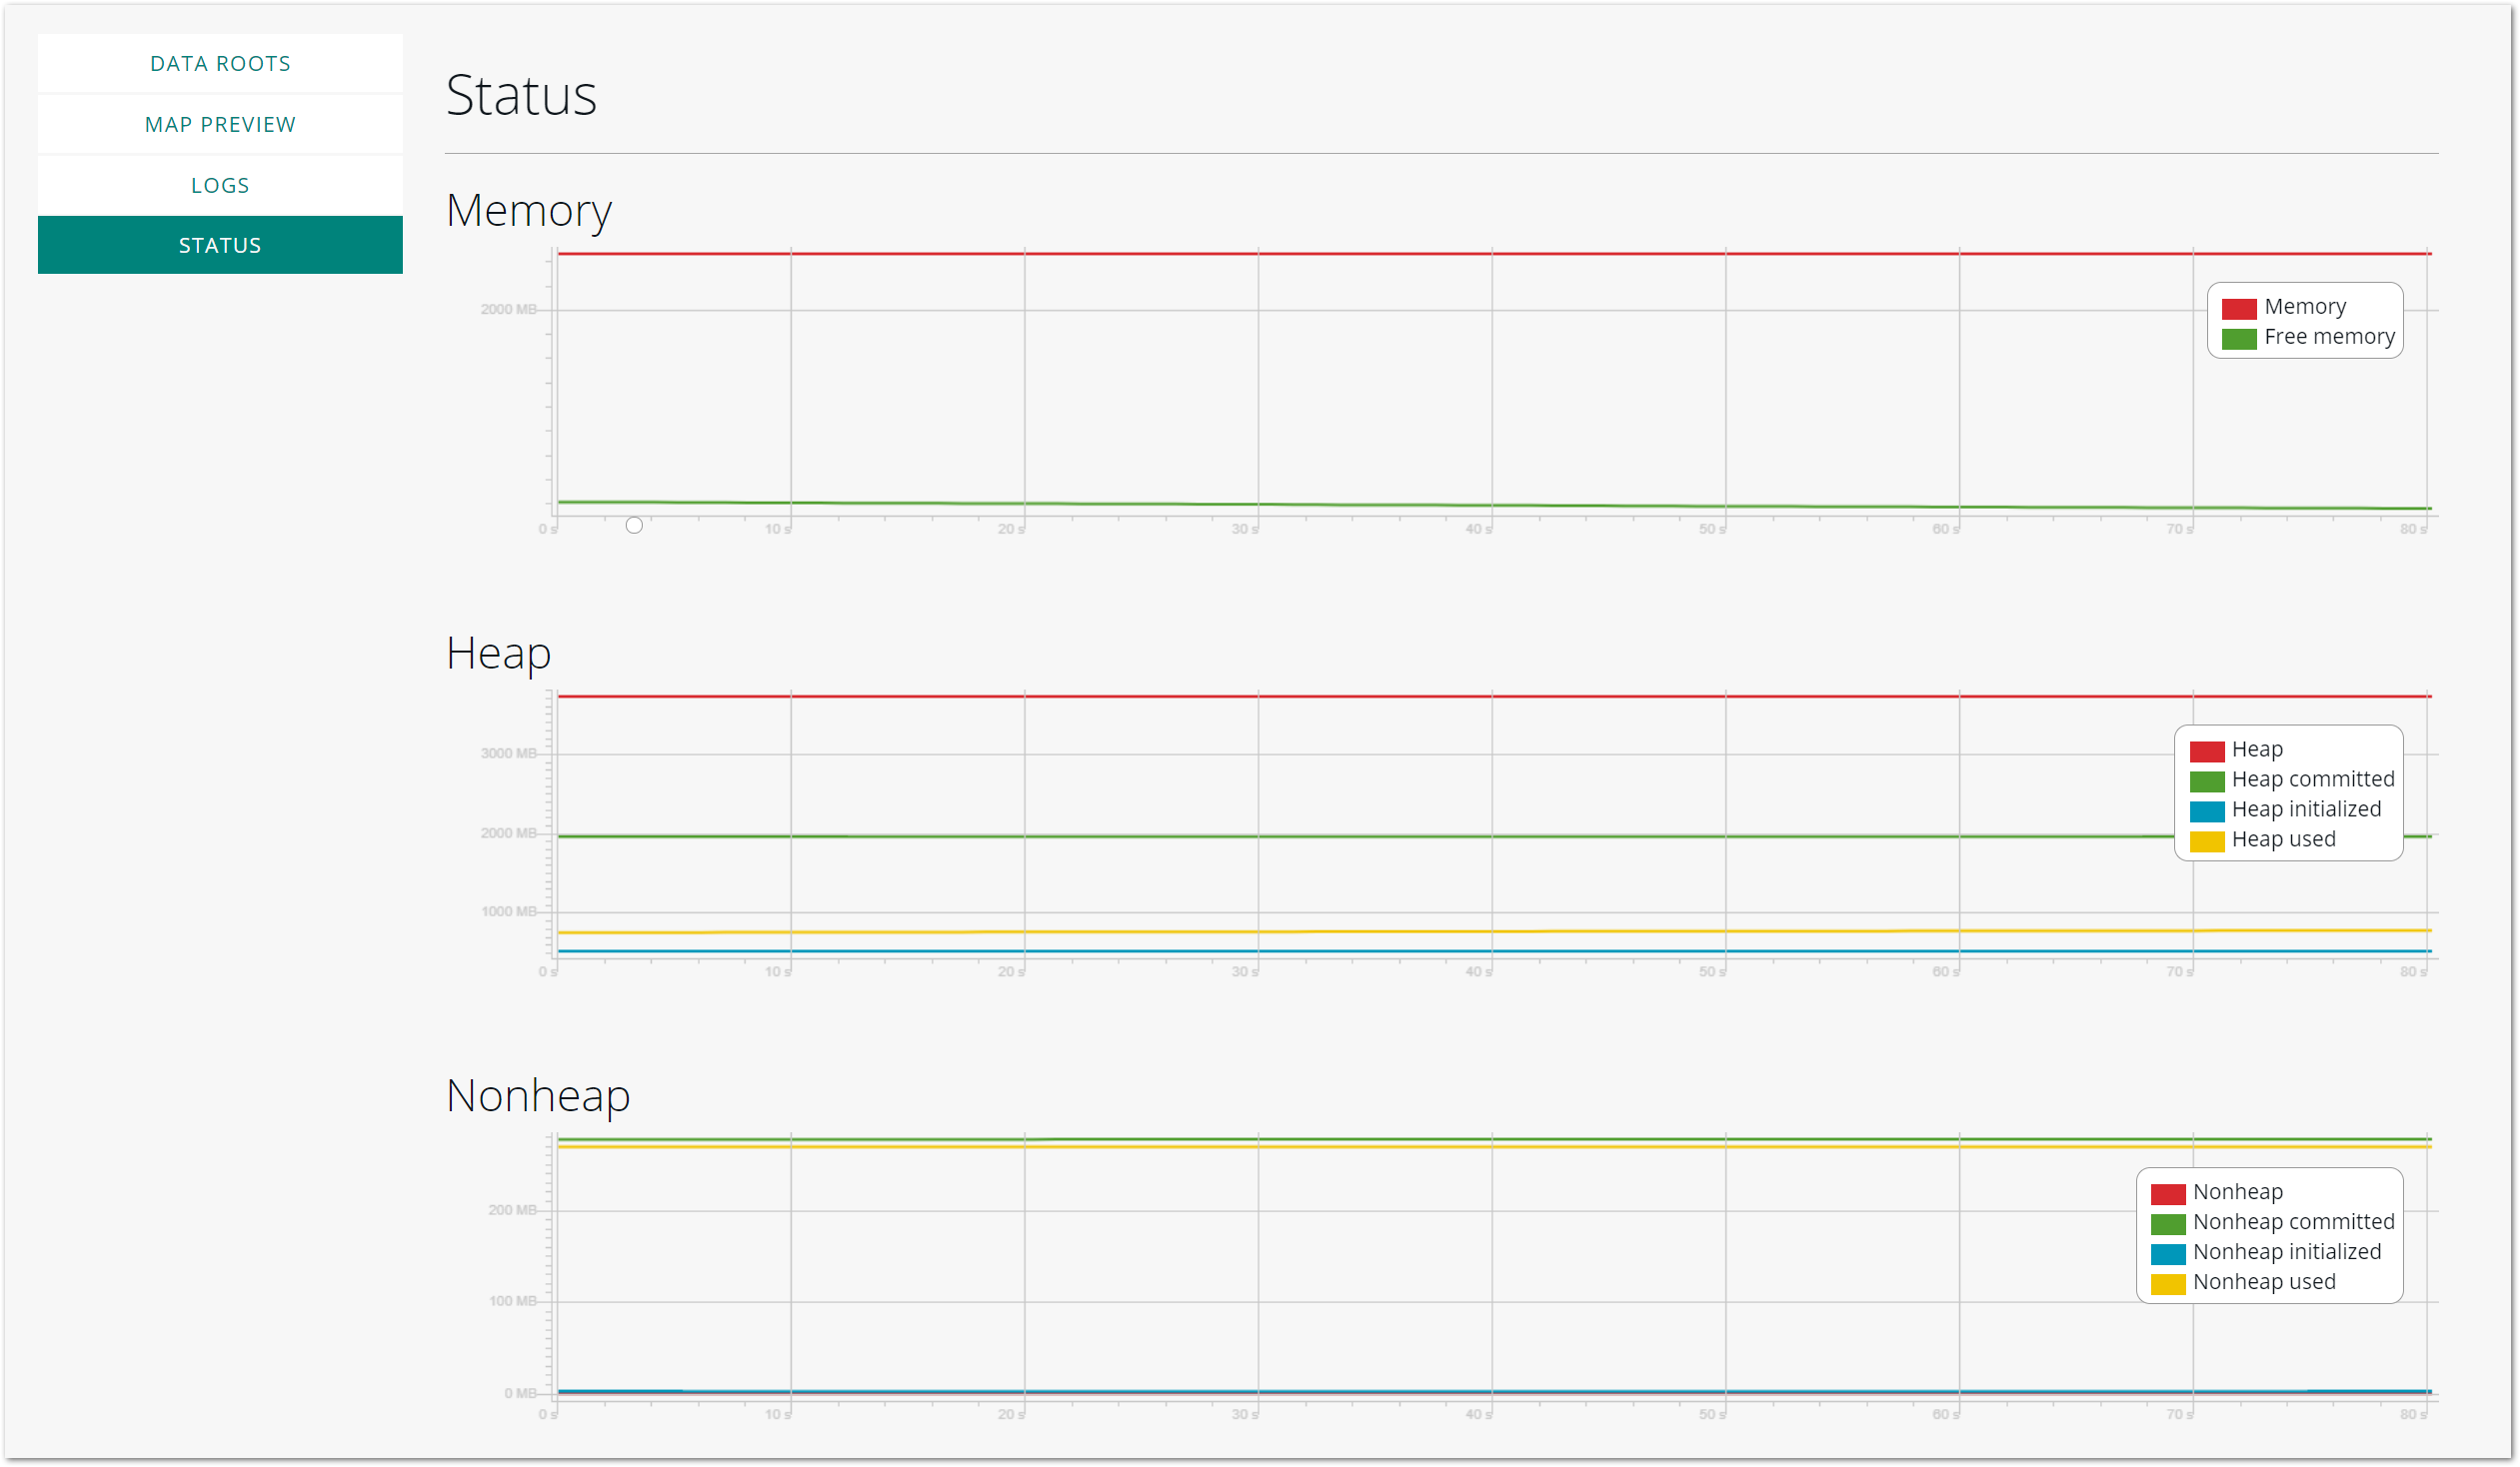
The Memory graph allows you to monitor how much how much server memory there is, and how much of it is still available.
The Heap graph displays the total size of the heap, which is memory used for the storage of Java objects. The graph lines show how much of the heap memory is committed, initialized and used by the JVM.
The Nonheap graph displays the total size of non-heap memory, which is memory used for other purposes than object storage. The graph lines show how much non-heap memory is committed, initialized and used by the JVM.
Appendix A: Serving point clouds
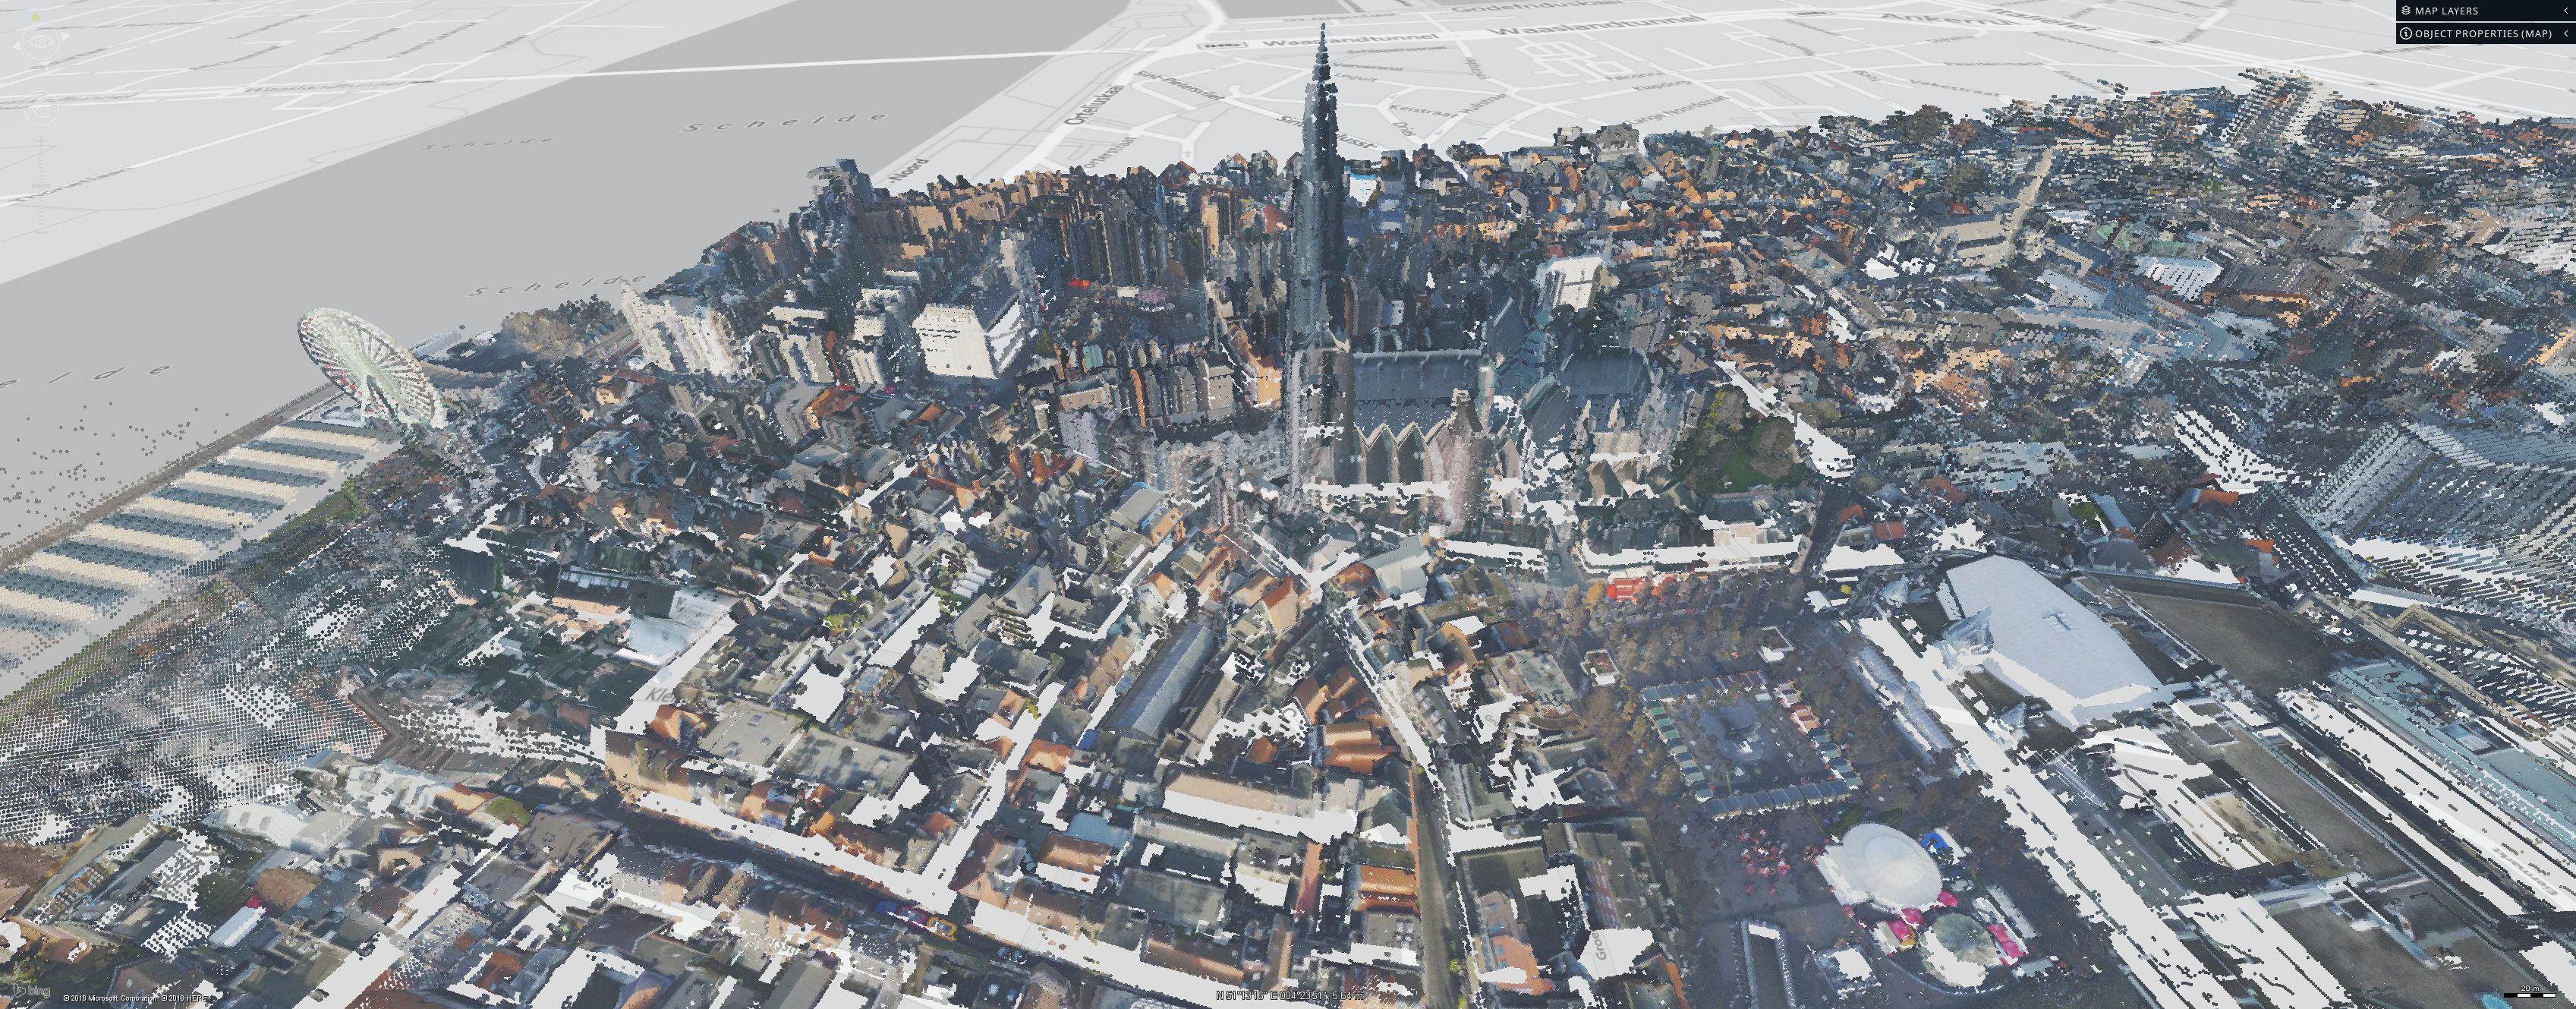
This scenario demonstrates how you can crawl a collection of point clouds, and serve it to clients as OGC 3D Tiles in an OGC 3D Tiles service.
OGC 3D Tiles is the optimal format for the distribution and visualization of big 3D mesh and point cloud data sets because they tile and multi-level the data.The tiling and multi-leveling process makes the data more usable in visualization clients, because the client can select a suitable level-of-detail in the data, and reduce the amount of data that needs to be loaded. Web services can also cache the tiles for fast retrieval.
In this scenario, you will use point cloud data or mesh data which you have locally stored in a folder. We are going to set up that folder as a data root for LuciadFusion Studio, which can serve the points as OGC 3D Tiles to clients such as applications based on LuciadLightspeed and LuciadRIA.
Add georeference information
To prepare the point cloud data for visualization by LuciadFusion Studio, and later on by visualization clients, you need to make sure that georeference information is available for the data. If LuciadFusion can’t detect georeference information, it won’t make the data available in Studio for serving.
|
Adding georeference information
Georeference information is usually provided in a |
Setting up the data root
Once georeference information is available for all the LAZ data in the folder, go to SETTINGS > DATA ROOTS > ADD DATA ROOT, and select the folder with the LAZ files and the georeference files.
LuciadFusion starts the crawling process, and adds all the LAZ files to the DATA tab.
You can set up LuciadFusion so that it regularly re-crawls the data root folder for new data, and adds that data to LuciadFusion Studio. For more information, see Scheduling and monitoring automatic crawling.
|
Data visible as a red hatched shape in the Studio map preview
The map preview in LuciadFusion only shows a red hatched rectangle at the location of the data set. A client with full 3D visualization capabilities is required to show the point cloud data. |
Setting up an OGC3DTiles service for point cloud data
We want to publish our point cloud data as an OGC 3D Tiles service. This is the designated service type for point cloud data and 3D mesh data. It preserves all point property information for full styling and filtering flexibility at the client side. Therefore, there is no need to combine the point cloud data with other, less suitable data types, nor do we need to add styling information at the product level. We can go straight to the creation of the service, and add all the LAZ files at once. LuciadFusion will create a product containing all the data in the background.
-
Select all the LAZ files of your data set by holding SHIFT and clicking each LAZ file on the DATA screen.
-
Click CREATE SERVICE.
-
Enter a service title and name in the Create service dialog, and select the OGC3DTILES service type.
-
Indicate which Point cloud Compression algorithm you want to apply: None or Draco.
-
Leave the Start service? check box selected, and click CREATE SERVICE.
At this point, LuciadFusion Studio starts tiling and multi-leveling the point cloud data. While it is taking care of this pre-processing job, your new service will have the PENDING status.
Setting up an OGC3DTiles service for mesh data
OGC 3D Tiles is also the designated service type for 3D mesh data. In this scenario, we set up a service for Binz mesh data.
-
Select the Binz file that you want to serve.
-
Click CREATE SERVICE.
-
Enter a service title and name in the Create service dialog, and select the OGC3DTILES service type.
-
Indicate which Mesh Compression algorithm you want to apply: None or Draco.
-
Leave the Start service? check box selected, and click CREATE SERVICE.
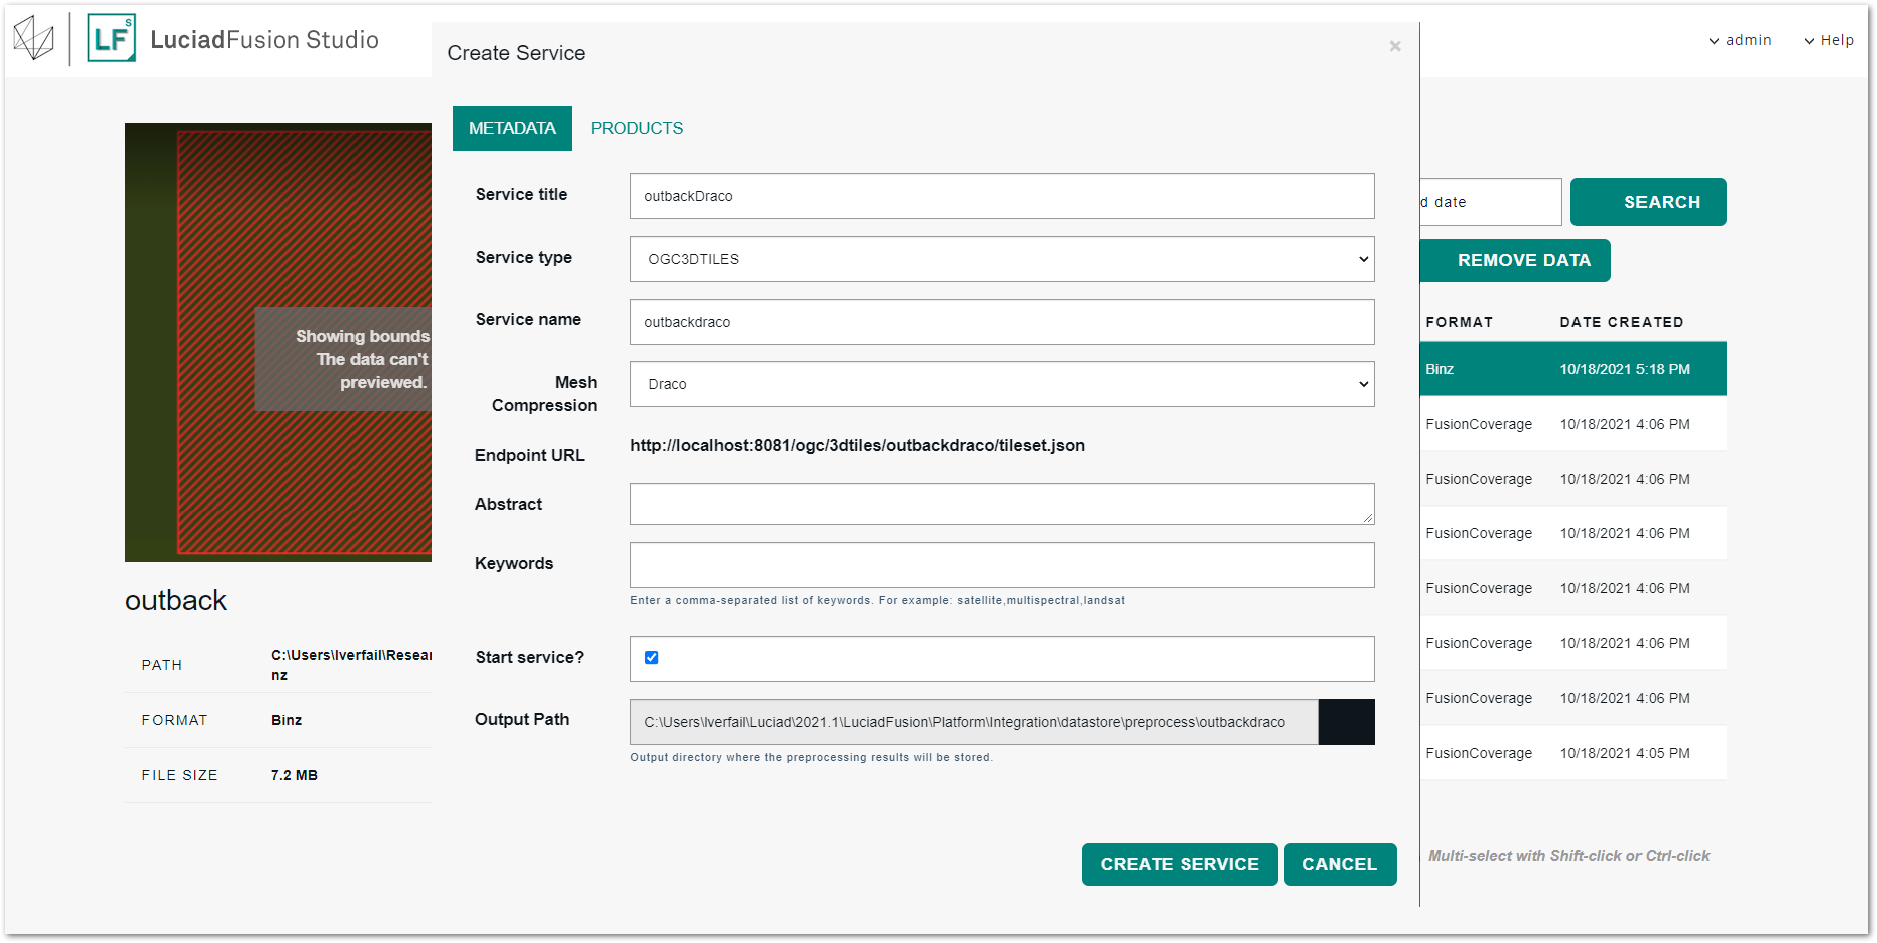
At this point, LuciadFusion Studio starts tiling and multi-leveling the Binz data. While it is taking care of this pre-processing job, your new service will have the PENDING status.
Follow up on your pre-processing job
The pre-processing may take a while if you loaded a large data set. To track the status of the pre-processing job, you can go to the JOBS screen. It shows the running pre-processing job in the lower half of the screen. You can click the job entry for more details.
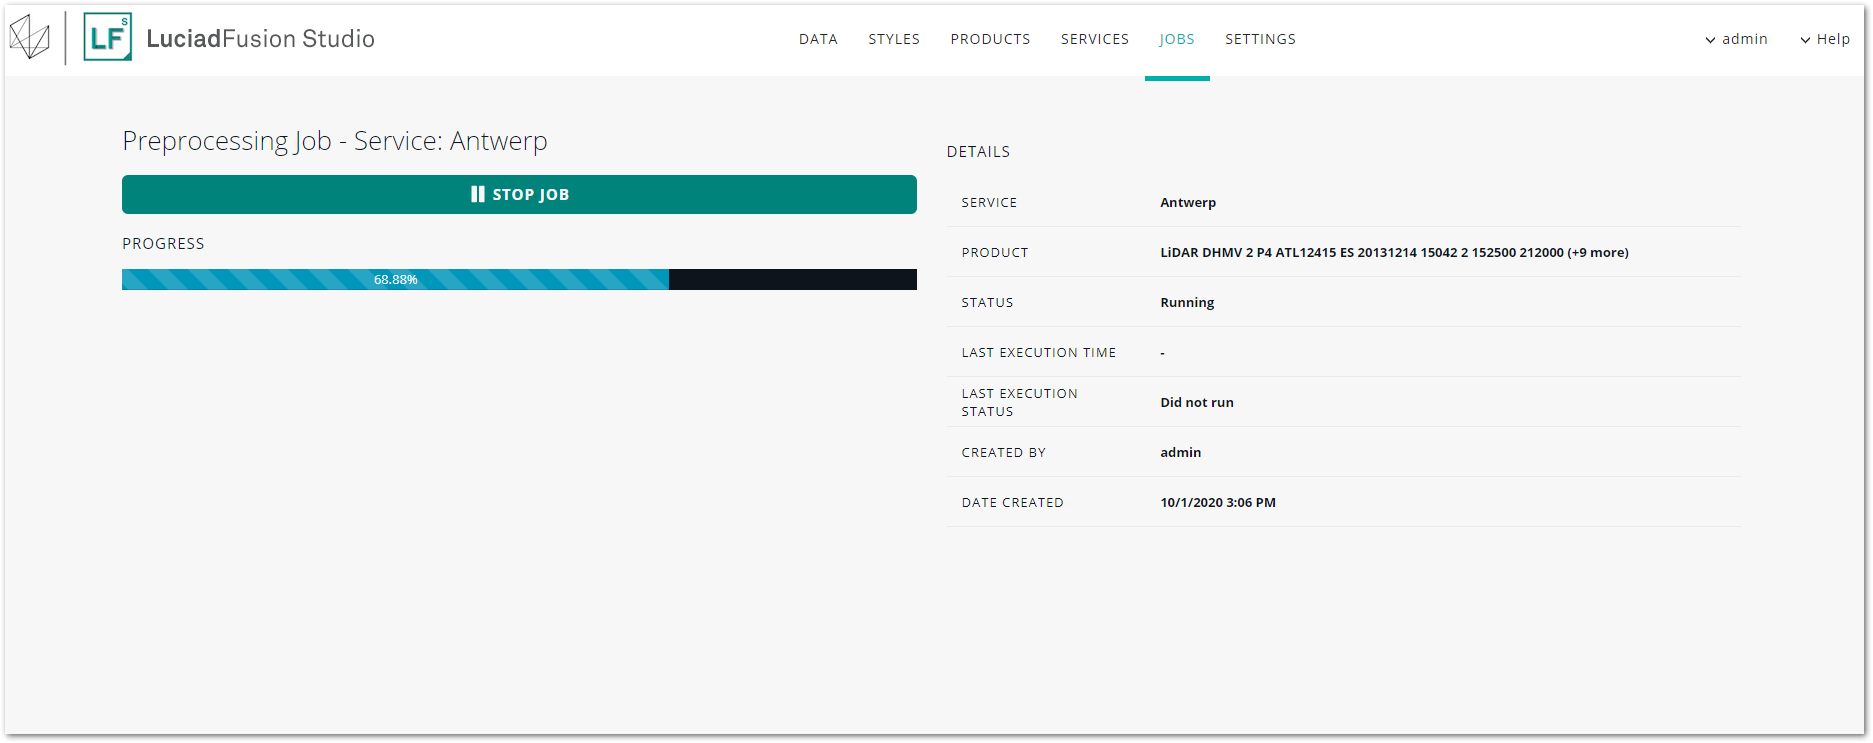
As soon as the pre-processing job is done, the OGC3DTiles service status switches from PENDING to RUNNING.
Connecting to the OGC3DTiles service from a client
You are now ready to use the data in client applications, such as LuciadLightspeed and LuciadRIA applications.
To connect to an OGC3D Tiles service and visualize the data, you need to know the endpoint URL of the service.
To find out what the endpoint URL is, go to SERVICES and click the title of the OGC 3D Tiles service in the list to open the details screen. Find the ENDPOINT URL entry.

You can copy that URL to the data loading code for your application, or fill it in the Connect to dialog in Lucy, for instance.
Appendix B: Serving elevation data to LuciadRIA
This scenario demonstrates how you can crawl a collection of elevation data and serve it to a LuciadRIA application in an LTS service.
A Luciad Tile Service (LTS) allows you to efficiently serve elevation data, because it offers that data in a hierarchical tile structure, called a coverage. Because an LTS service serves only LuciadFusion coverages, though, you must pre-process the elevation data ninto such a coverage first.
In the scenario, we use a folder with DHM files as an example for the elevation data, but it also applies if you have elevation data in a format such as DTED, ETOPO, and DEM. We are going to set up the folder containing elevation files as a data root for LuciadFusion Studio, create a product with the data, create an LTS service containing the product, and serve it after it has been pre-processed.
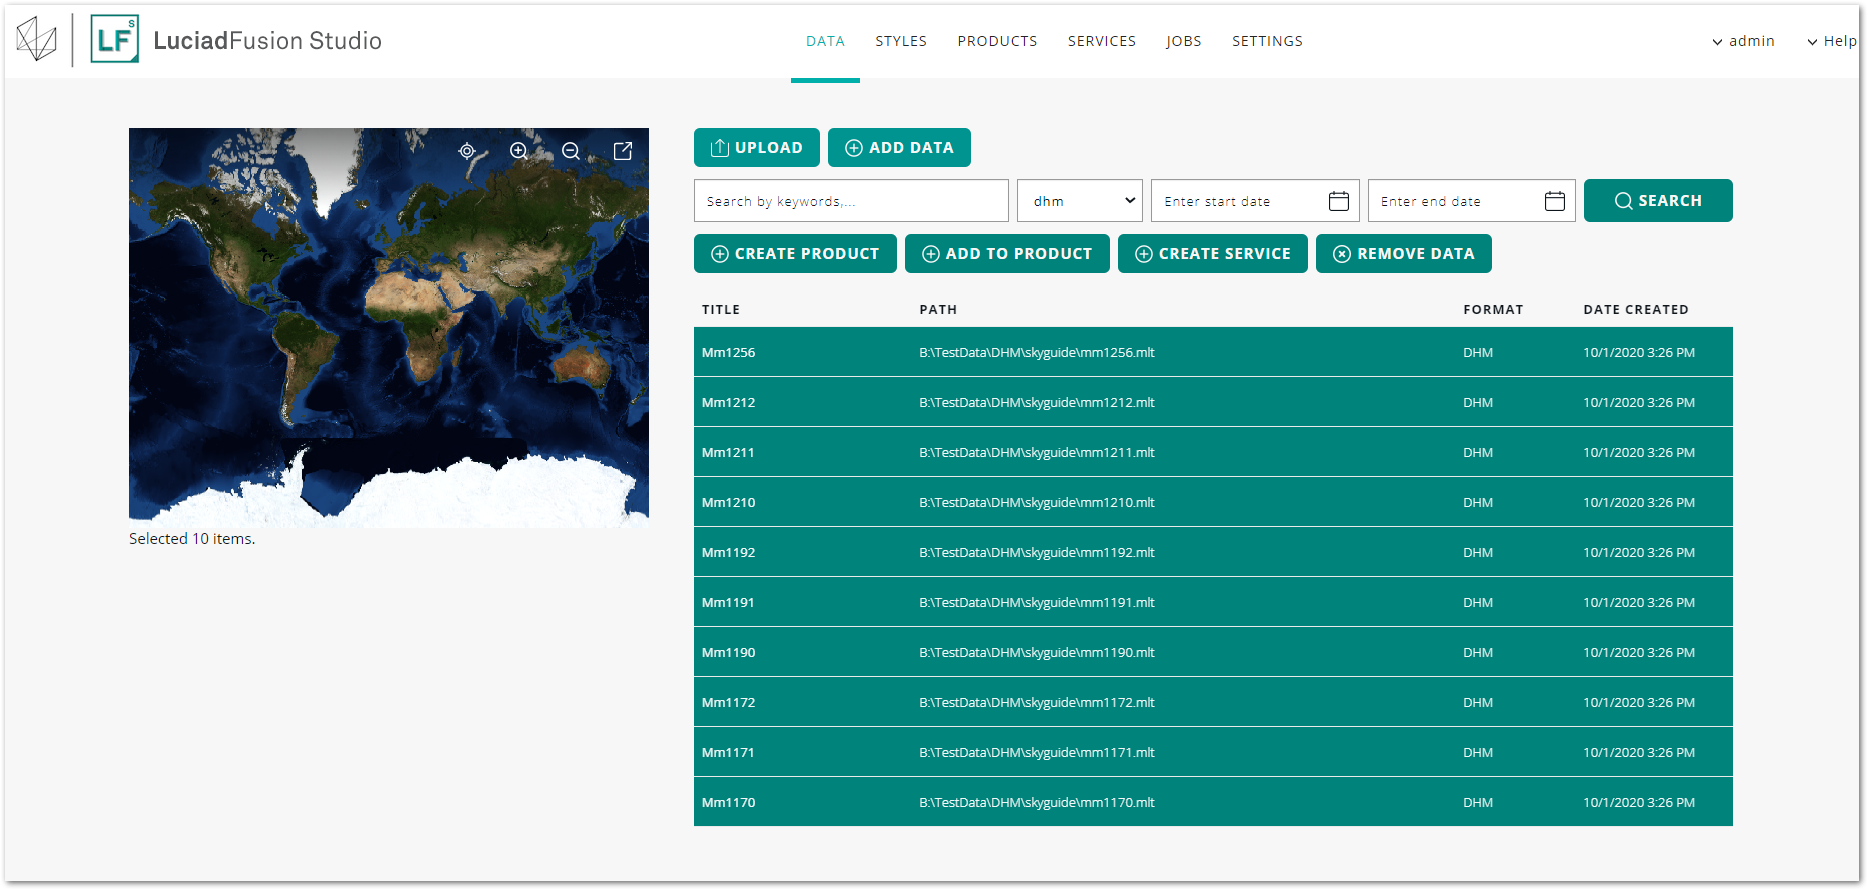
Setting up the data root
To set up the data root, go to SETTINGS > DATA ROOTS > ADD DATA ROOT, and select the folder with the DHM files.
LuciadFusion starts the crawling process, and adds all the DHM files to the DATA tab.
Creating the product
An LTS service offers one coverage for each product it contains, so we need to create a product with the DHM elevation files first. Combining multiple individual elevation data files in a single product allows you to serve this data as a single coverage through an LTS service. If you want to offer multiple coverages, you should create a product for each coverage you want to offer.
|
If you already created a LuciadFusion coverage of your data with the Data Connectivity Manager (DCM) and added that coverage to LuciadFusion Studio, you must only create a product containing that coverage. Products containing a LuciadFusion coverage do not require any pre-processing. Keep in mind that you can only create a product containing exactly one LuciadFusion coverage if you plan to serve it in an LTS service. |
To create the product:
-
Select all the DHM files of your data set by holding SHIFT and clicking each DHM file on the DATA screen.
-
Click CREATE PRODUCT.
-
Give a meaningful name and title to the product. The product name will also be used as the name for the coverage when it is added to an LTS service.
-
Click CREATE PRODUCT.
The product has been created.
You can now create an LTS service with the product to start serving the elevation data in the product.
Setting up an LTS service
As mentioned earlier, an LTS service serves a coverage for each product that it contains. A product in an LTS service must contain either a single LuciadFusion coverage, or one or more elevation data files. A product containing a LuciadFusion coverage can be served directly in an LTS service. On the other hand, products containing elevation data are automatically pre-processed into a LuciadFusion coverage when you use them to create an LTS service, or when you add them to an LTS service. This is the case for the product with DHM data.
To create an LTS service for the product with DHM data:
-
Go to the products page by clicking on the PRODUCTS tab.
-
Select the product with DHM data.

-
Click CREATE SERVICE.
-
Enter a service title and name in the Create service dialog, and select the LTS service type.

-
Leave the Start service? check box selected, and click CREATE SERVICE.
At this point, LuciadFusion Studio starts generating a Fusion coverage. While it is taking care of this pre-processing job, your new service will have the PENDING status.
The pre-processing may take a while if you loaded a large elevation data set. To track the status of the pre-processing job, you can go to the JOBS screen. It shows the running pre-processing job in the lower half of the screen. You can click the job entry for more details.
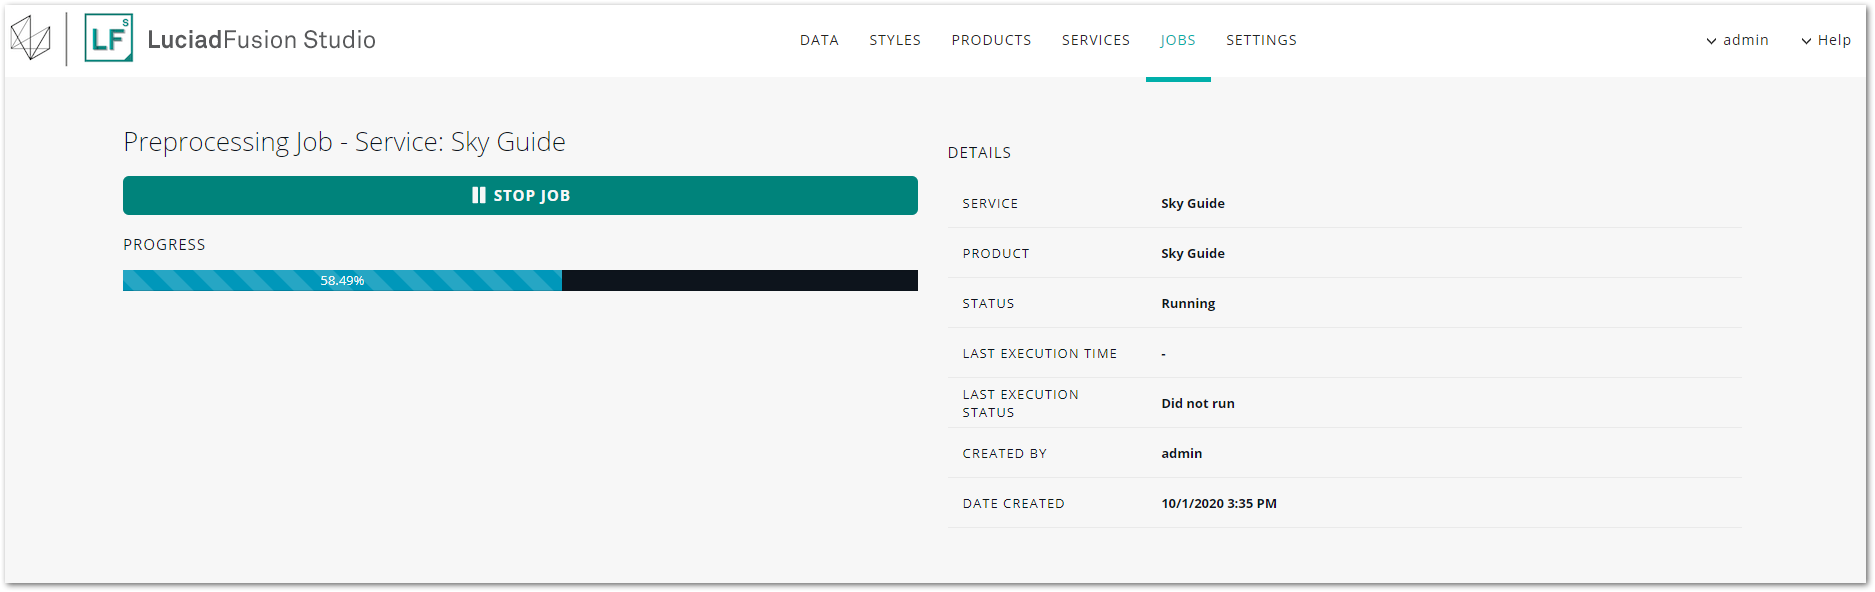
As soon as the pre-processing job is done, the LTS service status switches from PENDING to RUNNING.
|
If there is overlapping data in a product, the data might be re-ordered during pre-processing, and the resulting LuciadFusion coverage may store the data in in a different order than the original order in the product. LuciadFusion will order the data according to pixel density and other properties so that more detailed data is used in higher levels of the coverage. |
|
LTS service pre-processing failure.
If any data other than elevation data is added to a product in an LTS service, the pre-processing step will fail. Currently, you can pre-process only elevation data into a LuciadFusion coverage. If you want to create a coverage with other data, you need to use the Data Connectivity Manager. See the Data Connectivity Manager User’s Guide for more information. |
Once the LTS service is running, you can connect to it from a LuciadRIA application.
Connecting to an LTS service from LuciadRIA
To connect to an LTS service from LuciadRIA, you need to know the endpoint URL of the service, the coverage ID, and the coverage parameters.
Find out the endpoint URL
To find out what the endpoint URL is, go to the SERVICES tab in LuciadFusion Studio. Click the title of the LTS service in the list to open the details screen, and find the ENDPOINT URL entry.
Find out the coverage ID
If you are using LuciadRIA 2019.1 or a more recent version, you can create an LTSCapabilities instance from the endpoint URL to find the coverage ID.
If you are using LuciadRIA 2019.0 or an earlier version, you must get the coverage ID from LuciadFusion Studio. To find it, click the PRODUCTS tab in the details screen of the LTS service. Click the product for which you want to get the coverage ID.
The details screen of the product opens.
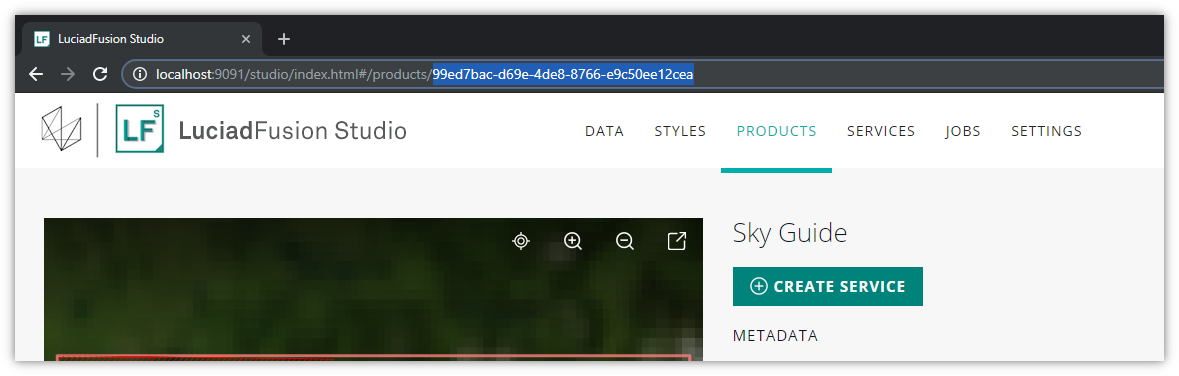
For most products, you can find the coverage ID by looking at the address bar of your web browser:
everything after products/ is the product ID, and therefore also the ID of the coverage.
|
Find out the product ID of an existing coverage
If the product is created from an existing coverage, LuciadFusion re-uses the ID of the existing coverage for the new coverage. In that case, you must find out the coverage ID in another way. To determine the coverage ID, click the PRODUCTS tab in the details screen of the LTS service, and click the coverage product to open its product details screen. 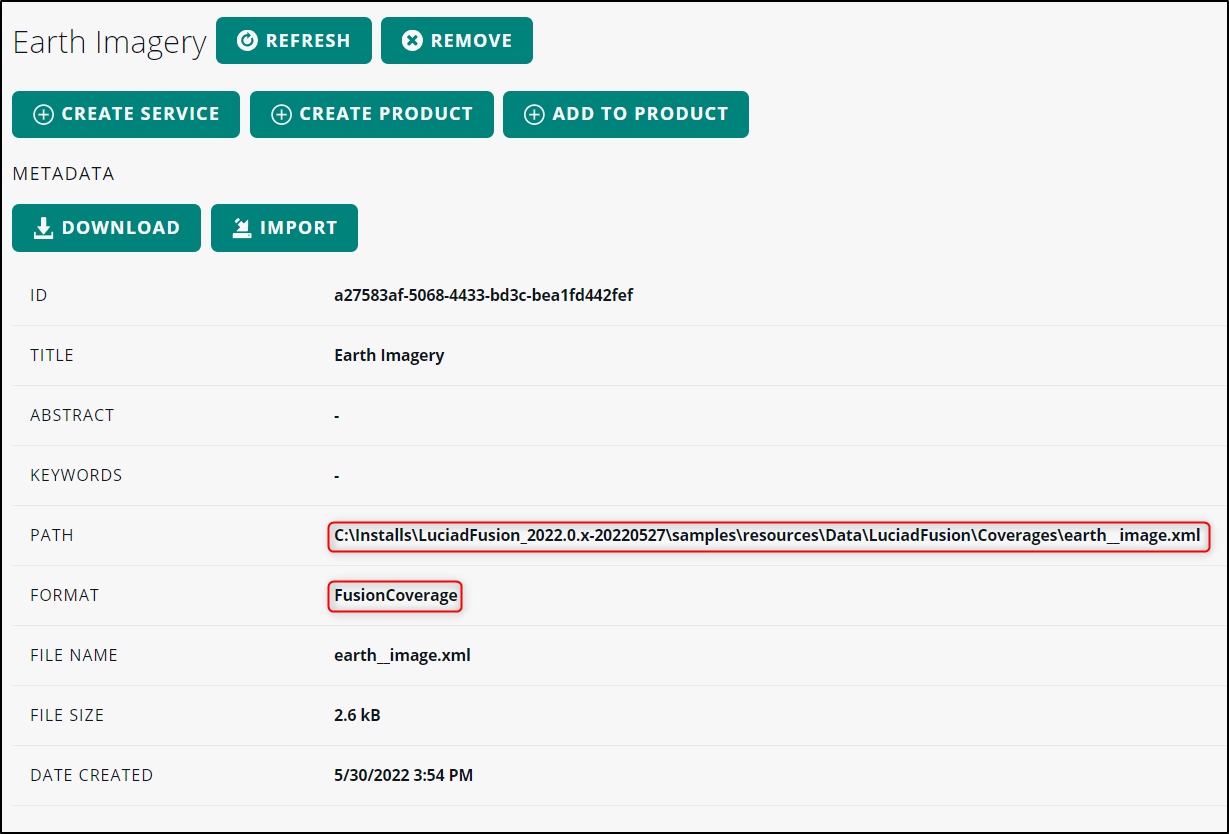
Figure 51. Find out which XML file to open for the coverage ID
If the FORMAT entry equals |
Find the coverage parameters
The Table 1, “Coverage parameters” table lists the parameters of a coverage generated in a LuciadFusion pre-processing job for an LTS service. The parameters are optimized for consumption by LuciadRIA.
| Parameter | Description | Value |
|---|---|---|
|
Type |
The type of the coverage |
|
|
Tile width |
The width of the tiles (in pixels) |
|
|
Tile height |
The height of the tiles (in pixels) |
|
|
Level 0 row count |
Number of rows at level 0 |
|
|
Level 0 column count |
Number of columns at level 0 |
|
|
Levels |
Number of levels in the tileset |
|
|
Sampling mode |
The sampling mode used when generating the tiles |
|
|
Bounding box |
The 2D bounding box of the coverage |
|
|
Georeference |
The geographic reference of the coverage’s bounding box |
|
|
Format |
The tile format of the coverage |
|
|
You can also connect to the LTS service from a LuciadLightspeed application or from Lucy. Keep in mind that these coverage parameters were optimized for LuciadRIA. |
Load in LuciadRIA
Now that you have the endpoint URL and coverage ID, you can load the data in LuciadRIA. Follow this tutorial to learn how to visualize LuciadFusion coverages in LuciadRIA.
Appendix C: Where do my service and product properties end up?
It is important to choose the title, abstract and keywords for the service carefully in LuciadFusion Studio. They will continue to be used to describe the service capabilities when the service is running. The same is true for product properties, where the name you give to the product may be used as the name of the map layers visualized in the client application.
This section clarifies the relation between the product and service properties you choose in LuciadFusion Studio and the services serving your products to client applications. It does so through the example of a WMS service and product. It tracks a property after its definition in LuciadFusion Studio, and shows its position in the capabilities XML document returned after a GetCapabilities request. Finally, it shows where the value ends up in the WMS client of Lucy, the LuciadLightspeed-based desktop application.
| WMS service property in LuciadFusion Studio | WMS service capabilities XML | Lucy WMS client field |
|---|---|---|
|
title |
<Service> <Title> |
WMS Client dialog - Service Info Title field |
|
abstract/abstractText |
<Service> <Abstract> |
WMS Client dialog - Service Info Description field |
|
keywords |
<Service> <KeywordList> |
| product property in LuciadFusion Studio | WMS service capabilities XML | Lucy WMS client field |
|---|---|---|
|
name |
<Layer> <Name> |
WMS Client dialog - Selected layer ID field |
|
title |
<Layer> <Title> |
WMS Client dialog - Selected layer Title field |
|
abstract/abstractText |
<Layer> <Abstract> |
WMS Client dialog - Selected layer Description field |
|
keywords |
<Layer> <KeywordList> |
WMS Client dialog - Service Info Description field |
Appendix D: LuciadFusion Studio search capabilities
This article provides an overview of the search options provided on each LuciadFusion Studio tab, along with search term examples.
Anytext search
The leftmost search bar allows you to perform a free-form search through the most important metadata fields of your imported data, styles, products or services, depending on the page where your search takes place. The tables below list the fields that are included in the free-form search per tab.
| Field name | Explanation | Example |
|---|---|---|
|
id |
The integer uniquely identifying this data |
|
|
path |
The path to this data |
|
|
name |
The name uniquely identifying this data |
|
|
title |
The title of this data |
|
|
type |
The type of this data |
|
|
abstract |
The brief summary of this data |
|
|
keywords |
The set of keywords of this data |
|
| Field name | Explanation | Example |
|---|---|---|
|
id |
The integer uniquely identifying this style |
|
|
name |
The name uniquely identifying this style |
|
|
title |
The title of this style |
|
|
type |
The type of this style |
|
|
abstract |
The brief summary of this style |
|
|
keywords |
The set of keywords of this style |
|
| Field name | Explanation | Example |
|---|---|---|
|
id |
The integer uniquely identifying this product |
|
|
name |
The name uniquely identifying this product |
|
|
title |
The title of this product |
|
|
type |
The type of this product |
|
|
abstract |
The brief summary of this product |
|
|
keywords |
The set of keywords of this product |
|
| Field name | Explanation | Example |
|---|---|---|
|
id |
The integer uniquely identifying this service |
|
|
status_label |
The status of this service, either running or stopped |
|
|
name |
The name uniquely identifying this service |
|
|
title |
The title of this service |
|
|
type |
The type of this service |
|
|
abstract |
The brief summary of this service |
|
|
keywords |
The set of keywords of this service |
|
Search terms and phrases
When you perform a free-form search, the query is broken up into terms, for example satellite, and operators such as AND. A term that consists of multiple words is surrounded by quotation marks,. “river data” for example, and is called a phrase.
Whitespaces, backslashes, forward slashes and dots are handled as delimiters. Note that a delimiter functions as an AND operator by default. Thus satellite earth, satellite.earth, satellite/earth and satellite\earth are all search queries that return entries containing both satellite and earth in one of their free-form fields. In this way, you can search for subfolders mentioned in a path and words at the end of sentences, which therefore end with a dot. The same delimiters will be used when splitting up the free-form fields mentioned above in atomic index fields, so you will not find the keyword newly-acquired using the query newly, but you will find the keyword earth.com using the query earth. Searches are case-insensitive. To view all possible entries again, you can search for *, for ?, or for no character at all.
Flexible searches
Free-form searches are exact searches by default. Therefore, queries for lucia or “image satellite” will not return the keywords luciad and satellite image as search results.
You are not limited to those exact searches, however. To perform a single-character wildcard search, use the ? symbol. For example, the query te?t will initiate a search for text as well as test. To perform a multiple-character wildcard search, use the * symbol. The query luc* will start a search for luciadlightspeed as well as lucy. The wildcards are not allowed in phrases though.
Another wildcard option consists of adding a tilde ~ to the end of your search term. It allows for ‘fuzzy searching’ for a word similar in spelling. An (optional) integer between
0 and 2 after the tilde can specify the maximum number of edits you allow. For example, satelite~1 will find satellite, but a search for satelit~1 will not. The default value is 2. However, the fuzzy search is meant to work for single-word queries. For multi-term searches
with fuzzy searching, we recommend the use of parentheses, (weather~) (summer~) for example.
By using the tilde at the end of a phrase, you can find words that are at a specific word distance from each other. For example, “political europe”~2 will not result in the abstract Political boundaries of medieval Europe being found, but “political europe”~3 will.
Boolean operators
You can use Boolean operators as logical operators between combined terms. AND, && (= AND), OR, || (= OR), NOT, ! (= NOT), - and + are supported. Boolean operators must be ALL CAPS and cannot be placed at the beginning of a query. Even NOT cannot be used with just one term. However, if you do need a single NOT condition, starting your query with a * is a handy workaround. For example, the query * NOT wms, and even the query * !wms, will return all entries not containing the word wms.
The + or required operator requires that the term right after the + symbol exists somewhere in the fields of the results. The – or prohibit operator excludes documents that contain the term right after the – symbol. To group Boolean clauses into sub-queries, you can use parentheses.
Searching specific fields
You can search for specific terms in specific fields. The default field will always be the free-form field, containing the data listed above. You can search any field by typing the field name followed by a colon : and the term you are looking for, for example abstract: weather. The field specifier is only valid for the term that it directly precedes. Again, you can use parentheses to group multiple clauses to a single field.
In the case of field searches, the concept of ‘range queries’ is especially useful. They allow matches of which the field values are between the specified lower and upper bounds. Sorting is done lexicographically. The range queries can be inclusive, denoted by square [] brackets, or exclusive, denoted by curly {} brackets, of the upper and lower bounds. The query format: {gif TO shp} will return entries with the MIF format, for example, but only the query format: [gif TO shp] will result in gif and SHP formats being returned as well.
Escaping special characters
As explained above, the following special characters are part of the query syntax (with the ^ operator being a term boost operator that is not necessary for our exact searches):
+ - && || ! ( ) { } [ ] ^ " ~ * ? :
Therefore, it is important to ‘escape’ such a symbol when it is used as a ‘normal symbol’ in a search query. You escape a symbol with a backslash, for example Desktop/Tmp/tmpfile1\~.