Prerequisites
This tutorial assumes the reader is familiar with
-
the fundamental LuciadLightspeed concepts introduced in the Create your first Lightspeed application tutorial (
ILspView,ILspLayer,ILcdModelandILcdModelDecoder) -
the fundamentals of vector styling, as introduced in the Introduction to styling vector data tutorial.
Goal
The goal of this tutorial is to illustrate some of the options of the complex stroking API in LuciadLightspeed. Complex stroking functionality makes it possible to visualize lines constructed from repeating patterns and decorations. An example is a zigzag line, with an arrow or text decorations.
LuciadLightspeed offers the TLspComplexStrokedLineStyle class for this purpose.
This class is very powerful, and allows you to create a line in virtually any way you want.
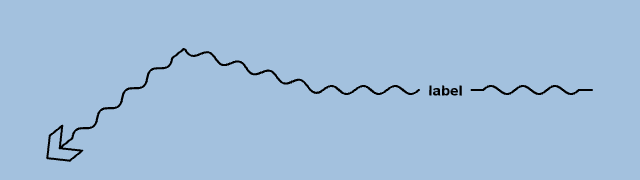
This tutorial explains how complex stroking works, and shows in a number of steps how a complicated complex stroke can be built. The main complex stroking concepts are applied along the way. The end result will be the following line:
How do complex strokes work?
You can compose a complex stroke of the following elements:
-
Decorations: small non-repeating elements that are added at a specific location on a line, such as arrow heads, text decorations, and icons.
-
Regular stroke pattern: A pattern that is repeated along the entire line, zigzag lines, wavy lines or dash patterns, for example.
-
Fallback stroke pattern: Similar to the regular stroke pattern, but it is used in places where no decorations or regular stroke pattern can be painted. It is typically a very simple pattern, like a plain line.
In some cases, a complex stroke is interrupted, and partially skipped:
-
Obstacles: when a decoration is already painted somewhere along the line, it forms an obstacle for all other other decorations, regular strokes or fallback stroke. Consequently, the decoration, or the obstructed part of the regular/fallback stroke pattern, is dropped and will not be painted at that location. Note that it is possible to tweak this behavior. This is demonstrated later on in this tutorial.
-
Corners: when a decoration or regular stroke patterns crosses a sharp corner of the line, it is dropped.
To learn more about visualizing complex strokes, see the developer’s guide.
Building a complex stroke
Initial setup
For the setup of this tutorial, we use a JFrame containing a 2D Lightspeed view.
public class ComplexStrokingTutorial {
  final ILspAWTView fView = TLspViewBuilder.newBuilder().buildAWTView();

  public ComplexStrokingTutorial() {
    try {
      TLcdGridReference worldReference = new TLcdGridReference(new TLcdGeodeticDatum(), new TLcdEquidistantCylindrical());
      TLspViewTransformationUtil.setup2DView(fView, worldReference);
      new TLspViewNavigationUtil(fView).fit(new TLcdLonLatBounds(-1, -0.3, 2, 0.6), new TLcdGeodeticReference());
    } catch (TLcdOutOfBoundsException e) {
      //In a real application, we would need proper error handling
      throw new RuntimeException(e);
    }
  }

  public JFrame createUI() {
    JFrame frame = new JFrame("Complex stroke tutorial");

    frame.getContentPane().add(fView.getHostComponent(), BorderLayout.CENTER);
    frame.getContentPane().add(new TLcdLayerTree(fView), BorderLayout.EAST);
    frame.getContentPane().add(fView.getHostComponent(), BorderLayout.CENTER);
    frame.getContentPane().add(new TLcdLayerTree(fView), BorderLayout.EAST);

    frame.setSize(800, 600);
    frame.setDefaultCloseOperation(WindowConstants.EXIT_ON_CLOSE);

    return frame;
  }
  public static void main(String[] args) throws Exception {
    EventQueue.invokeLater(new Runnable() {
      @Override
      public void run() {
        JFrame frame = new ComplexStrokingTutorial().createUI();
        frame.setVisible(true);
      }
    });
  }
We also use a utility method which creates a layer with a single polyline, and visualizes this polyline using the specified complex stroke.
private ILspLayer createComplexStrokeLayer(TLspComplexStrokedLineStyle aLineStyle, String aLabel) {
  TLcdVectorModel model = new TLcdVectorModel();
  model.setModelReference(new TLcdGeodeticReference());
  model.setModelDescriptor(new TLcdModelDescriptor());

  TLcdLonLatPolyline polyline = new TLcdLonLatPolyline();
  polyline.insert2DPoint(0, -1, -0.25);
  polyline.insert2DPoint(1, -0.5, 0.15);
  polyline.insert2DPoint(2, 0, 0.0);
  polyline.insert2DPoint(3, 1, 0.0);
  model.addElement(polyline, ILcdModel.NO_EVENT);

  return TLspShapeLayerBuilder.newBuilder()
                              .model(model)
                              .bodyStyler(TLspPaintState.REGULAR, aLineStyle)
                              .label(aLabel)
                              .build();
}
To improve readability, we use a static import
import static com.luciad.view.lightspeed.style.complexstroke.ALspComplexStroke.*;The creation of the layer is not shown in the snippets to focus the attention of the reader on the complex stroke creation. The full code at the end of this tutorial includes the layer creation.
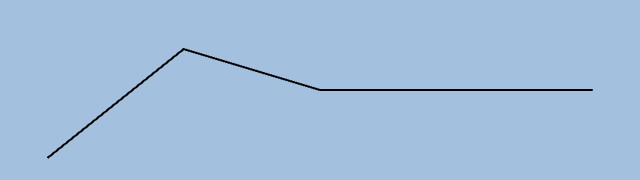
Painting a plain line
We start off our complex stroke with a plain line. We will use this line as our fallback while we proceed with the construction
of a more complex stroke.
The following code shows how you can use TLspComplexStrokedLineStyle to paint a plain line with a width of 2 pixels.
ALspComplexStroke plainLine = parallelLine().lineWidth(2).build();
return TLspComplexStrokedLineStyle.newBuilder()
                                  .fallback(plainLine)
                                  .build();
In this code, we construct an ALspComplexStroke that represents a plain line.
We want to use the plain line as a fallback stroke, to make sure that a line is painted whenever nothing else is painted.
The plain line is set on TLspComplexStrokedLineStyle using the fallback() method.
In this example, nothing else has been painted, so the plain line is visualized as the fallback stroke:
Adding an arrow
Of course, we are not just interested in a plain line.
Otherwise, we could just have used TLspLineStyle.
We want a line with an arrow.
To create the arrow, we construct another ALspComplexStroke.
ALspComplexStroke arrow = arrow().size(32).fillColor(Color.black).forward(false).build();Using the decoration method, the arrow head can be added to the plain line.
The full code for the line with arrow becomes:
ALspComplexStroke plainLine = parallelLine().lineWidth(2).build();

ALspComplexStroke arrow = arrow().size(32).fillColor(Color.black).forward(false).build();

return TLspComplexStrokedLineStyle.newBuilder()
                                  .decoration(0.0, arrow)
                                  .fallback(plainLine)
                                  .build();
The code adds a default arrow head at the start of the line. The arrow head has a length of 32 pixels, a black color, and
points to the start of the line.
The ALspComplexStroke.arrow() method allows you to create a large variety of arrow heads of any color or size.

The result is an arrow head decoration at the start of the complex stroke, followed by the plain fallback line. The fallback line is only there because we haven’t defined our regular stroke yet.
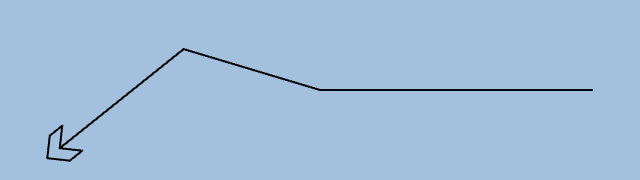
Filling the gap between the arrow and the line
You may have noticed that there is a small gap between the arrow head and the line in the image above. This is not exactly what we want. So how do we fill this gap?
Remember that fallback strokes are only painted whenever nothing else is painted.
In this case, the arrow has a length of 32 pixels, but the arrow base has an indentation so that its center lies a few pixels
closer to the tip of the arrow.
The fallback stroke doesn’t know that, however.
It only detects that the arrow is 32 pixels wide, and stops a few pixels short of the arrow base because it thinks something
is there already.
To connect the line to the arrow, we have to tell the fallback stroke that it can partially overlap with the arrow head through
an additional stroke.
We can use the fallbackStroking() method to accomplish such an overlap.
It tells the fallback stroke it is okay to add an extra stroke even though there is something there already.
ALspComplexStroke arrowShape = arrow().size(32).fillColor(Color.black).forward(false).build();
ALspComplexStroke arrowFallback = append(gap(16), fallbackStroking(16));
ALspComplexStroke arrow = compose(arrowShape, arrowFallback);
The code creates a transparent stroke of the same length as the arrow head, 32 pixels.
This is the arrow fallback line.
It consists of one gap stroke of 16 pixels concatenated with another stroke of 16 pixels created with the fallbackStroking() method.
The fallbackStroking() method tells the fallback stroke that the arrow fallback line can be painted along those 16 pixels, even though the plain
fallback line is already there.
Next, the arrow shape and the transparent stroke, which contains the fallbackStroking() method, are composed to form one ALspComplexStroke.
The resulting decoration is added to the complex stroke. The full code for the line with arrow becomes:
ALspComplexStroke plainLine = parallelLine().lineWidth(2).build();

ALspComplexStroke arrowShape = arrow().size(32).fillColor(Color.black).forward(false).build();
ALspComplexStroke arrowFallback = append(gap(16), fallbackStroking(16));
ALspComplexStroke arrow = compose(arrowShape, arrowFallback);

return TLspComplexStrokedLineStyle.newBuilder()
                                  .decoration(0.0, arrow)
                                  .fallback(plainLine)
                                  .build();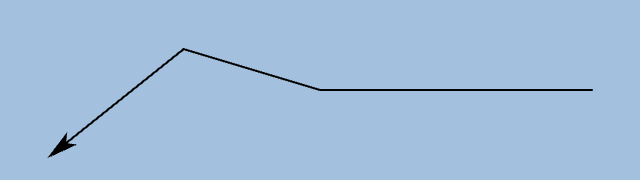
|
This is useful if you want to add a decoration over the line, for example.
For example, when you are adding text on top of the line, the |
Creating a custom arrow
What if the set of default arrow heads doesn’t contain the right one for the job?
In that case you can create your own arrow.
You can do so by appending or composing other basic ALspComplexStroke building blocks, like lines.
The example shows how to use the polyline() method, which creates a stroke pattern that is composed of multiple line stroke patterns:
double[] x = {0, 16, 32, 16, 32, 16, 0};
double[] y = {0, 16, 16, 0, -16, -16, 0};
ALspComplexStroke arrowShape = polyline().points(x, y).lineWidth(2).build();
ALspComplexStroke arrowFallback = append(gap(16), fallbackStroking(16));
ALspComplexStroke arrow = compose(arrowShape, arrowFallback);
This code defines a polyline, consisting of 6 line segments. The resulting custom arrow is 32 pixels wide as well.
As before, the arrow is set as decoration on the line. The full code for the line with the arrow becomes:
ALspComplexStroke plainLine = parallelLine().lineWidth(2).build();

double[] x = {0, 16, 32, 16, 32, 16, 0};
double[] y = {0, 16, 16, 0, -16, -16, 0};
ALspComplexStroke arrowShape = polyline().points(x, y).lineWidth(2).build();
ALspComplexStroke arrowFallback = append(gap(16), fallbackStroking(16));
ALspComplexStroke arrow = compose(arrowShape, arrowFallback);

return TLspComplexStrokedLineStyle.newBuilder()
                                  .decoration(0.0, arrow)
                                  .fallback(plainLine)
                                  .build();
Adding a repeating pattern along the line
It is often useful to repeat a pattern along the line, to turn it into a symbol with a specific meaning for example.
To repeat a pattern, you can create a regular stroke using the regular() method.
This method repeats a pattern along the entire line.
Remember that parts of the regular stroke may be dropped if a decoration is already present, or when the stroke passes through
a corner of the line.
ALspComplexStroke wave1 = wave().lineWidth(2).length(16).amplitude(4).startAngle(0).angle(180).build();
ALspComplexStroke wave2 = wave().lineWidth(2).length(16).amplitude(4).startAngle(180).angle(180).build();
ALspComplexStroke wavePattern = append(wave1, wave2);
In this example, a wave pattern is applied to the line. As a wave consists of an upper arc and a lower arc, those two wave parts are created first. Then, they are appended to form a complete wave. Such an approach makes it possible to drop just one part of the wave when the stroke encounters an obstacle or a corner. One part of the wave is replaced with the fallback line, while the other part remains visible.

The wave pattern is set on the complex stroke using the regular method, resulting in:
ALspComplexStroke plainLine = parallelLine().lineWidth(2).build();

ALspComplexStroke wave1 = wave().lineWidth(2).length(16).amplitude(4).startAngle(0).angle(180).build();
ALspComplexStroke wave2 = wave().lineWidth(2).length(16).amplitude(4).startAngle(180).angle(180).build();
ALspComplexStroke wavePattern = append(wave1, wave2);

double[] x = {0, 16, 32, 16, 32, 16, 0};
double[] y = {0, 16, 16, 0, -16, -16, 0};
ALspComplexStroke arrowShape = polyline().points(x, y).lineWidth(2).build();
ALspComplexStroke arrowFallback = append(gap(16), fallbackStroking(16));
ALspComplexStroke arrow = compose(arrowShape, arrowFallback);

return TLspComplexStrokedLineStyle.newBuilder()
                                  .decoration(0.0, arrow)
                                  .regular(wavePattern)
                                  .fallback(plainLine)
                                  .build();
Adding a text decoration
This step adds a text decoration at a location along the line. The text decoration is surrounded by gaps of 8 pixels.
ALspComplexStroke text = atomic(append(gap(8), text("label").build(), gap(8)));Note that the combination of the gaps and the text has been made 'atomic', meaning that the gaps and the text will be treated as one unit. That is done to make sure that when the text cannot be placed, for example because it crosses a corner of the line, the gaps are dropped as well.
The text is set on the complex stroke as another decoration:
ALspComplexStroke plainLine = parallelLine().lineWidth(2).build();

ALspComplexStroke wave1 = wave().lineWidth(2).length(16).amplitude(4).startAngle(0).angle(180).build();
ALspComplexStroke wave2 = wave().lineWidth(2).length(16).amplitude(4).startAngle(180).angle(180).build();
ALspComplexStroke wavePattern = append(wave1, wave2);

double[] x = {0, 16, 32, 16, 32, 16, 0};
double[] y = {0, 16, 16, 0, -16, -16, 0};
ALspComplexStroke arrowShape = polyline().points(x, y).lineWidth(2).build();
ALspComplexStroke arrowFallback = append(gap(16), fallbackStroking(16));
ALspComplexStroke arrow = compose(arrowShape, arrowFallback);

ALspComplexStroke text = atomic(append(gap(8), text("label").build(), gap(8)));

return TLspComplexStrokedLineStyle.newBuilder()
                                  .decoration(0.0, arrow)
                                  .decoration(0.75, text)
                                  .regular(wavePattern)
                                  .fallback(plainLine)
                                  .build();
Of course you can add other patterns and decorations as well.
There are many complex stroke building blocks that were not mentioned in this tutorial.
For those, have a look at the javadoc of the
TLspComplexStrokedLineStyle and
ALspComplexStroke classes.
Full code
import static com.luciad.view.lightspeed.style.complexstroke.ALspComplexStroke.*;

import java.awt.BorderLayout;
import java.awt.Color;
import java.awt.EventQueue;

import javax.swing.JFrame;
import javax.swing.WindowConstants;

import com.luciad.geodesy.TLcdGeodeticDatum;
import com.luciad.model.ILcdModel;
import com.luciad.model.TLcdModelDescriptor;
import com.luciad.model.TLcdVectorModel;
import com.luciad.projection.TLcdEquidistantCylindrical;
import com.luciad.reference.TLcdGeodeticReference;
import com.luciad.reference.TLcdGridReference;
import com.luciad.shape.shape2D.TLcdLonLatBounds;
import com.luciad.shape.shape2D.TLcdLonLatPolyline;
import com.luciad.util.TLcdOutOfBoundsException;
import com.luciad.view.lightspeed.ILspAWTView;
import com.luciad.view.lightspeed.TLspViewBuilder;
import com.luciad.view.lightspeed.layer.ILspLayer;
import com.luciad.view.lightspeed.layer.TLspPaintState;
import com.luciad.view.lightspeed.layer.shape.TLspShapeLayerBuilder;
import com.luciad.view.lightspeed.style.TLspComplexStrokedLineStyle;
import com.luciad.view.lightspeed.style.complexstroke.ALspComplexStroke;
import com.luciad.view.lightspeed.util.TLspViewNavigationUtil;
import com.luciad.view.lightspeed.util.TLspViewTransformationUtil;
import com.luciad.view.swing.TLcdLayerTree;

public class ComplexStrokingTutorial {
  final ILspAWTView fView = TLspViewBuilder.newBuilder().buildAWTView();

  public ComplexStrokingTutorial() {
    try {
      TLcdGridReference worldReference = new TLcdGridReference(new TLcdGeodeticDatum(), new TLcdEquidistantCylindrical());
      TLspViewTransformationUtil.setup2DView(fView, worldReference);
      new TLspViewNavigationUtil(fView).fit(new TLcdLonLatBounds(-1, -0.3, 2, 0.6), new TLcdGeodeticReference());
    } catch (TLcdOutOfBoundsException e) {
      //In a real application, we would need proper error handling
      throw new RuntimeException(e);
    }
  }

  public JFrame createUI() {
    JFrame frame = new JFrame("Complex stroke tutorial");

    frame.getContentPane().add(fView.getHostComponent(), BorderLayout.CENTER);
    frame.getContentPane().add(new TLcdLayerTree(fView), BorderLayout.EAST);

    fView.addLayer(createComplexStrokeLayer(createLineStyle1(), "Plain line"));
    fView.addLayer(createComplexStrokeLayer(createLineStyle2(), "Plain line with arrow"));
    fView.addLayer(createComplexStrokeLayer(createLineStyle3(), "Plain line with arrow without gap"));
    fView.addLayer(createComplexStrokeLayer(createLineStyle4(), "Plain line with custom arrow"));
    fView.addLayer(createComplexStrokeLayer(createLineStyle5(), "Repeating pattern"));
    fView.addLayer(createComplexStrokeLayer(createLineStyle6(), "Text decoration"));

    frame.getContentPane().add(fView.getHostComponent(), BorderLayout.CENTER);
    frame.getContentPane().add(new TLcdLayerTree(fView), BorderLayout.EAST);

    frame.setSize(800, 600);
    frame.setDefaultCloseOperation(WindowConstants.EXIT_ON_CLOSE);

    return frame;
  }

  private ILspLayer createComplexStrokeLayer(TLspComplexStrokedLineStyle aLineStyle, String aLabel) {
    TLcdVectorModel model = new TLcdVectorModel();
    model.setModelReference(new TLcdGeodeticReference());
    model.setModelDescriptor(new TLcdModelDescriptor());

    TLcdLonLatPolyline polyline = new TLcdLonLatPolyline();
    polyline.insert2DPoint(0, -1, -0.25);
    polyline.insert2DPoint(1, -0.5, 0.15);
    polyline.insert2DPoint(2, 0, 0.0);
    polyline.insert2DPoint(3, 1, 0.0);
    model.addElement(polyline, ILcdModel.NO_EVENT);

    return TLspShapeLayerBuilder.newBuilder()
                                .model(model)
                                .bodyStyler(TLspPaintState.REGULAR, aLineStyle)
                                .label(aLabel)
                                .build();
  }

  private TLspComplexStrokedLineStyle createLineStyle1() {
    ALspComplexStroke plainLine = parallelLine().lineWidth(2).build();
    return TLspComplexStrokedLineStyle.newBuilder()
                                      .fallback(plainLine)
                                      .build();
  }

  private TLspComplexStrokedLineStyle createLineStyle2() {
    ALspComplexStroke plainLine = parallelLine().lineWidth(2).build();

    ALspComplexStroke arrow = arrow().size(32).fillColor(Color.black).forward(false).build();

    return TLspComplexStrokedLineStyle.newBuilder()
                                      .decoration(0.0, arrow)
                                      .fallback(plainLine)
                                      .build();
  }

  private TLspComplexStrokedLineStyle createLineStyle3() {
    ALspComplexStroke plainLine = parallelLine().lineWidth(2).build();

    ALspComplexStroke arrowShape = arrow().size(32).fillColor(Color.black).forward(false).build();
    ALspComplexStroke arrowFallback = append(gap(16), fallbackStroking(16));
    ALspComplexStroke arrow = compose(arrowShape, arrowFallback);

    return TLspComplexStrokedLineStyle.newBuilder()
                                      .decoration(0.0, arrow)
                                      .fallback(plainLine)
                                      .build();
  }

  private TLspComplexStrokedLineStyle createLineStyle4() {
    ALspComplexStroke plainLine = parallelLine().lineWidth(2).build();

    double[] x = {0, 16, 32, 16, 32, 16, 0};
    double[] y = {0, 16, 16, 0, -16, -16, 0};
    ALspComplexStroke arrowShape = polyline().points(x, y).lineWidth(2).build();
    ALspComplexStroke arrowFallback = append(gap(16), fallbackStroking(16));
    ALspComplexStroke arrow = compose(arrowShape, arrowFallback);

    return TLspComplexStrokedLineStyle.newBuilder()
                                      .decoration(0.0, arrow)
                                      .fallback(plainLine)
                                      .build();
  }

  private TLspComplexStrokedLineStyle createLineStyle5() {
    ALspComplexStroke plainLine = parallelLine().lineWidth(2).build();

    ALspComplexStroke wave1 = wave().lineWidth(2).length(16).amplitude(4).startAngle(0).angle(180).build();
    ALspComplexStroke wave2 = wave().lineWidth(2).length(16).amplitude(4).startAngle(180).angle(180).build();
    ALspComplexStroke wavePattern = append(wave1, wave2);

    double[] x = {0, 16, 32, 16, 32, 16, 0};
    double[] y = {0, 16, 16, 0, -16, -16, 0};
    ALspComplexStroke arrowShape = polyline().points(x, y).lineWidth(2).build();
    ALspComplexStroke arrowFallback = append(gap(16), fallbackStroking(16));
    ALspComplexStroke arrow = compose(arrowShape, arrowFallback);

    return TLspComplexStrokedLineStyle.newBuilder()
                                      .decoration(0.0, arrow)
                                      .regular(wavePattern)
                                      .fallback(plainLine)
                                      .build();
  }

  private TLspComplexStrokedLineStyle createLineStyle6() {
    ALspComplexStroke plainLine = parallelLine().lineWidth(2).build();

    ALspComplexStroke wave1 = wave().lineWidth(2).length(16).amplitude(4).startAngle(0).angle(180).build();
    ALspComplexStroke wave2 = wave().lineWidth(2).length(16).amplitude(4).startAngle(180).angle(180).build();
    ALspComplexStroke wavePattern = append(wave1, wave2);

    double[] x = {0, 16, 32, 16, 32, 16, 0};
    double[] y = {0, 16, 16, 0, -16, -16, 0};
    ALspComplexStroke arrowShape = polyline().points(x, y).lineWidth(2).build();
    ALspComplexStroke arrowFallback = append(gap(16), fallbackStroking(16));
    ALspComplexStroke arrow = compose(arrowShape, arrowFallback);

    ALspComplexStroke text = atomic(append(gap(8), text("label").build(), gap(8)));

    return TLspComplexStrokedLineStyle.newBuilder()
                                      .decoration(0.0, arrow)
                                      .decoration(0.75, text)
                                      .regular(wavePattern)
                                      .fallback(plainLine)
                                      .build();
  }

  public static void main(String[] args) throws Exception {
    EventQueue.invokeLater(new Runnable() {
      @Override
      public void run() {
        JFrame frame = new ComplexStrokingTutorial().createUI();
        frame.setVisible(true);
      }
    });
  }
}