Prerequisites
In this tutorial, it is assumed that the reader is familiar with the LuciadLightspeed concepts introduced in the Create your first Lightspeed application tutorial:
-
Lightspeed views:
ILspView -
Lightspeed layers:
ILspLayer -
Model and model decoders:
ILcdModelandILcdModelDecoder
Goal
This tutorial teaches you the basic concepts of the LuciadLightspeed API for styling raster data on a Lightspeed view.
This tutorial creates a JFrame containing a Lightspeed view.
We will add 2 different layers to this view:
-
One background layer with satellite imagery. This layer will use the default styling.
-
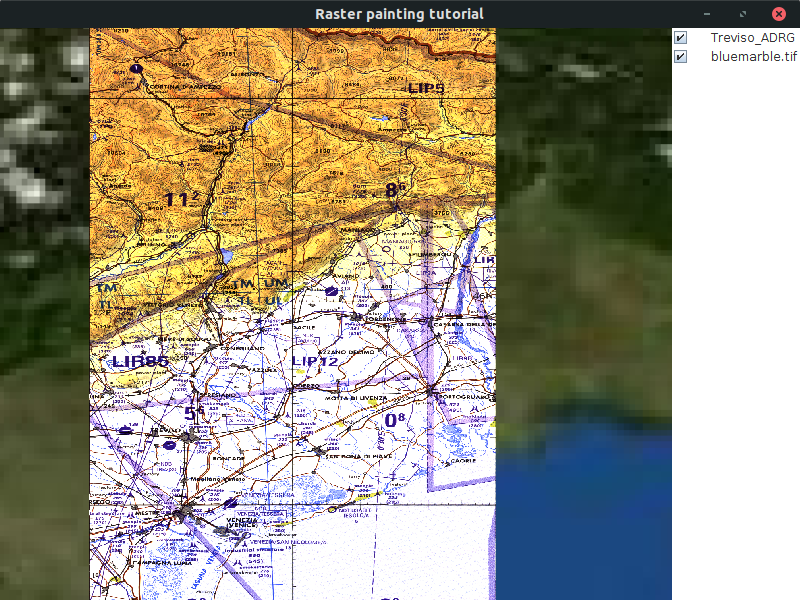
One layer with raster data from the city of Treviso in Italy. We will change the brightness and the contrast of this layer.
You can find the complete, runnable code at the end of the tutorial.
Initial setup
This tutorial starts from an application that shows a Lightspeed view in a JFrame:
public class BasicRasterStylingTutorial {
  final ILspAWTView fView = TLspViewBuilder.newBuilder().buildAWTView();

  public JFrame createUI() {
    JFrame frame = new JFrame("Raster painting tutorial");

    frame.getContentPane().add(fView.getHostComponent(), BorderLayout.CENTER);
    frame.getContentPane().add(new TLcdLayerTree(fView), BorderLayout.EAST);

    frame.setSize(800, 600);
    frame.setDefaultCloseOperation(WindowConstants.EXIT_ON_CLOSE);

    return frame;
  }
  public static void main(String[] args) {
    EventQueue.invokeLater(() -> {
      JFrame frame = new BasicRasterStylingTutorial().createUI();
      frame.setVisible(true);
    });
  }
}
Apply default styling to the background layer
To make the rest of the code a bit more compact, we start by introducing a utility method to decode the data:
private ILcdModel decodeModel(String aSourceName) {
  try {
    TLcdCompositeModelDecoder modelDecoder =
        new TLcdCompositeModelDecoder(TLcdServiceLoader.getInstance(ILcdModelDecoder.class));
    return modelDecoder.decode(aSourceName);
  } catch (IOException e) {
    //In a real application, we would need proper error handling
    throw new RuntimeException(e);
  }
}
For the background layer, we use a GeoPackage raster file with low-resolution satellite imagery from the whole world.
To create a layer for that data, we use the TLspRasterLayerBuilder.
This builder is designed for raster data.
We do not specify any style settings for this layer, so that the default styling is applied. In the case of an imagery layer, this means that its images are displayed as-is.
TLspRasterLayerBuilderprivate void addSatelliteLayer() {
ILspLayer layer =
TLspRasterLayerBuilder.newBuilder()
.model(decodeModel("Data/GeoPackage/bluemarble.gpkg"))
.build();
fView.addLayer(layer);
}Apply custom styling to the Treviso layer
For the layer with data of the city of Treviso, we are going to customize the styling.
To specify the styling of raster data, you can use a TLspRasterStyle object, an extension of ALspStyle.
ALspStyle objects, and their extensions, are container objects grouping a set of styling settings.
It is a definition of what the data should look like.
During the painting, LuciadLightspeed converts these styles into OpenGL state.
In this case, we adjust the contrast and brightness of the raster images.
//Define the style for the raster
TLspRasterStyle rasterStyle =
TLspRasterStyle.newBuilder()
.brightness(1.1f)
.contrast(1.5f)
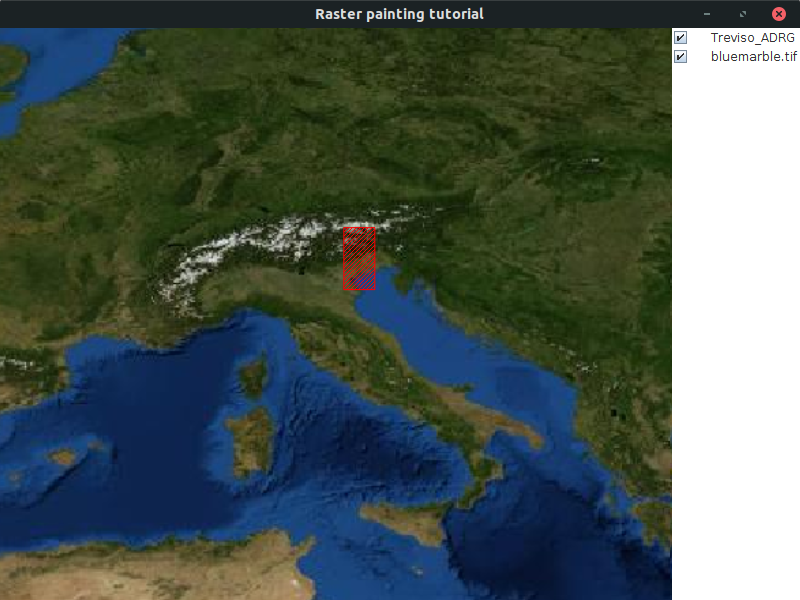
.build();Most raster data is suitable to be shown at certain scales only. For example, it makes no sense to show very detailed raster data of a certain area when a map has been zoomed out, because the details will no longer be distinguishable on the map.
To avoid the loading of unnecessary raster data in such cases, the Lightspeed map shows just the geographical bounds of the raster data set when it is zoomed out. As a result, the performance of the application increases, and the consumption of huge amounts of memory is prevented.
When the default styling of the TLspRasterLayerBuilder is applied, those bounds are styled with a red hatch pattern.
We are going to mimick that in this example by defining a TLspLineStyle for the outline of the bounds, and a TLspFillStyle for the fill of the bounds.
Both the TLspLineStyle and TLspFillStyle are ALspStyle extensions, just like TLspRasterStyle.
//Define the styling for the raster bounds when zoomed out
TLspLineStyle lineStyle =
TLspLineStyle.newBuilder()
.color(Color.RED)
.build();
TLspFillStyle fillStyle =
TLspFillStyle.newBuilder()
.color(Color.RED)
.stipplePattern(TLspFillStyle.StipplePattern.HATCHED)
.build();On the map, this looks like:
To allow the raster layer to use those styles, we need to pass them to the TLspRasterLayerBuilder.
We do so by grouping them into a TLspStyler instance, and calling the styler method on the TLspRasterLayerBuilder.
private void addTrevisoLayer() {
//Define the style for the raster
TLspRasterStyle rasterStyle =
TLspRasterStyle.newBuilder()
.brightness(1.1f)
.contrast(1.5f)
.build();
//Define the styling for the raster bounds when zoomed out
TLspLineStyle lineStyle =
TLspLineStyle.newBuilder()
.color(Color.RED)
.build();
TLspFillStyle fillStyle =
TLspFillStyle.newBuilder()
.color(Color.RED)
.stipplePattern(TLspFillStyle.StipplePattern.HATCHED)
.build();
ILspLayer layer =
TLspRasterLayerBuilder.newBuilder()
.model(decodeModel("Data/Rst/treviso.rst"))
.styler(TLspPaintRepresentationState.REGULAR_BODY, new TLspStyler(lineStyle, fillStyle, rasterStyle))
.build();
fView.addLayer(layer);
}|
See Why does my imagery layer show a red (hatched) rectangle? for more information about the red hatching pattern. |
The full code
import java.awt.BorderLayout;
import java.awt.Color;
import java.awt.EventQueue;
import java.io.IOException;
import javax.swing.JFrame;
import javax.swing.WindowConstants;
import com.luciad.model.ILcdModel;
import com.luciad.model.ILcdModelDecoder;
import com.luciad.model.TLcdCompositeModelDecoder;
import com.luciad.util.service.TLcdServiceLoader;
import com.luciad.view.lightspeed.ILspAWTView;
import com.luciad.view.lightspeed.TLspViewBuilder;
import com.luciad.view.lightspeed.layer.ILspLayer;
import com.luciad.view.lightspeed.layer.TLspPaintRepresentationState;
import com.luciad.view.lightspeed.layer.raster.TLspRasterLayerBuilder;
import com.luciad.view.lightspeed.style.TLspFillStyle;
import com.luciad.view.lightspeed.style.TLspLineStyle;
import com.luciad.view.lightspeed.style.TLspRasterStyle;
import com.luciad.view.lightspeed.style.styler.TLspStyler;
import com.luciad.view.swing.TLcdLayerTree;
public class BasicRasterStylingTutorial {
final ILspAWTView fView = TLspViewBuilder.newBuilder().buildAWTView();
public JFrame createUI() {
JFrame frame = new JFrame("Raster painting tutorial");
addSatelliteLayer();
addTrevisoLayer();
frame.getContentPane().add(fView.getHostComponent(), BorderLayout.CENTER);
frame.getContentPane().add(new TLcdLayerTree(fView), BorderLayout.EAST);
frame.setSize(800, 600);
frame.setDefaultCloseOperation(WindowConstants.EXIT_ON_CLOSE);
return frame;
}
private ILcdModel decodeModel(String aSourceName) {
try {
TLcdCompositeModelDecoder modelDecoder =
new TLcdCompositeModelDecoder(TLcdServiceLoader.getInstance(ILcdModelDecoder.class));
return modelDecoder.decode(aSourceName);
} catch (IOException e) {
//In a real application, we would need proper error handling
throw new RuntimeException(e);
}
}
private void addSatelliteLayer() {
  ILspLayer layer =
      TLspRasterLayerBuilder.newBuilder()
                            .model(decodeModel("Data/GeoPackage/bluemarble.gpkg"))
                            .build();

  fView.addLayer(layer);
}
private void addTrevisoLayer() {
//Define the style for the raster
TLspRasterStyle rasterStyle =
    TLspRasterStyle.newBuilder()
                   .brightness(1.1f)
                   .contrast(1.5f)
                   .build();
//Define the styling for the raster bounds when zoomed out
TLspLineStyle lineStyle =
    TLspLineStyle.newBuilder()
                 .color(Color.RED)
                 .build();
TLspFillStyle fillStyle =
    TLspFillStyle.newBuilder()
                 .color(Color.RED)
                 .stipplePattern(TLspFillStyle.StipplePattern.HATCHED)
                 .build();
ILspLayer layer =
TLspRasterLayerBuilder.newBuilder()
.model(decodeModel("Data/Rst/treviso.rst"))
.styler(TLspPaintRepresentationState.REGULAR_BODY, new TLspStyler(lineStyle, fillStyle, rasterStyle))
.build();
fView.addLayer(layer);
}
public static void main(String[] args) {
EventQueue.invokeLater(() -> {
JFrame frame = new BasicRasterStylingTutorial().createUI();
frame.setVisible(true);
});
}
}