Although LuciadLightspeed consists of a Java-based API, you can embed it into a .NET application that is written in C#, for instance. This article will help you make such an integration, allowing you to couple your .NET application and UI components to LuciadLightspeed. As a result, your application gains full access to:
-
All LuciadLightspeed functionality
-
The full hardware-accelerated performance of LuciadLightspeed, achieved through OpenGL.
Architecture overview
Using airspaces
If you’re looking to integrate multiple GUI toolkits in a Windows application, you may come across the term “airspace problem”. Microsoft more formally refers to “technology regions”, which better describes what we’re talking about. In a nutshell, each pixel in a window can only be owned by one rendering technology, so either by Win32, WinForms, WPF, or DirectX for example. Typically, you choose one technology and build your entire application on it. If you want to mix technologies, you need to partition your GUI into non-overlapping technology regions or “airspaces”.
The different toolkits provide various components for doing so. This table lists a number of toolkit components that can host a component from another toolkit as a child:
| Integration path | API class |
|---|---|
|
WPF in WinForms |
|
|
WinForms in WPF |
|
|
DirectX in WPF |
|
|
WPF in Win32 |
|
|
Win32 in WinForms |
|
|
Win32 in WPF |
The last two components in the overview are particularly interesting: you can take any native window handle (HWND) and host the content of that window inside a WinForms or WPF parent component. This means that if we can obtain the window
handle of a JFrame, we can re-parent or "dock" Java components into a native window.
Getting that window handle is not difficult: you can do so either through the internal JDK class `WComponentPeer, or by using native API calls such as GetForegroundWindow().
Integrating a Lightspeed view
Knowing that we can embed Java components in a WinForms or WPF interface, we can now approach the integration of the Lightspeed view as follows:
-
Use JNI to create a Java virtual machine running inside the .NET host application.
-
Create a
JFramecontaining a Lightspeed view, aTLspAWTViewfor example. -
Obtain the
HWNDof that`JFrame. -
Use
`NativeWindoworHwndHostto embed the contents of theJFrameinto the C# application. -
Use additional JNI calls to let the host application interact with the Lightspeed view, for instance to add layers, change the map reference, and so on.
The following section provides a step-by-step walkthrough of this process. It discusses WPF, but the process is entirely analogous for Windows Forms.
WPF integration walkthrough
Getting started with JNI
The easiest way to work with JNI in a .NET application is provided by the jni4net library. This tool includes two important components:
-
A convenient object-oriented API to configure and start a JVM
-
A command-line tool called
proxygen, which takes Java classes as input and produces C# wrappers (based on JNI) around them as output
Let’s look at each of these in more detail.
Starting a JVM
The jni4net class used to start up a Java VM is called Bridge. It has a static method CreateJVM() which takes a BridgeSetup object as input. This object contains the settings to be used by the VM, such as the class path and any command line parameters.
The following code snippet illustrates the usage of these classes:
// Initialize JNI bridge
// NOTE: the jni4net libs need to be copied next to the application's executable!
var setup = new BridgeSetup(true)
{
    Verbose = true,
    VeryVerbose = true,
    Debug =  true
};
setup.AddAllJarsClassPath(@"../LuciadLightspeed/lib");
setup.AddClassPath(@"../LuciadLightspeed/licenses");
setup.AddClassPath(@"../LuciadLightspeed/resources");
// Start the JVM
Bridge.CreateJVM(setup);
When CreateJVM() returns, the VM is running and ready to use.
Bridging a Java class with proxygen
You can invoke proxygen with an XML configuration file as input. This file lists the Java classes for which proxies should be generated, as well
as the classpath entries required for those classes to compile. The XML file can also specify the output directories proxygen should write its output to. An example configuration might look as follows:
<?xml version="1.0" encoding="utf-8" ?>

<jni4net-proxygen xmlns="http://jni4net.sf.net/0.8.8.0/toolConfig.xsd">
  <TargetDirJvm>java</TargetDirJvm>
  <TargetDirClr>gensrc</TargetDirClr>

  <JavaClass TypeName="samples.lightspeed.integration.hostedview.HostedLightspeedViewProxy"/>

  <ClassPath Path="..\LuciadLightspeed\lib\lcd_cbridge.jar"/>
  <ClassPath Path="..\LuciadLightspeed\lib\lcd_core.jar"/>
  <ClassPath Path="..\LuciadLightspeed\lib\lcd_lightspeed.jar"/>
  <ClassPath Path="..\LuciadLightspeed\samples\lib\lcd_core_samples.jar"/>
  <ClassPath Path="..\LuciadLightspeed\samples\lib\lcd_lightspeed_samples.jar"/>
</jni4net-proxygen>
Note that there are two TargetDir elements. This is because proxygen will create two output files for every input class: an annotated Java stub for the input class and the actual C# wrapper
class. The former needs to be compiled and added to the JVM classpath, while the latter needs to be included in the host application.
Before the C# wrapper class can be used, you need to register it with Bridge as follows:
// Register generated proxies
Bridge.RegisterAssembly(typeof(HostedLightspeedViewProxy).Assembly);
From this point on, we can instantiate the wrapper class in the host application, and use it as if we’re working directly with the Java class itself.
|
Tip for integrating application logic
Think about whether a piece of functionality is best implemented in Java or in C#. Crossing the boundary between Java and C# is an extra burden: avoid it if possible. If you do have to cross the boundary, make the interaction lightweight. |
Creating a Lightspeed view
For the purpose of this walkthrough, we encapsulate the Lightspeed view in a proxy class that exposes all the functionality
our application needs. We can then run proxygen on this class to generate a JNI wrapper around it, and include this wrapper in our host application.
We will be working with the HostedLightspeedViewProxy class.
Source code of HostedLightspeedViewProxy
package samples.lightspeed.integration.hostedview;

import static org.lwjgl.system.jawt.JAWTFunctions.*;

import java.awt.BorderLayout;
import java.awt.Component;
import java.awt.Container;

import javax.swing.JFrame;
import javax.swing.JLabel;

import org.lwjgl.system.jawt.JAWT;
import org.lwjgl.system.jawt.JAWTDrawingSurface;
import org.lwjgl.system.jawt.JAWTDrawingSurfaceInfo;
import org.lwjgl.system.jawt.JAWTWin32DrawingSurfaceInfo;

import com.luciad.gui.TLcdAWTUtil;
import com.luciad.gui.swing.TLcdOverlayLayout;
import com.luciad.util.measure.ILcdLayerMeasureProviderFactory;
import com.luciad.util.measure.ILcdModelMeasureProviderFactory;
import com.luciad.util.service.TLcdServiceLoader;
import com.luciad.view.lightspeed.ALspAWTView;
import com.luciad.view.lightspeed.TLspAWTView;
import com.luciad.view.lightspeed.TLspViewBuilder;
import com.luciad.view.lightspeed.measure.TLspViewMeasureProvider;
import com.luciad.view.lightspeed.painter.grid.TLspLonLatGridLayerBuilder;
import com.luciad.view.lightspeed.swing.TLspScaleIndicator;
import com.luciad.view.lightspeed.swing.navigationcontrols.TLspNavigationControlsBuilder;

import samples.lightspeed.common.LspDataUtil;
import samples.lightspeed.common.LuciadLogoIcon;
import samples.lightspeed.common.MouseLocationComponent;
import samples.lightspeed.common.MouseReadoutProvider;
import samples.lightspeed.common.controller.ControllerFactory;

/**
 * Proxy class for a Lightspeed view that can be docked in a .NET
 * application. The host application should instantiate this class
 * and then use {@link #getHWnd()} in conjunction with
 * {@code NativeWindow} (for Windows Forms) or {@code HwndHost}
 * (for WPF) to embed the Lightspeed view in the host GUI.
 */
public class HostedLightspeedViewProxy {

  private JFrame fFrame;
  private TLspAWTView fView;

  public HostedLightspeedViewProxy() {
    TLcdAWTUtil.invokeAndWait(() -> {
      fFrame = new JFrame("Lightspeed view container");
      fFrame.setDefaultCloseOperation(JFrame.DO_NOTHING_ON_CLOSE);
      fFrame.getContentPane().setLayout(new BorderLayout());
      fFrame.setUndecorated(true);

      fView = TLspViewBuilder
          .newBuilder()
          .buildAWTView();

      fView.setController(ControllerFactory.createGeneralController(null, fView));

      configureView(fView);

      fFrame.getContentPane().add(fView.getHostComponent());
      fFrame.pack();
      fFrame.setLocation(-1000, -1000);
      fFrame.setVisible(true);
    });
  }

  private ALspAWTView getView() {
    return fView;
  }

  private static long getHWndImpl(Component c) {
    // Get the drawing surface
    JAWT awt = JAWT.calloc();
    awt.version(JAWT_VERSION_1_4);
    if (!JAWT_GetAWT(awt)) {
      return 0;
    }
    JAWTDrawingSurface ds = JAWT_GetDrawingSurface(c, awt.GetDrawingSurface());
    if (ds == null) {
      return 0;
    }

    try {
      // Lock the drawing surface
      int lock = JAWT_DrawingSurface_Lock(ds, ds.Lock());
      if ((lock & JAWT_LOCK_ERROR) != 0) {
        return 0;
      }

      try {
        // Get the drawing surface info
        JAWTDrawingSurfaceInfo dsi = JAWT_DrawingSurface_GetDrawingSurfaceInfo(ds, ds.GetDrawingSurfaceInfo());
        if (dsi == null) {
          return 0;
        }
        JAWTWin32DrawingSurfaceInfo dsi_win = JAWTWin32DrawingSurfaceInfo.create(dsi.platformInfo());
        long hwnd = dsi_win.hwnd();

        JAWT_DrawingSurface_FreeDrawingSurfaceInfo(dsi, ds.FreeDrawingSurfaceInfo());
        return hwnd;
      } finally {
        // Unlock the drawing surface
        JAWT_DrawingSurface_Unlock(ds, ds.Unlock());
      }
    } finally {
      // Free the drawing surface
      JAWT_FreeDrawingSurface(ds, awt.FreeDrawingSurface());
    }
  }

  /**
   * Returns the native window handle of the JFrame containing the Lightspeed view.
   */
  public long getHWnd() {
    long[] hwnd = {0L};
    TLcdAWTUtil.invokeAndWait(() -> {
      hwnd[0] = getHWndImpl(fFrame);
    });
    return hwnd[0];
  }

  /**
   * Called by the host application when the Lightspeed view can be disposed.
   */
  public void destroy() {
    TLcdAWTUtil.invokeAndWait(() -> {
      fFrame.setVisible(false);
      fFrame.getContentPane().removeAll();
      fFrame.dispose();
      fFrame = null;
      fView.destroy();
      fView = null;
    });
  }

  /**
   * Performs the initial configuration of the Lightspeed view. Customize this
   * to suit your application, e.g. to load default background data or add
   * different overlay components.
   *
   * @param aView the Lightspeed view
   */
  private void configureView(TLspAWTView aView) {
    Container overlay = aView.getOverlayComponent();
    TLcdOverlayLayout layout = (TLcdOverlayLayout) overlay.getLayout();

    // Add a lon/lat grid
    aView.addLayer(TLspLonLatGridLayerBuilder.newBuilder().build());

    // Add map navigation controls
    Component navigationControls = TLspNavigationControlsBuilder
        .newBuilder(aView)
        .build();
    overlay.add(navigationControls);
    layout.putConstraint(navigationControls, TLcdOverlayLayout.Location.NORTH_EAST, TLcdOverlayLayout.ResolveClash.VERTICAL);

    // Add a scale indicator
    TLspScaleIndicator scaleIndicator = new TLspScaleIndicator(aView);
    scaleIndicator.setScaleAtCenterOfMap(true);
    JLabel scaleIndicatorLabel = scaleIndicator.getLabel();
    overlay.add(scaleIndicatorLabel);
    layout.putConstraint(scaleIndicatorLabel, TLcdOverlayLayout.Location.SOUTH_EAST, TLcdOverlayLayout.ResolveClash.VERTICAL);

    // Add a Luciad logo
    JLabel luciadLogo = new JLabel(new LuciadLogoIcon());
    overlay.add(luciadLogo);
    layout.putConstraint(luciadLogo, TLcdOverlayLayout.Location.SOUTH_WEST, TLcdOverlayLayout.ResolveClash.VERTICAL);

    // Add a mouse cursor location readout
    Iterable<ILcdModelMeasureProviderFactory> measureProviderFactories = TLcdServiceLoader.getInstance(ILcdModelMeasureProviderFactory.class);
    Iterable<ILcdLayerMeasureProviderFactory> layerMeasureProviderFactories = TLcdServiceLoader.getInstance(ILcdLayerMeasureProviderFactory.class);
    overlay.add(
        new MouseLocationComponent(
            aView,
            new MouseReadoutProvider(aView, new TLspViewMeasureProvider(aView, measureProviderFactories, layerMeasureProviderFactories))
        ),
        TLcdOverlayLayout.Location.SOUTH
    );
  }

  /**
   * Decodes the specified data and adds a layer for it to the map.
   *
   * @param aSource the path of the data
   */
  public void loadData(String aSource) {
    TLcdAWTUtil.invokeAndWait(() -> {
      try {
        LspDataUtil
            .instance()
            .model(aSource)
            .layer()
            .addToView(getView());
      } catch (Exception e) {
        e.printStackTrace();
      }
    });
  }
}
This class contains the following functionality:
-
The constructor creates a
TLspAWTViewand adds it to aJFrame. -
It additionally performs some initial configuration on the view, such as adding a lon/lat grid layer and various overlay controls, such as a scale indicator.
-
The
getHwnd()method returns theJFrame's native window handle. -
destroy()disposes of theJFrameand the Lightspeed view. -
loadData()loads data such as SHP, GeoTIFF or any other supported format, from a file and adds a corresponding layer to the view.
You can of course adapt HostedLightspeedViewProxy to include any additional functionality required by your application.
Embedding the Lightspeed view in WPF
After running proxygen on HostedLightspeedViewProxy, we can extend the HwndHost class to support the docking of the Lightspeed view into a WPF interface. To do so, we need to implement two methods:
-
BuildWindowCore()is responsible for creating the window that will be docked inside theHwndHost. This method takes an HWND as input and should create a new win` dow that is a child of the given one. In our case, we can’t create aJFramethat is a child of a native window, so we will obtain theJFrame` 'sHWND` and use the Win32 API callsSetParent()andSetWindowLong()to convert the existing top-level window into a child window. -
DestroyWindowCore()is responsible for cleaning up the previously created child window, and should therefore dispose theJFrameand destroy the Lightspeed view.
The attached file HostedLightspeedView.cs implements all of the above, and can be used as a starting point for your own development. Note that, in addition to implementing
the two bookkeeping methods described above, it also exposes the loadData() method of HostedLightspeedViewProxy.
Debugging your application
You can debug the Java code, even when it has been integrated in a C# project. These are the steps to follow:
-
Add the following to the list of JVM arguments in
BridgeSetup:
"-agentlib:jdwp=transport=dt_socket,server=y,suspend=n,address=5005" -
In IntelliJ, add a remote run configuration:
-
Go to Run → Edit Configurations…
-
Click the green + button and select Remote from the Add New Configuration drop-down menu.
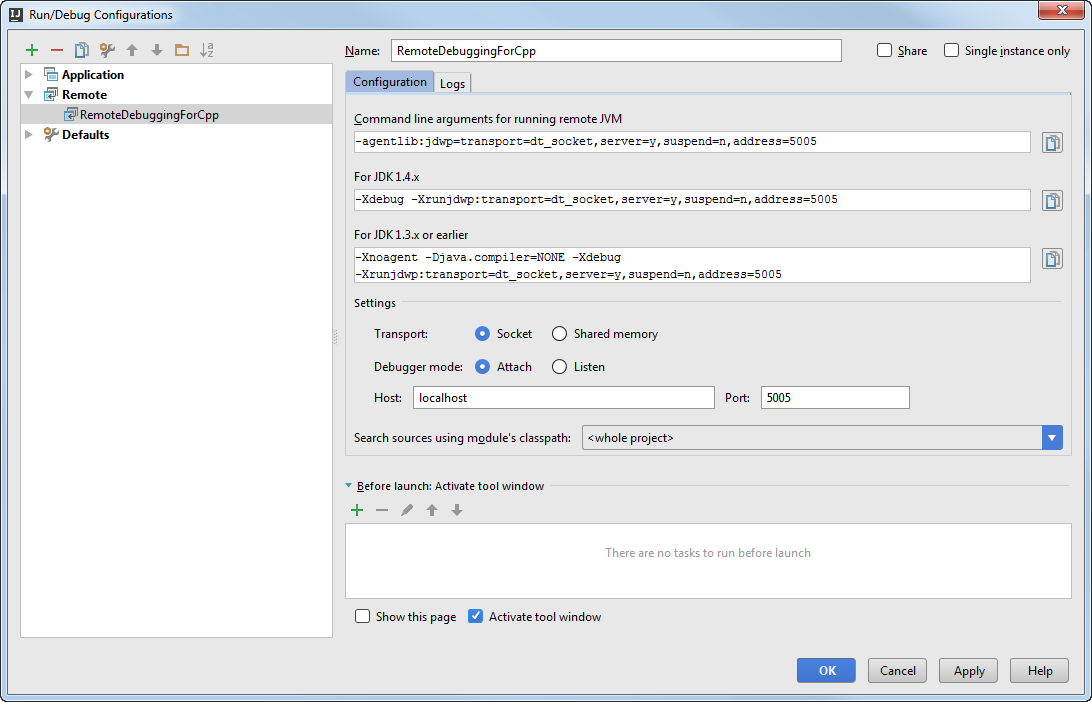
-
Enter a name for the run configuration. You can leave the auto-populated properties in the configuration as they are.
-
-
You can now run your application in debug mode, and connect to it from IntelliJ by running the remote configuration in debug mode as well. You can use breakpoints and step through Java code from IntelliJ.