|
In this tutorial, you will learn how to successfully run the LuciadLightspeed samples from NetBeans. |
Prerequisites for the IDE integration
In the project configuration procedure, it is assumed that you already installed the following software:
-
Java Development Kit (JDK) 1.8 or higher. You can download a JDK from http://www.oracle.com/technetwork/java/javase/downloads/index.html.
-
LuciadLightspeed. In this tutorial, we use LuciadLightspeed Version 2018.
-
NetBeans IDE. You can download the NetBeans IDE from https://netbeans.apache.org/download/index.html. In this article, we use the NetBeans IDE 8.2.
Creating a Luciadlightspeed development project in NetBeans
-
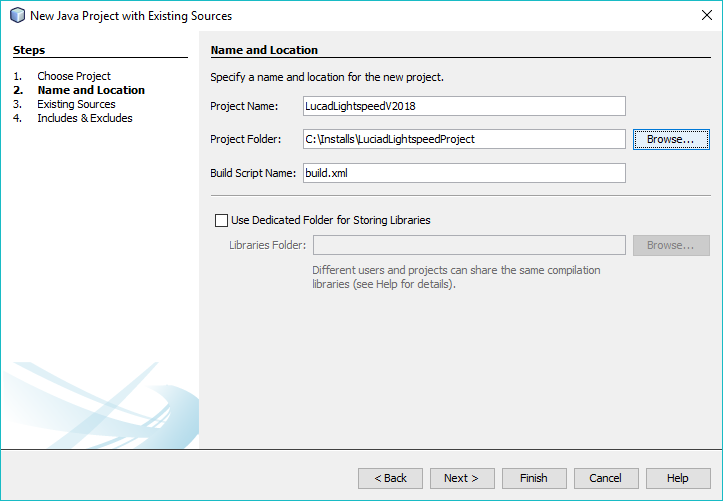
Start NetBeans and create a new project: go to File > New project from the main menu. The New Project screen opens.
-
Select Java in the Categories pane and Java Project with Existing Sources from the Projects pane, and click Next.

-
In the Project Folder text box, select the folder that contains the LuciadLightspeed installation folder (one level up from the installation folder), and choose a Project Name. Click Next.
-
Click the Add Folder… button next to the Source Package Folders field, and open the
LuciadLightspeed_<version>\samples\srcfrom the Browse Source Packages Folder window.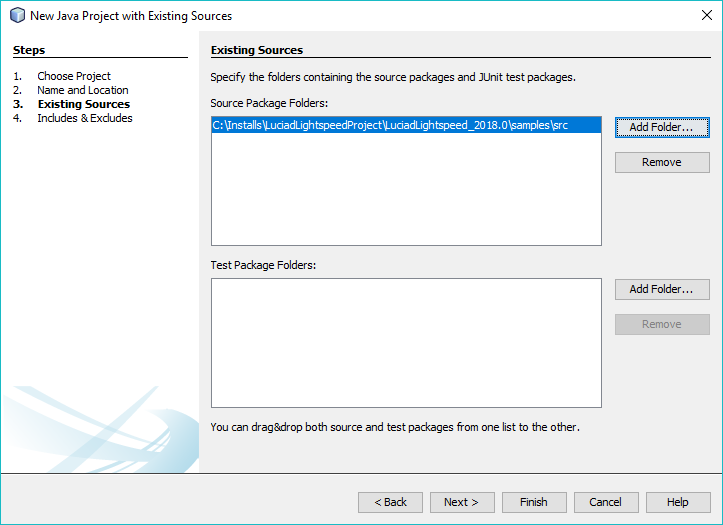
-
Click Next, and click Finish on the Includes & Excludes window without changing anything. NetBeans starts creating the new project.
Completing the project configuration
Before you can run the samples, you need to make sure that all project dependencies are in place, such as the LuciadLightspeed license file and the project resources. It is also strongly recommended to enable annotation processing in your project. LuciadLightspeed uses annotations to register services with a registry, and provide instant application services.
-
In the Projects navigation pane on the left, right-click the project you just created, and select Properties.
-
In the Project Properties window, go to the Libraries category in the left-hand pane. Make sure that a version 1.8 JDK or higher is selected in the Java Platform: dropdown menu.
-
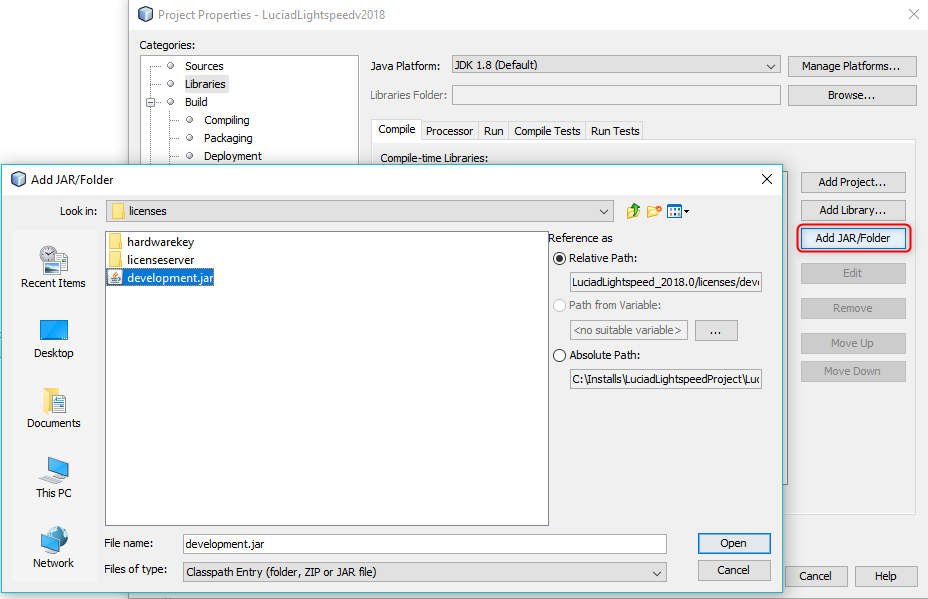
On the Compile tab, click Add JAR/Folder to start adding the license file and project resources.
In recent NetBeans versions, you can define a module path as well as a class path on the Compile tab. Skip the module path, and set up only the class path with the LuciadLightspeed libraries.
-
Select the
development.jarfile from theLuciadLightspeed_<version>\licensesfolder, and click Open. The license file is displayed in the Compile-time Libraries field. -
Click Add Library to define the LuciadLightspeed library.
-
In the Add Library window, click the Create button. Enter a library name that includes
LuciadLightspeedand the version number, and click OK.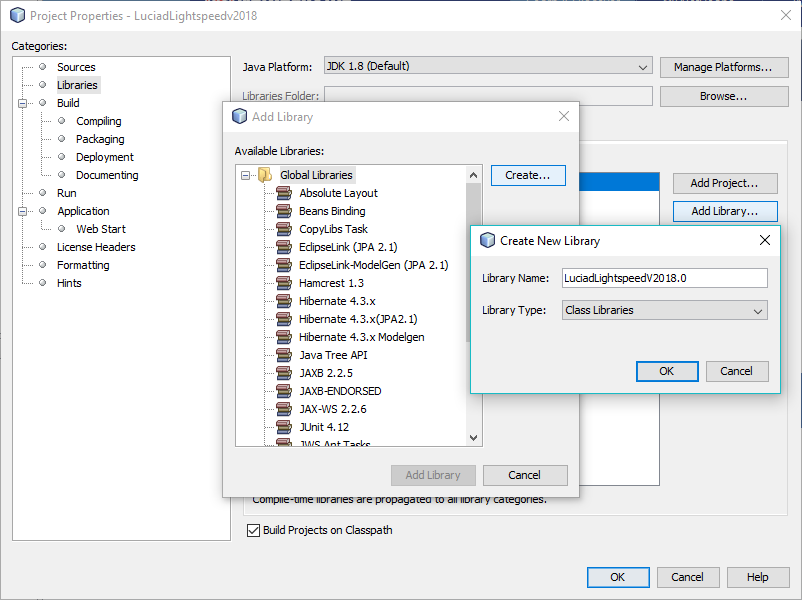
-
In the Customize library window, click Add JAR/Folder, and browse to the
LuciadLightspeed_<version>\libfolder. -
Select all the
*.jarfiles you can find at that folder level, and click Add JAR/Folder to display the JAR files in the Customize Library window.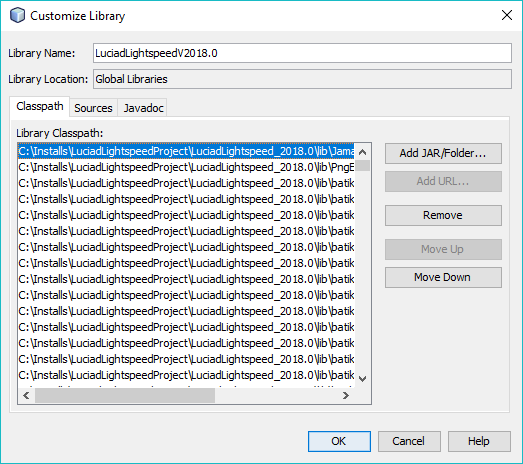
-
Do the same for the
LuciadLightspeed_<version>\samples\lib\thirdpartyfolder: browse to that folder and select all the*.jarfiles you can find at that folder. -
Click the OK and Add Library buttons to return to the Compile tab in the project Properties window. The LuciadLightspeed library has been added to the list.
-
Click Add JAR/Folder, go to the
LuciadLightspeed_<version>\configfolder and select it, and click Open. -
Repeat the previous step to add the
LuciadLightspeed_<version>\samples\resourcesfolder. Theconfigandsamples\resourcesfolders are added to the list in the Compile-time Libraries field.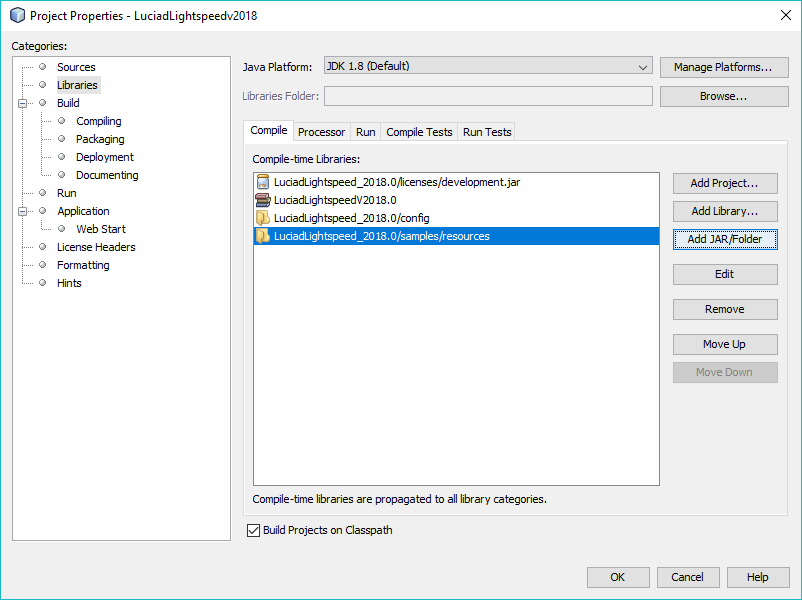
-
Go to Build > Compiling in the left-hand pane, de-select the Compile on Save and Run Compilation in external VM check boxes, and select the Enable Annotation Processing check box.
-
Click Add next to the Annotation Processors field. Enter
com.luciad.util.service.TLcdServiceAnnotationProcessorin the Annotation Processor FQN: field, and click OK.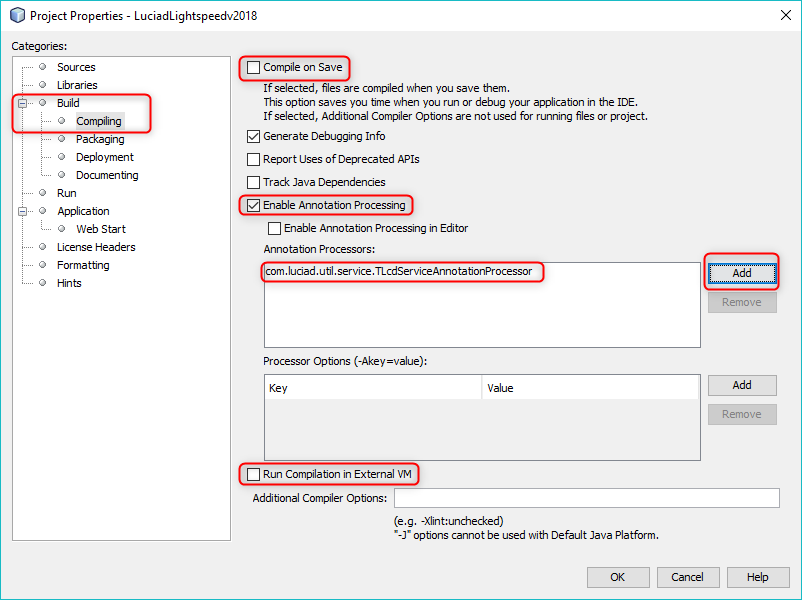
-
Click OK to let NetBeans re-configure the project. To make sure each project setting is taken into account, right-click the project, and select Clean and build before proceeding.
Defining a run configuration for the LuciadLightspeed samples
Luciad strongly recommends specifying a number of Virtual Machine (VM) options before running your samples. They will ensure that your samples run smoothly, and perform well. You can specify the VM options in the run configuration for your LuciadLightspeed project.
-
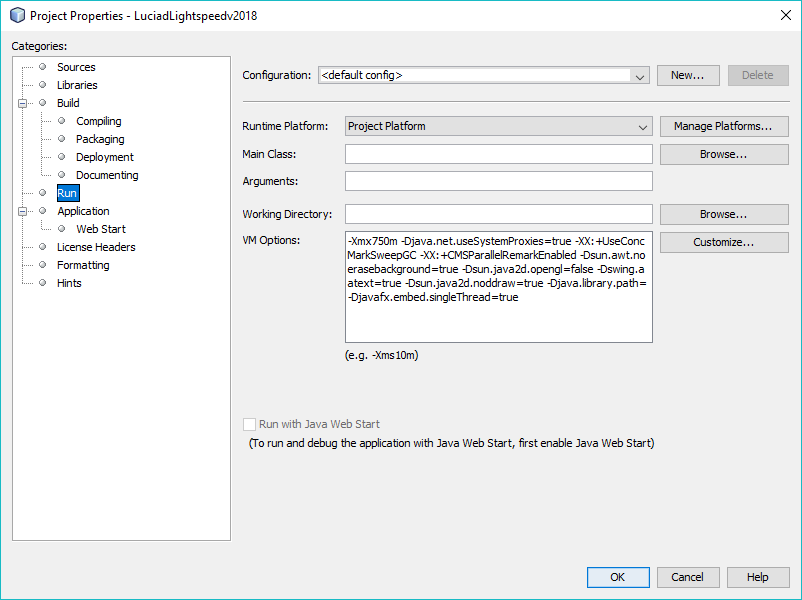
In the Projects navigation pane on the left, right-click the project, and select Properties.
-
Go to the Run category in the left-hand pane.
-
Enter the VM options below in the VM Options field, and click OK.
-Xmx1500m
-Djava.net.useSystemProxies=true
-Djava.util.logging.config.file=samples/resources/samples/logging.properties
-Dsun.awt.noerasebackground=true
-Dsun.java2d.opengl=false
-Dswing.aatext=true
-Dsun.java2d.d3d=false
-Djava.library.path=
--add-exports java.desktop/sun.awt.image=ALL-UNNAMED
--add-exports java.desktop/com.sun.java.swing.plaf.windows=ALL-UNNAMED
The double-dash
--VM options cause errors on JDK 8. JDK 8 users can safely skip those options.To run JavaFX samples on Java 11 or higher, you should also specify these options:
--add-modules javafx.controls,javafx.web,javafx.swing,javafx.fxml
--module-path /path/to/your/javafx-sdk/lib
From now on, your samples will use the specified VM options when you run them.
Integrating the LuciadLightspeed Javadoc into your project
NetBeans can show you the Javadoc for a LuciadLightspeed API code element when you click the code element and press Ctrl+Space. To activate the Javadoc feature for the LuciadLightspeed Javadoc:
-
In the Projects navigation pane on the left, right-click the project, and select Properties.
-
Go to the Libraries category in the left-hand pane.
-
On the Compile tab, select the LuciadLightspeed library you created earlier, and click Edit.
-
In the Customize Library window, go to the Javadoc tab, and click Add Zip/Folder.
-
Navigate to the
LuciadLightspeed_<version>\ docs\reference\LuciadLightspeedfolder, select it, and click Add ZIP/Folder.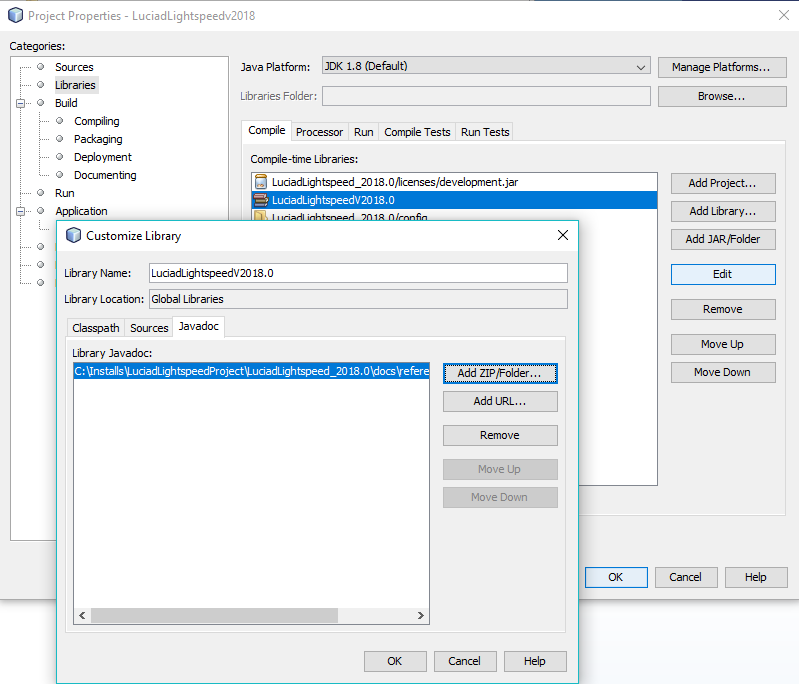
-
Click OK twice to leave the Customize Library window and the Project Properties window. NetBeans now retrieves and shows the Javadoc whenever you click a LuciadLightspeed API element, and press Ctrl + Space.
You are done! Now you can run the sample of your choice and start developing.
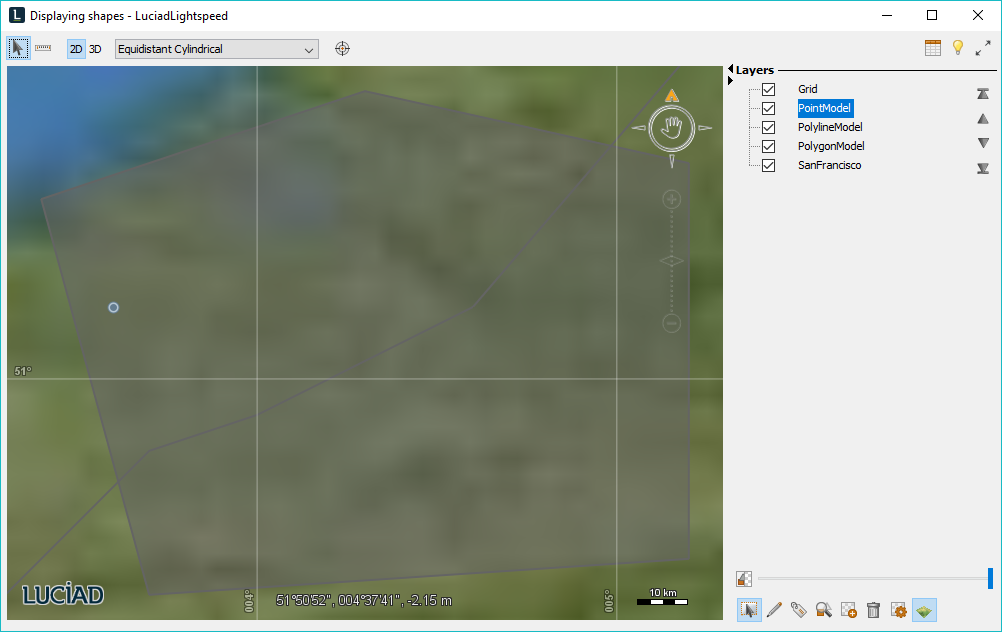
Test running a sample
In your NetBeans LuciadLightspeed project, you can run the sample executable files with the  icon.
icon.
You can test your IDE setup by running the shapes example:
-
Expand the
samples.lightspeed.shapespackage in theSource Packagesdirectory in the project project navigation pane on the left. -
Right-click on
MainPanel.javaand select Run File from the context menu. The sample starts in this window.