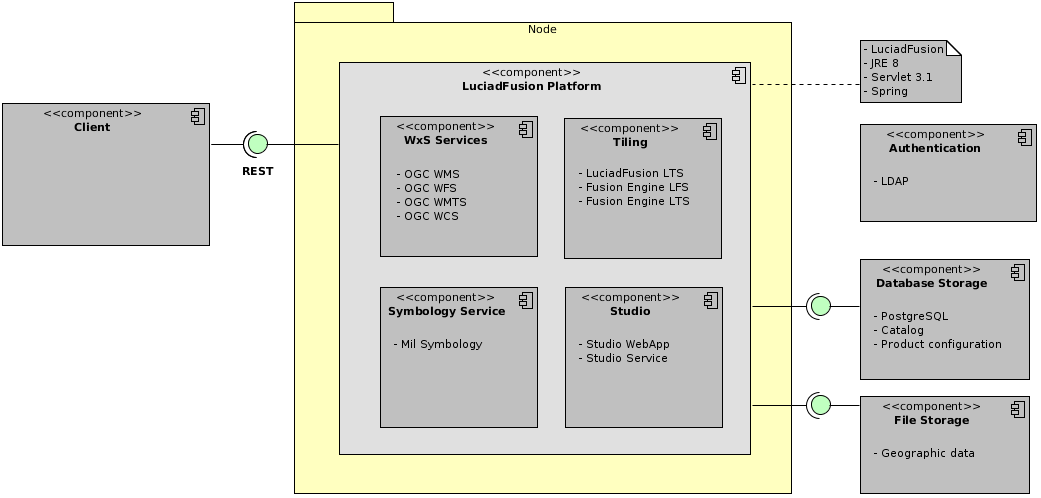
This guide explains how to create a production version of the LuciadFusion Platform, and how to deploy it.
Deployment architecture
The LuciadFusion Platform is a server application that provides access to published data. The server application is accessed through a client application communicating over the network. The client application can be a desktop application or a browser-based application.

Client applications can communicate directly with the server application. However, it is
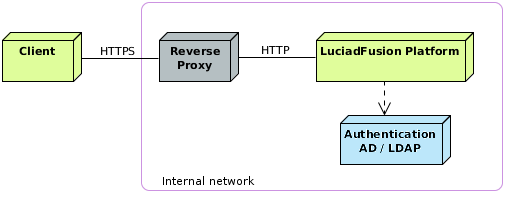
recommended to integrate the server application behind a web server, such as Apache HTTP Server,
with a reverse proxy setup. Many organizations currently have such a setup in place.
It makes the configuration of secured connections to the server easier.
In a reverse proxy setup, direct access to the server by client applications is blocked. The client application uses HTTPS to connect to the reverse proxy server. The reverse proxy server forwards the requests to the LuciadFusion server using plain HTTP, on an internal network. The SSL certificates are managed by the reverse proxy server, the Apache HTTP Server.

Preparing the LuciadFusion server for deployment
The LuciadFusion distribution comes with a deployment build script that can build a deployable application. Before you can run it, you need to complete a few tasks as preparation:
Set up the build environment
The build environment prerequisites for deploying with the deployment build script are Ant and ProGuard.
Use of Ant for deployment
The deployment build script itself is based on Ant. The Ant tool is available within the LuciadFusion distribution. You don’t need to set it up any further.
After completing the rest of your deployment preparation, you can run the deploy_fusionplatform_service Ant script.
Install ProGuard for obfuscation
You can choose to obfuscate the LuciadFusion code when you deploy it. The deployment build script includes obfuscation with ProGuard as a deployment step. The obfuscation tool ProGuard isn’t re-distributed within the LuciadFusion distribution. Please install ProGuard by following the instructions in this article.
A sample configuration script for this tool, specific to the obfuscation of the LuciadFusion server, is available in build/proguard/luciad_fusionplatform_service.pro.
See Obfuscating your application for more information.
|
If deployment size is an issue, you can reduce the deployment package size by about 200 MB by excluding the resource JAR with
geoid metadata from obfuscation. See the commented out |
Install your deployment license
For a LuciadFusion deployment, you need a deployment license. Copy your deployment license file deployment.jar to the
licenses folder. When you run the build script, it picks up the license, and includes it in the generated artifact.
Set up a production database
The LuciadFusion product stores its configuration in a database. It supports PostgreSQL, Oracle, SQL Server, and H2 databases.
For a production environment, we strongly recommend a PostgreSQL, Oracle or SQL Server database management system (DBMS).
To set up a LuciadFusion database in your chosen DBMS:
-
Install the supported DBMS of your choice.
-
In the DBMS, create an empty database that LuciadFusion can connect to and use.
-
Create a database user with the right privileges for your DBMS so that LuciadFusion can create the necessary database tables through that user. For the user privileges required for your DBMS type, see Table 1, “Database setup”.
-
Install and enable the right extensions, modules, and settings for your DBMS. See Table 1, “Database setup” for an overview per DBMS type.
Once you have configured the deployment profile with the database environment values, LuciadFusion automatically creates the required tables when it first starts up with your database configuration.
| DBMS | LuciadFusion user roles and privileges | Required extensions, modules, and settings |
|---|---|---|
|
Privileges:
|
Extensions:
|
|
|
Privileges:
|
"Spatial and Graph" module. See https://www.oracle.com/database/technologies/spatialandgraph.html |
|
|
Role |
Set the |
Configure the application
The LuciadFusion distribution comes with a sample setup that uses a fusion.development profile.
For deployment, you must prepare a fusion.production profile by setting up the appropriate configuration files in the config folder of your LuciadFusion installation. LuciadFusion includes a template configuration file to start from.
To start a production profile for the deployment of your application:
-
Copy the template file
application-fusion.production-template.ymltoapplication-fusion.production.yml. -
Modify the properties in
application-fusion.production.ymlto match the characteristics of your environment, your chosen DBMS for instance. You must set at least these properties for a successful deployment:
For more information and setting examples, see the documentation in the production configuration file itself.
You can also add more profile configurations to the fusion.development and fusion.production profiles.
For guidelines regarding the configuration files, see Configuring LuciadFusion Studio.
Add custom code
This is an optional step. The LuciadFusion distribution is organized in such a way that you can make a deployment-ready version of the application without writing custom code.
The Studio customization and Platform Extension documentation explain how you can plug custom code into the LuciadFusion server application.
The build script picks up source code located in the directory src.
Copy your custom source files in this folder if you want to include them.
|
If your custom code contains Spring annotations or code that requires Java reflection to discover,
make sure that you exclude your custom code from obfuscation. See the commented-out example in |
Add LuciadFusion Studio UI translations
The LuciadFusion distribution offers the UI of the end user application LuciadFusion Studio in English. You can easily add UI translations, though. See How to localize the LuciadFusion Studio UI for more information.
The build script picks up the translations located in the config/studio/static/i18n/translations directory.
Build the LuciadFusion server application for deployment
Go to the folder build/fusionplatform and run the deployment build script deploy_fusionplatform_service for your platform:
-
Windows:
deploy_fusionplatform_service.bat -
Linux and macOS:
deploy_fusionplatform_service.sh
The deployment build generates two artifacts in the directory distrib/FusionPlatform.
Running the example script for a deployment build provides more information about the build script and Selecting the right build artifact helps you choose between the artifacts.
Running the example script for a deployment build
The build script in the distribution is an example Ant build script that shows how to generate a LuciadFusion server application with a production profile. The configuration for the production profile is explained in Configuring LuciadFusion Studio. In this section, it’s assumed that the configuration is complete.
The build script provides targets to build LuciadFusion for deployment within a servlet container, Apache Tomcat or Jetty for example, and as a standalone version with a servlet container embedded.
You can run the deployment build script without arguments. The default target generates two artifacts, a WAR and a standalone ZIP archive for example. If you want to control what artifact type is generated, you must specify one of the following build targets as a command line argument.
-
package:zip: builds the application in such a way that you can start it up as a standalone application using a start script. The application is packaged in a ZIP archive. -
package:war: builds the application in such a way that you can deploy it in a servlet container like Apache Tomcat or Jetty. The application is packaged as a WAR. -
package: the main build target of the example build script. It generates both the WAR and the ZIP archive.
The deployment build script contains comments that help you create your own automated deployment build process. The build script generates output on the console for your convenience.
Selecting the right build artifact
You need to choose the artifact depending on your deployment options.
-
To deploy in a servlet container, Apache Tomcat for example, use
LuciadFusionPlatform.war, a web archive ready for deployment. The servlet container must support the servlet 3.1 specification. If you deploy in a default configuration of Apache Tomcat, you can start using the LuciadFusion Studio web application for configuration of the server. You can find it at http://localhost:8080/LuciadFusionPlatform/studio. You need the web archive artifact in the majority of cases.
|
Headless configuration
LuciadFusion doesn’t require a graphics card to run. If you’re going to run LuciadFusion on a machine without a GPU, it’s
recommended to configure your servlet container with the Java VM option |
-
To deploy the server application in a standalone version, use
LuciadFusionPlatform.zip. It offers a start-up script using an embedded Jetty servlet container. Extract the zip archive and start the LuciadFusion Platform server by running the scriptStartFusionPlatformServer. The Studio web application to configure the server is available at the location http://localhost:8080/studio. This artifact is useful mainly for local deployment.If you use this option, you can still finetune the configuration by setting or changing properties in
application-fusion.production.ymlin theresourcesdirectory. Changes take effect when you re-start the application.
|
Headless configuration
LuciadFusion doesn’t require a graphics card to run. If you’re using the ZIP option to deploy LuciadFusion in a standalone
version, the embedded Jetty servlet container automatically runs with the Java VM option |