Introducing the Tiling Engine
The Tiling Engine is a service that organizes geospatial source data in a hierarchical tile structure, called a coverage. This organization into a multi-leveled tile pyramid is called fusion, and optimizes access to the data for the purpose of querying, visualization, and analysis.
The Tiling Engine consists of API that allows you to optimize imagery, elevation and multi-dimensional data in a pre-processing step. It takes your data, and turns it into a high-performance tile pyramid repository on disk. The resulting multi-leveled coverages allow for a much smoother visualization and analysis experience in Luciad products as well as other OGC clients.
Multi-leveling and tiling data offers advantages in cases similar to these:
-
Your raster data does not have overview levels. If your raster data consists of just one level containing all the detail, users will quickly lose sight of it when they zoom out of the map. The Tiling Engine allows you to define lower-detail overview levels for such data.
-
Your data set consists of a large number of small files, and is therefore too large to serve. By tiling and multi-leveling such data, you can serve only the data relevant for the requested level-of-detail.
The tiles can be stored as individual coverages, or as part of a Tile Store. A Tile Store is a logical structure combining various coverages.
|
To manage and serve coverages from the LuciadFusion Studio in the LuciadFusion product, you need to store the tiles as individual coverages. |
You can retrieve the tiles prepared in the Tiling Engine from a LuciadLightspeed Fusion client.
Developing a Tiling Engine
A Tiling Engine fuses a number of assets (source data) into a single coverage. Section Using the tiling mechanism describes the tiling mechanism used by the Tiling Engine. The following sections describe how to run the sample Tiling Engine and how to develop a custom Tiling Engine.
Using the tiling mechanism
The Tiling Engine processes the source data into a hierarchical tiling structure. The tiling structure provides a set of tiles with multiple levels of detail. Each level contains a regular grid of tiles. Level 0 is the least detailed level and each subsequent level doubles the numbers of rows and columns in the tile grid. The combined levels form a hierarchical tiling structure in which one tile on level N corresponds to a block of 2x2 tiles on level N+1 as illustrated in Figure 1, “Tiling Engine’s tiling structure, showing tiles at levels N (left) to N+4 (right)”.
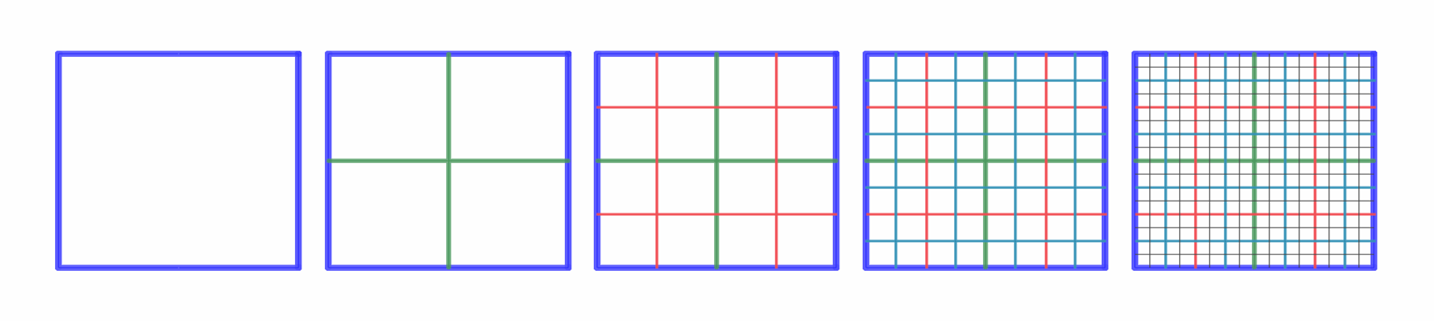
Each level covers exactly the same geographic area, but the number of tiles increases at each higher level. As each tile has a fixed size (for example an image of 256x256 pixels), the higher levels contain more details and thus provide a higher resolution than the lower levels.
The tiling mechanism provides an efficient way to retrieve subsets of large data sets, such as terrain and world data. End users can quickly retrieve data for a specific area at a specific resolution. The source data does not need to be gridded or tiled and it is not a problem if there is no source data available for every tile in the tiling structure.
Running the sample Tiling Engine
The LuciadLightspeed distribution provides a command-line sample Tiling Engine which allows you to quickly load assets, and fuse them into a coverage.
To start the sample Tiling Engine, run the fusion.engine .bat or .sh script in the samples folder. If you run the script without arguments, the sample Tiling Engine displays its features and options in a console.
To visualize the resulting coverage, you can use the Fusion Client sample.
Creating and using a Tiling Engine
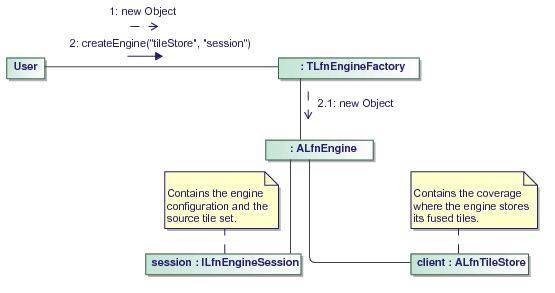
ALfnEngine is the central class for fusing data. Figure 2, “Create a Tiling Engine” illustrates the steps necessary to create an instance of this class. First, you need to create an ALfnEngineEnvironment. You typically re-use the same instance, as it may hold resources for which the allocation or initialization is expensive.
The engine factory can be constructed using the engine environment as sole constructor parameter. Then you call the createEngine method to create an engine. This method requires a tile store and a coverage ID. The following sections provide more information on running an engine and preparing a coverage for fusion.
|
The instructions in this article apply to engines running locally only. |
Preparing a coverage for fusion
The Tiling Engine generates tiles and stores these into a coverage of a Tile Store. Refer to the Fusion Client Developer’s Guide for more information on obtaining a Tile Store instance. The source assets and target coverage are specified by the coverage itself.
Before creating an engine, the target coverage metadata and all used source asset metadata must exist on the Tile Store.
The coverage has a status for each of its assets that indicates whether it has already been completely fused or not (asset info). This status is used and controlled by the engine to determine which parts of the data to fuse. It is not necessary to set the statuses of the target coverage metadata prior to creating the engine.
|
To prepare your Tile Store for consistency checking, consider decorating the Tile Store with a |
Creating a coverage
First, you must select TLfnRasterCoverageMetadata for raster coverages.
Then, you can create a coverage by using its Builder.
To simplify the creation of coverages, the coverage builder use auto-defaults.
Using coverage auto-defaults
The creation of a coverage typically involves the addition of assets. The preferred way of adding assets to a coverage is
through ALfnCoverageMetadata.addAssetInfo(ALfnAssetMetadata , String ).
If you use this method, the coverage builder will use auto-default values to set its properties. The auto-defaults are constructed
from the metadata of the assets, and match the set of asset metadata as closely as possible.
This is illustrated in Program: Create a coverage with some assets using auto-defaults. The coverage’s bounding box, geographic reference, layout
and several other properties will be determined from the assets' properties..
The auto-defaults are constantly re-evaluated while the builder builds the coverage, as one auto-default may affect another.
Once you have built an ALfnCoverageMetadata object using the method build of the ALfnCoverageMetadata.Builder class, the auto-defaults become inactive and the coverage’s properties become fixed.
You can also use ALfnCoverageMetadata.assetInfos to add assets to a coverage, although you will not be able to use auto-defaults for the definition of the coverage properties
in that case.
The common auto-defaults are determined as follows:
-
ID: a new UUID.
-
Geographic reference: the geographic reference system common to all assets, if there is one. Otherwise, the default geodetic reference system WGS 84 is selected.
-
Bounding box: the union of all the assets' bounding boxes in the coverage’s geographic reference, or the world’s bounding box if there are no assets yet.
-
Ignore non-fatal failures: is
falseby default. If you create a coverage using the API, you have to enable it explicitly.
TLfnCompositeFormat format = engineEnvironment
    .getCompositeFormat();
ALfnAssetMetadata assetMetadata1 = format
    .createAsset("Data/GeoTIFF/BlueMarble/bluemarble.tif", null);
ALfnAssetMetadata assetMetadata2 = format
    .createAsset("Data/Jpeg2000/c_08460890_06_04500_col_2007.jp2", null);
TLfnRasterCoverageMetadata coverageMetadata = TLfnRasterCoverageMetadata
    .newBuilder()
    .addAssetInfo(assetMetadata1, STATUS_INCOMPLETE)
    .addAssetInfo(assetMetadata2, STATUS_INCOMPLETE)
    .build();
TLfnCompositeFormat format = engineEnvironment
    .getCompositeFormat();
ALfnAssetMetadata assetMetadata1 = format
    .createAsset("background.tiff", null);
ALfnAssetMetadata assetMetadata2 = format
    .createAsset("hires.jp2", null);
TLfnRasterCoverageMetadata coverageMetadata = TLfnRasterCoverageMetadata
    .newBuilder()
    .addAssetInfo(assetMetadata1, ALfnCoverageMetadata.AssetInfo.STATUS_INCOMPLETE)
    .addAssetInfo(assetMetadata2, ALfnCoverageMetadata.AssetInfo.STATUS_INCOMPLETE)
    .build();
Switching off auto-defaults
To switch off auto-defaults for a specific property, set the property explicitly, as illustrated in Program: Create a coverage with some assets. Override the auto-defaults for bounding box and geographic reference by setting them explicitly.. The auto-default setting of the other properties will still be in effect, with the explicitly set property taken into account. For example, if you set the geographic reference explicitly, the bounding box property setting will automatically be transformed to match it.
Even if you set a property explicitly, it is possible that the builder transforms it.
A typical example is the bounding box: if you set the bounding box explicitly to an instance of TLcdXYBounds for instance, but the geographic reference is geodetic, then the builder will automatically make a TLcdLonLatBounds instance.
In other words, the object you set on the builder may not be the same as the one you get from the builder, or from the built
coverage metadata.
The following sections explain how to set up each type of coverage. Each section starts with a description of the auto-defaults for the discussed coverage type.
coverageMetadata = TLfnRasterCoverageMetadata
    .newBuilder()
    .geoReference(new TLcdGeodeticReference())
    .boundingBox(new TLcdLonLatBounds(-180, -90, 360, 180))
    .addAssetInfo(assetMetadata1, STATUS_INCOMPLETE)
    .addAssetInfo(assetMetadata2, STATUS_INCOMPLETE)
    .build();
TLfnRasterCoverageMetadata coverageMetadata = TLfnRasterCoverageMetadata
    .newBuilder()
    .geoReference(new TLcdGeodeticReference())
    .boundingBox(new TLcdLonLatBounds(-180, -90, 360, 180))
    .addAssetInfo(assetMetadata1, ALfnCoverageMetadata.AssetInfo.STATUS_INCOMPLETE)
    .addAssetInfo(assetMetadata2, ALfnCoverageMetadata.AssetInfo.STATUS_INCOMPLETE)
    .build();
Using a resource metadata resolver
If you want to use the auto-defaults but do not want to set the asset metadata all over again, you can use a resource metadata resolver to allow the builder to resolve asset IDs to asset metadata. This is illustrated in Program: Create a new coverage starting from an existing one and reset the coverage ID to its auto-default to generate a new one. Use a resource metadata resolver to allow the coverage to resolve asset IDs to asset metadata..
ILfnResourceMetadataResolver resolver = new TLfnCollectionResourceMetadataResolver(Arrays.asList(assetMetadata1, assetMetadata2));
ALfnCoverageMetadata newCoverageMetadata = coverageMetadata
    .asBuilder(resolver)
    .addAssetInfo(assetMetadata3, STATUS_INCOMPLETE)
    .id(null) // Generate a new ID for the new coverage
    .build();
Preparing tiled coverages
The auto-defaults specific to tiled coverages are:
-
Coverage layout (level-0 column and row count): the closest fit for square tiles with square pixels given the bounding box. For a world bounding box in a geodetic reference, this is 2 x 1.
-
Type: the coverage type supported by all the assets, with a preference towards the asset type itself, if there are multiple supported types. If the assets can be fused into multiple coverage types, the coverage type identical to the asset type is preferred. This assumes that the default formats are registered with the
ALfnEngineEnvironment. If you have customized these formats, you may need to set this property explicitly. -
Tile format: the auto-default tile format depends on the coverage type. This assumes that the default codecs are registered with the
ALfnEnvironment. The default codecs are shown in Table 1, “Default supported tile formats”. If you have customized these codecs in any way, do not rely on the auto-default format, and set this property explicitly.
|
Coverage type |
Name |
Description |
|
RASTER |
image/tiff |
Uses deflate compression. Supports integer and floating point data types such as 32-bit floating point weather data, 8-bit per band RGB imagery, or 16-bit per band HDR imagery. Supports multi-dimensional data using multi-page TIFF, where a single page corresponds to a specific combination of multi-dimensional values. This is the default when fusing NetCDF and GRIB data. |
|
IMAGE |
image/jpeg |
Uses 90 % compression. Ideal for photorealistic imagery. This is the default when all assets are of the IMAGE type. It is capable of storing transparency in a Luciad-specific JPEG extension. Non-Luciad clients will ignore the transparency information. |
|
IMAGE |
image/png |
Ideal for rasterized vector data and images with transparency. This is the default when at least one asset is of the VECTOR type. |
|
ELEVATION |
image/tiff |
Uses 32-bit floating point for accuracy. This is the default. It supports decimal values with floating point precision. |
|
ELEVATION |
image/png |
Uses 16-bit grayscale. This is a compact format, but it does not support decimal meter values; values are rounded to whole meters. This is the default for backwards compatibility. |
You can re-order or remove the default tile data codecs, and add your own.
|
If you add a tile data codec for a coverage, the visualization client also needs to have that codec registered. |
Preparing raster coverages
Raster coverages can have one of 3 data types: RASTER, IMAGE or ELEVATION. The latter 2 types can be considered specific subtypes of the RASTER type. It is recommended to use RASTER whenever possible, because it is the most powerful type, but there are several cases where IMAGE and ELEVATION are still useful.
|
The term raster coverage usually denotes a coverage that has the specific type |
Selecting a coverage type
Over time, raster coverages will replace all of the other 2 subtypes. Currently, the subtypes still have their use so they are not deprecated yet.
-
Coverages of type
RASTERcan preserve bands and dimensions of multi-band and multi-dimensional data. Multi-band data can have any band semantics, including RGB(A), elevation, or weather bands. Source data that complies with the LuciadLightspeed image processing API can be fused to such a coverage. This includes most raster formats, with the exception of some legacy formats. Clients should decide if the data is RGB(A) imagery, elevation, multi-band or weather based on the band semantics rather than the type of the coverage. For more information about multi-dimensional coverages, see Preparing multi-dimensional raster coverages. -
Coverages of type
IMAGEcontain RGB(A) imagery. Source data for which theALfnFormathas anILcdSLDGXYLayerFactorycan be fused to such a coverage. This includes virtually any format, including vector formats such as ECDIS. -
Coverages of type
ELEVATIONcontain elevation data. Source data for which theALfnFormathas anILcdModelHeightProviderFactorycan be fused to such a coverage.
Raster coverages of type RASTER are the most powerful. Always use raster coverages of the RASTER type, unless:
-
You want to fuse vector data. If you want to fuse vector data to a raster coverage, use the
IMAGEcoverage type. Vector data cannot be fused to theRASTERcoverage type. -
You want to use the tile formats "image/jpeg" or "image/png" for RGB(A) imagery. Select the
IMAGEcoverage type instead. Out of the box,RASTERonly supports the tile format "image/tiff", but you can use the API to customize the format. -
You want to use the compact elevation format "image/png" for elevation data. Use the
ELEVATIONtype instead. -
You need the coverage to be compatible with LuciadRIA. LuciadRIA only supports image coverages and elevation coverages with tile format "image/png".
Overview of raster coverage auto-defaults
The auto-defaults specific to raster coverages are:
-
Tile width and height: the closest fit for square pixels given the bounding box and coverage layout.
-
Bounding box: if the two properties mentioned above are still not enough for square pixels, the bounding box is slightly increased, by less than a pixel in all directions, in a final attempt to have square pixels.
-
Sampling mode: the sampling mode of the samples in the coverage. The auto-default is either
AREAfor pixel-is-area data orPOINTfor pixel-is-point data. -
Band semantics: the union of the band semantics of the asset parts of all the assets contributing to the coverage. This applies only to coverages of type
RASTER. -
Dimensions: when the coverage type is
RASTER, it is the union of the dimensions of the asset parts of all the assets contributing to the coverage. When the coverage type isIMAGE, it is the first possible filter value, consisting of the first possible value of every dimensional axis.
Preparing multi-level raster data
When the source data is multilevel raster data, fusion will automatically use the appropriate level of source data to produce the tiles at the multiple levels of a tile pyramid.
When the source data is a multilevel image or multilevel image mosaic, and the level relationship is "overview", the levels are different, mutually exclusive representations of the same data. In this case, at most a single level of source data will contribute to the tiles at a particular level of the resulting tile pyramid. One level of source data may "replace" another at a different level of the resulting tile pyramid. There is one specific way to model this sort of multilevel source data:
-
An
ALcdMultilevelImageorALcdMultilevelImageMosaicwithELcdLevelRelationship.OVERVIEWoriginating from anILcdModelwith anILcdImageModelDescriptor.
When the level relationship of the source data is "stack", the levels are representations of unrelated data. In this case, they are treated as if they were different source data. The following are all equivalent to fusion:
-
Multiple
ILcdModelinstances decoded from unrelated sources, fused into a single coverage. -
An
ILcdModelthat has multiple elements (domain objects) that either "are an image" or "have an image". Examples are ECRG, CADRG. -
A single
ALcdMultilevelImageorALcdMultilevelImageMosaicwithELcdLevelRelationship.STACKoriginating from anILcdModel. An example is GeoTIFF.
|
You should use |
Configuring the order of asset fusion
On the raster coverage metadata, you can choose to configure the fusion order of the raster assets. By default there is no asset order, and the asset part fusion order is such that more detailed asset parts are fused on top of less detailed ones. When you explicitly preserve the asset order, the assets will be fused in the order of the assets infos in the coverage. The asset part order still applies to the parts within an asset.
Configuring tile combining
You can configure a tile combining strategy on the raster engine session. A tile combining strategy defines how values for
tiles on a less detailed level are computed from the tile values of a more detailed level. The default strategy is AVERAGE, which takes the average of the contributing values. If you are fusing elevation data, you can use the strategy MAXIMUM, which takes the maximum of the contributing values. If any of the contributing values is unknown, the resulting maximum
value will also be unknown. The tile combining strategy setting is not compatible with fusion on the server.
Preparing coverages with floating point values
Elevation and multi-valued coverages support floating point values. To store decimal values as 32-bit floating point values, select the"image/tiff" format as tile MIME type when you are specifying the coverage metadata. Ideally, the coverage input format supports floating point values as well. GeoTIFF is currently the only input format that support floating point elevation values.
Even when the input data format does not support decimal values, there is a benefit in using "image/tiff" as a tile format, because the Tiling Engine interpolates values for this format.The interpolated values are typically decimal, and thus it makes sense to store them as floating point values, even if the input values are not decimal.
The legacy "image/png" tile format also provides limited support for decimal values, because the Tiling Engine scales the values. The 16-bit unsigned integer range is scaled between the minimum and maximum values of a tile, resulting in fixed point values. The drawback of this is that the precision is unpredictable, because the scaling depends on the minimum and maximum values, which are different in each tile.
Preparing point-sampled coverages
The sampling mode of a raster coverage can be AREA or POINT, whether a pixel is an area or a point.
For imagery, AREA is the natural sampling mode and the only supported one.
For elevation, POINT is the typical sampling mode, but AREA is also supported.
For multi-valued data, AREA is the only supported sampling mode.
If a pixel is a point, it corresponds to a grid intersection of the raster, while if a pixel is an area, it corresponds to
a grid cell.
Bear in mind that a point-sampled raster with exactly the same bounding box and resolution has +1 row and column value compared
to its area-sampled counterpart.
This is reflected in tile sizes for elevation data: in POINT sampling mode, the default tile size is 65 x 65, while in AREA sampling mode, the default tile size is 64 x 64.
By default, the sampling mode of a coverage is determined from the sampling modes of the assets contributing to it when the
coverage metadata is created.
The fallback sampling mode is AREA,
If all asset parts of all contributing assets have POINT sampling mode, the coverage’s sampling mode also defaults to POINT.
If at least one asset part of one contributing asset has AREA sampling mode, the coverage’s sampling mode defaults to AREA.
If there are no assets or no asset parts, the default sampling mode defaults to AREA.
It is allowed to mix asset parts of different sampling modes into a coverage with either sampling mode. Because source data is generally interpolated when necessary during the fusion process. This interpolation also takes care of conversion from one sampling mode to another if necessary.
Preparing multi-dimensional raster coverages
Multi-dimensional raster coverages store each possible combination of values for one or more dimensions as multiple pages in a single tile. Each combination corresponds to one page. The only tile format that supports storage as multiple image pages is "image/tiff", which uses the multi-page feature of TIFF.
A typical example of multi-dimensional raster data is NetCDF or GRIB data. A single NetCDF or GRIB file may contain multiple NetCDF variables. Each variable can have one or two dimensions: time and vertical position, each with a set of possible values.
A raster coverage can only contain a single variable.
By default, all dimensional information of the source data will be preserved.
If you want to limit the dimensional information preserved in the coverage, use TLfnRasterCoverageMetadata.Builder.dimensions().
|
You may want to limit dimensional information to preserve space and/or bandwidth: each combination of dimensional values results in a separate page, which takes up space and bandwidth. |
If you want to restrict the possible value combinations to just one combination, consider using the coverage type IMAGE: it allows rendering NetCDF weather data to a coverage as RGB imagery.
Preparing image coverages with vector assets
The Tiling Engine allows you to fuse vector assets into an image coverage. In fact, some formats, such as DGN, can only be fused in this manner. The vector data will be rasterized in a coverage during the fusion process, so there may be visual rasterization artifacts. You can minimize those artifacts by taking the following guidelines into consideration:
-
Use
"image/png"files instead of"image/jpg"files to eliminate JPEG artifacts. JPEG’s lossy compression is suitable for photorealistic imagery, but not for vector data. -
Make sure that pixels are square by optimizing a combination of coverage layout, tile size and bounding box settings. To help you with this,
TLfnTileStoreUtiloffers the static methods:-
optimizeLayout(TLfnRasterCoverageMetadata.Builder) -
optimizeTileSize(TLfnRasterCoverageMetadata.Builder) -
optimizeBoundingBox(TLfnRasterCoverageMetadata.Builder).
-
The additional method optimizeForSquareTiles(TLfnRasterCoverageMetadata. Builder) combines those methods in the order in which they are listed.
-
Verify a vector asset’s scale information, and adapt it if necessary. A coverage’s most detailed level is determined by the pixel density of its assets. When the Tiling Engine fuses vector data as a raster, it estimates the pixel density of an asset from the input data. Some formats, such as S-57, provide sufficient scale information to make this an accurate estimate. Other formats, such as SHP, provide no scale information at all. For these formats, the Tiling Engine determines the scale heuristically. In these cases, the estimated pixel density may not be what you want, resulting in too much or too little detail in the coverage. It is therefore wise to review and adapt the vector asset’s scale information before committing the assets.
-
Keep in mind that vector data may have visibility scales. Because a coverage has discrete scales corresponding to discrete levels, it is not always possible to match a visibility scale exactly. Typically, the visibility in the rasterized coverage is extended slightly, so that the data is visible at least at its original visibility scale, and possibly slightly beyond.
To eliminate rasterization artifacts, be sure to view the coverage:
-
In its native georeference
-
At a scale corresponding exactly to one of the coverage’s levels
In the coverage, the size of the rasterized features depends on the screen resolution. The Tiling Engine uses a fixed pixel size of 0.28 millimeters. If your screen does not match this resolution, the rasterized features may be smaller or larger.
To eliminate cluttering of vector features at less detailed levels, the source data is used to produce all tiles at all levels.
Handling image coverages with S-57 assets
If you want to fuse S-57 assets into an image coverage, you need to take into account underscale and overscale indicators. These are specific to S-57 data:
-
The navigational purpose scale is the minimum scale at which the data is visible. Below this scale, red boxes indicate that the data is under scale. These are the underscale indicators.
-
The compilation scale is the maximum scale at which the data is valid. At twice the compilation scale or higher, vertical gray lines indicate the data is over scale. These are the overscale indicators.
When you are visualizing a coverage in its native georeference at the scale corresponding to the coverage’s levels, you may assume that:
-
The most detailed level always has overscale indicators.
-
Less detailed levels may have underscale indicators.
-
The visibility of overscale and underscale indicators is guaranteed to be correct at scales corresponding exactly to the levels of a coverage. In between those scales, there are no such guarantees because the visibility depends on the quality settings, or level switch factor, of the view. At those scales in between coverage levels, overscale and underscale indicators will become visible "too soon".
-
A quality setting of 0.75 guarantees that icons have a correct size on average.
Preparing coverages for fusion of tile sets
The Tiling Engine can also fuse raster asset parts that have a tile set structure. A tile set structure consists of:
-
A power-of-two tile pyramid defined by the bounding box of the asset part, the geographic reference of the asset, and a row count and column count at level 0.
-
A tile format that is a MIME type, typically an image MIME type.
-
Tiles sizes that are identical across the tile set.
The Tiling Engine can fuse such tile sets into an image coverage.
Fusing assets with tile set asset parts
You can fuse assets with a tile set structure just like any other raster assets. During fusion, the tile set structure is decoded, rendered, and encoded to an image coverage.
If the coverage tile structure matches that of the asset part, the fusion process is optimized: it copies tiles directly from the asset tile set, without rendering them. If you want to benefit from this optimization, make sure that the following conditions are met:
-
The coverage must consist of one asset. The asset consists of just one asset part. The asset part has a tile set structure.
-
The coverage geographic reference and bounding box of the coverage must match that of the asset part.
-
The tile MIME type defined on the coverage matches the format of the asset.
|
If the tile MIME type defined on the target coverage matches the format of the asset, the fusion of tile sets is most optimal: the tiles are copied as they are, and the processing steps of decoding and encoding are skipped. If the asset format does not match the MIME type defined on the coverage, tiles are still copied directly from the asset tile set, but they are decoded and re-encoded to match the coverage’s tile format. |
By default, the TLfnRasterCoverageMetadata.Builder detects assets with a tile set structure, and uses auto-defaults so that its parameters match the coverage structure accordingly.
Keep in mind that if you set one of the relevant parameters manually, your coverage structure may no longer match, and you
may not be able to benefit from all tile set fusion optimizations.
Fusing additional tile set formats
By default, the Tiling Engine supports tile set fusion for the formats WMTS and Geospatial PDF.
If you want to create a custom format that supports tile set fusion, use ALfnFormat.
Take the following into account when you define a custom tile set format:
-
ALfnFormat.createAssetmust return aTLfnRasterAssetMetadatawith exactly oneRasterAssetPart, which must have aTileSetStructurethat is notnull. -
ALfnFormat.getDataSourceModelDecoderFactorymust return aILcdEarthModelDecoderFactorywhich decodesILcdModelinstances with a singleILcdEarthTileSetas element, which must have exactly oneILcdEarthTileSetCoverage. -
ILdcEarthTileSet.isFormatSupportedmust returntruefornew TLcdEarthTileFormat(BufferedImage.class). -
If you want to benefit from the additional optimization of raw tile set fusion, your
ILcdEarthTileSetCoverage.getNativeFormatmust return aTLfnEarthTileFormat(aMIMEType)whereaMIMETypematches one of the Tiling Engine’s supported tile formats. These are "image/png" and "image/jpeg" by default. In addition,ILcdEarthTileSet.isFormatSupportedmust returntruefornew TLcdEarthTileFormat(aMIMEType, InputStream.class). In other words, your custom tile set needs to be able to deliver the raw tile data stream.
Preparing coverages with asset sources in Tile Store
A coverage may have its assets' sources in the Tile Store. You can use the assetSourcesInTileStore method to configure this on all the ALfnCoverageMetadata.Builder instances. As a result, the Tiling Engine will copy the asset sources to the Tile Store as a part of the fusion process.
This is currently supported for ECDIS S-57 and S-63 asset sources only. The fusion process will fail for other formats.
Fusion failure handling
Sometimes, failures are encountered during a data fusion. The Tiling Engine distinguishes between non-fatal failures and fatal failures.
- Non-fatal failures
-
occur because of broken source data, or because of an unsupported feature in the source data. You can define how non-fatal failures are handled on the metadata of a coverage. When coverage metadata is created through the API, the `ignore non-fatal failures' setting is disabled by default. As a result , non-fatal failures are treated as fatal and fusion will not finish. If you enable the setting, non-fatal failures will be gracefully skipped and the Tiling Engine will be allowed to finish.
- Fatal failures
-
occur when an unexpected error occurs, or when there are too many non-fatal failures. Fatal failures prevent a fusion job from finishing. If the number of non-fatal failures reaches a certain threshold, the non-fatal failures become fatal, and the fusion job will fail. The default threshold is 10000 for vector and 1000 for raster data.
You can override default failure thresholds for raster data and vector data. To do so, change the numbers specified in the
system properties com.luciad.fusion.engine.rasterFailureThreshold=<whole number> and com.luciad.fusion.engine.vectorFailureThreshold=<whole number> respectively.
Fusing data
Once you have created an engine as described in Creating and using a Tiling Engine you can start the fusion process by calling its fuse method. This method will return normally if the fusion has finished successfully or throw a CancellationException if the fusion was stopped. You can stop a fusion by calling the stop method and resume it by calling fuse again.
Tracking the fusion progress
You can track the fusion progress by calling the getProgress method. This method returns a TLfnProgress instance with the total number of tiles to process, the current number of processed tiles, and an estimate of the remaining
processing time. You can also request the progress before the fusion is started, for example to obtain the total number of
tiles.
Adding new data to a coverage
Adding and fusing new assets to an existing coverage is similar to fusing data to a new coverage. There are however a couple of restrictions:
-
Adding new data only works for image and elevation, not for raster coverages.
-
New assets can only be added at the end, not in between existing assets.
-
All existing assets must be kept in their original order.
-
All existing assets must have the status
COMPLETE.
If one of these restrictions is violated, the creation of the engine will fail with an IllegalArgumentException and an appropriate message.
Follow these steps to add new assets to an existing coverage:
-
Retrieve the existing coverage and its list of assets.
-
Add the new assets and define their order so they will be fused on top of the existing assets. It is currently not supported to insert new assets in between existing assets.
-
Create an engine with the new parameters and start it.
|
The intended use case of adding new assets is to start with fusing a low-detailed coverage that covers the entire world. Once that is finished, gradually add higher-detailed assets on top. Typically, these higher-detailed assets will not cover the entire world but a relatively small area so that there is very little overlap between them. |
Adding ECDIS updates to a coverage
Adding ECDIS updates to a coverage is supported as a special case of adding new data to a coverage. Because an ECDIS update cannot be decoded as a stand-alone model, it can only be added to an existing coverage which already contains a base and possibly any prior updates. The ECDIS base is modeled as an asset, and subsequent ECDIS updates are modeled as additional assets. In order to fuse an ECDIS update, the sources of the base and prior updates must still be present at the location mentioned in the asset metadata.
Fusing S-63 data (encrypted ECDIS)
The Tiling Engine supports fusing S-63 (ECDIS) data, which is the encrypted equivalent of S-57 (ECDIS) data. There are some limitations:
-
The permits for the S-63 data are auto-detected, and need to be located next to the data. The
PERMIT.TXTorENC.PMTfiles need to be next to theCATALOG.031file, or next to the individual cell file to which they apply. -
Once an S-63 asset has been added to a coverage, the whole coverage will automatically be encrypted using the S-63 hardware ID from the license.
-
It is not possible to disable encryption of S-63 coverages.
-
For a tiled coverage, all tiles will be encrypted, even those that do not overlap with the S-63 asset.
-
For a non-tiled coverage, the asset sources will be copied in their encrypted form.
-
The system performing the actual fusion requires the S-63 hardware ID in the license. When fusing on the server, this means the server needs the S-63 license.
Cropping an existing coverage
You can use an already fused coverage as an input asset for a new coverage. This allows you to modify and refuse the existing coverage, without reprocessing the initial assets that were used to create the original coverage. One important application is cropping: you can use this technique to create a copy of a coverage that contains only a subset of the area covered by the original coverage.
Follow these steps to create a cropped copy of a coverage:
-
Retrieve the coverage metadata of the source coverage.
-
Create an asset metadata for this coverage.
-
Create a coverage metadata for the target coverage, containing the coverage asset from the previous step as an asset. Set the bounding box (or bounding shape) of this metadata to the desired cropped bounds of the target coverage.
-
Create a new engine, and start it.
-
Once the cropped coverage has been fused successfully, you may consider removing the original to reclaim some space.
TLfnTileStoreUtil provides some utility methods to facilitate this process, as illustrated by Program: Using TLfnTileStoreUtil to crop a coverage:
-
newCoverageAsAssetMetadataBuildercreates an asset metadata builder for a given coverage. Remember that you have to explicitly set the asset ID on the builder. -
Create a new builder using the original coverage metadata as template. Be sure to set a new ID and bounding box on it. The new bounding box actually defines the cropped area.
-
Decide the tile layout (level-0 row- and column count) for the cropped coverage. You can set these manually, or you can let
optimizeTileLayouthelp you. It will choose the best matching tile layout based on the cropped bounding box. -
Decide the tile size. You can set these manually, or you can let
optimizeTileSizehelp you. It will choose the best matching tile size, while staying as close as possible to the pixel aspect ratio and total pixel count of the original.
TLfnTileStoreUtil to crop a coverage
TLfnRasterAssetMetadata coverageAsAssetMetadata =
    TLfnTileStoreUtil.newCoverageAsAssetMetadataBuilder(sourceCoverageMetadata,
                                                        sourceTileStore)
                     .id(coverageAsAssetId)
                     .build();

TLfnRasterCoverageMetadata.Builder croppedCoverageBuilder =
    sourceCoverageMetadata.asBuilder()
                          .id(targetCoverageId)
                          .boundingBox(croppingBounds)
                          .assetInfos(new ALfnCoverageMetadata.AssetInfo(coverageAsAssetId, STATUS_INCOMPLETE));
TLfnTileStoreUtil.optimizeTileLayout(sourceCoverageMetadata, croppedCoverageBuilder);
TLfnTileStoreUtil.optimizeTileSize(sourceCoverageMetadata, croppedCoverageBuilder);
TLfnRasterCoverageMetadata croppedCoverageMetadata = croppedCoverageBuilder.build();
Note that you can only use raster and elevation coverages as input assets for other coverages.
|
The pixel densities of the levels in a coverage depend on the tile layout of the coverage. As the tile layout of the cropped coverage will typically differ from the tile layout of the original coverage, the pixel densities of the generated levels in the target coverage will also differ from the densities in their corresponding source coverage level. |
Replicating Tile Store data
The Tiling Engine allows you to manage data that is common to multiple Tile Stores through replication.
What is Tile Store Replication?
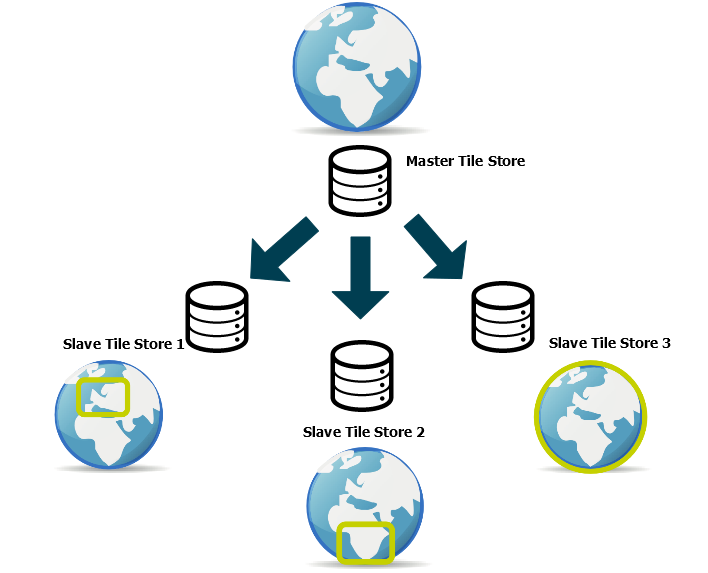
If you are managing a systems infrastructure with multiple Tile Stores that need to serve identical data to their respective data consumers, you can set up Tile Store replication. Typically, Tile Store replication is useful when geospatial data and its updates are managed in a central master Tile Store at headquarters. Local back offices act as slaves to the master Tile Store, and have their own replica of the data. The back offices may have limited disk space or bandwidth, so it is possible to provide them with only a subset of the data at headquarters, specific to their needs.
In another use case, ships at sea have the same data, each with their own license. When they encounter each other at sea, they replicate the most recent data from one another. When they enter the harbor, where more bandwidth is available, they replicate data from a server in the harbor.
Slave Tile Stores may have specific data needs from the master Tile Store, as illustrated by Figure 3, “Tile Store replication with distinct area-of-interest definitions.”:
-
All master data
-
A specific selection of the master data
-
The data for a specific area-of-interest (AOI) only.
The following sections explain how you can ensure that those data needs are met.
Components of a Tile Store replication setup
A replication setup consists of:
-
A master Tile Store, containing the data to be replicated
-
One or more slave Tile Stores, containing the replicated data, often confined to a specific area of interest.
-
Tile Store resources that need to be partially or completely replicated from the master to the slave. These resources may be assets, coverages, or themes. Each resource has an ID. A replicated resource on the slave has the same ID as the original resource on the master. The resources consist of data and metadata. Slaves may have additional local coverages beside those replicated from the master.
During the replication process, a Tiling Engine first copies the metadata from the master to the slave, and then the data, until the contents of the master and the slave are consistent with each other.
Workflow for Tile Store replication
The Tiling Engine allows you to compare all resources on the master with those on the slave, inspect them and make changes
before actually initiating the replication.
The TLfnReplication object represents a temporary in-memory `view' on the slave, and is your point of entry class for replication.
A typical Tile Store replication workflow is:
-
You obtain a replication preview to inspect what the result of replication would be: iterate
TLfnReplication.getResourceIDs(), and get the correspondingTLfnReplicationResource, an in-memory preview of the state of the resource after replication. -
You make changes, and preserve or exclude individual resources for replication with
TLfnReplicationResource.unmarkForReplication. You can also set an area-of-interest (AOI) withTLfnReplicationResource.setAreaOfInterest. For more information about using and managing AOIs, see Replication with area-of-interest. These changes are applied to the in-memory replication object. -
Once you are satisfied with the preview of the replication result, you can call
TLfnReplication.commitAndFuse. This is a blocking call. In-memory changes are committed to the slave tile store, the metadata of the slave Tile Store is updated, and t starts a fusion process to replicate the data.
|
If you want more control over the replication, you can use |
Properties of Tile Store data replication
Tile Store replication always occurs from master to slave. This section discusses how this works in practice, and how the individual Tile Store resources and their metadata are replicated.
Replication in one direction
Replication only occurs in one direction, from the master to the slave. By default:
-
The master data replaces the slave data only if the master data is newer.
-
If the slave stores data that is not present on the master, that will be removed.
-
If master data is not present on the slave, it will be added to the slave.
It is possible to inspect and override these defaults for individual resources before actually starting replication. For example, you can decide to replicate the data from the master even if the slave data is more recent than the master data.
Replicating from slave to master
The slave data never replaces the master data, even if it is newer. If you want to update the master with the data from the slave, you must initiate a second replication afterwards where you switch the roles of master and slave. This way, you can achieve bi-directional replication.
Symmetrical master and slave roles
Replication is symmetrical in terms of the master and slave roles. There is nothing that inherently makes a Tile Store a master or slave. The roles of master and slave are allocated on demand: a Tile Store that is slave to a master for a given replication process could very well be the master next time.
How are data resources replicated?
Replication replicates data only if it is part of a coverage. The replication engine for a coverage is responsible for copying possible asset sources and tiles in the coverage.
Visibility of replication results
The metadata is replicated ahead of the data. At what point replicated data becomes visible on the slave depends on the commit policy assigned to the slave Tile Store. A Tile Store can have a:
-
PER_COVERAGEcommit policy: the view on the coverage data is consistent during the replication process. As long as replication for that coverage is ongoing, you will be viewing the old data consistentl. When replication finishes for that coverage, the view consistently switches to the new data. -
PER_TILEcommit policy: the view may not be consistent. As replication progresses, new tiles become visible incrementally. Old and new tiles may be mixed in a view. The results of WMSGetFeatureInforequests to a coverage may be out-of-sync with the data you are seeing.
Identification of data resources and versions
During the replication process, resources are identified by a globally unique ID. These resource IDs are globally unique by default. However, if you have manually overridden resource IDs, and you want to use those resources in a replication setup, take into account that those resource IDs are used as globally unique identifiers across Tile Stores.
Replication identifies newer versions of resources based on a global update sequence number. This number is in fact a timestamp, so make sure that the clocks of the different systems in your replication farm are in-sync (UTC-wise).
Replication with area-of-interest
You can limit the replication of tiled raster coverages to a specific area-of-interest. An area-of-interest is a geographical region defined by a shape or a collection of shapes.
By assigning an AOI to one or more coverages on a slave Tile Store, you can limit the size of those coverages. During replication, only those master tiles or master asset sources that overlap with the AOI are filtered and stored on the slave. As a result, you can save both bandwidth and disk space on the slave Tile Store, and replication time may be reduced.
Coverages in a Tile Store may all have the same AOI, or each can have a different AOI.
Managing AOIs
Before you can use an AOI with a resource, you must add it to the TLfnReplicationAreaOfInterestManager.
To create a TLfnReplicationAreaOfInterest object, call TLfnReplicationAreaOfInterestManager.add to add a shape, or use an existing AOI from TLfnReplicationAreaOfInterestManager.getAreas. You can then use this object as an AOI on an individual resource.
Because the AOIs are managed independently of the coverages:
-
They can be re-used across multiple coverages.
-
They are persisted even when there are no resources that use the AOIs.
When and how can you use an area-of-interest?
Take the following options and constraints into account when you are working with AOIs:
-
AOIs only work for tiled raster coverages.
-
If you are using data or a data format with low resolution, the AOI filtering may still include data beyond the AOI. Typically, low-resolution tiles stretch far beyond the AOI. When you zoom in, though, you will see that detailed data is available inside the AOI only.
-
An AOI does not change the bounding box of a coverage. It merely filters the data in the coverage.
-
An AOI lives on the Tile Store, and is applied to a coverage at replication time. Once replication is finished, there is no indication on the slave that it is only a `partial' replication of its master. This means that if the slave is used as a master in a subsequent replication, the new slave is not aware that its master only has a partial coverage.
-
You can re-replicate a coverage with a different AOI, but the tiles of the original replication will not be deleted. Any tiles resulting from the previous replication will remain in the coverage, even if they no longer overlap with the new AOI.
Appendix A: Acronyms and abbreviations
This appendix lists the acronyms and abbreviations used in this guide with their full term.
|
Acronym |
Full term |
|
ADRG |
Arc Digitized Raster Graphics |
|
AIXM |
Aeronautical Information Exchange Model |
|
AOI |
Area-of-Interest |
|
API |
Application Programming Interface |
|
ASRP |
Arc Standard Raster Product |
|
BCI |
Document de Maitrise des Interfaces (ICD) |
|
DGN |
(Microstation) Design |
|
DHM |
Digital Height Model |
|
DIMAP |
Digital Image Map |
|
ECDIS |
Electronic Chart Display Information System |
|
ECW |
Enhanced Compression Wavelet |
|
EPSG |
European Petroleum Survey Group |
|
GRIB |
Gridded Binary |
|
HDD |
(Conventional) Hard Disk Drive |
|
HTTP |
HyperText Transfer Protocol |
|
ISO |
International Standards Organization |
|
JVM |
Java Virtual Machine |
|
LFS |
Luciad Fusion Service |
|
LTS |
Luciad Tile Service |
|
MrSID |
(LizardTech) Multi-resolution Seamless Image Database |
|
NITF |
National Imagery Transmission Format |
|
OGC |
Open Geospatial Consortium |
|
S-57 |
International Hydrographic Organization S-57 |
|
S-63 |
International Hydrographic Organization S-63 |
|
SHP |
Esri Shape |
|
SSD |
Solid State Drive |
|
URL |
Uniform Resource Locator |
|
USRP |
UPS/UTM Standard Raster Product |
|
UTC |
Universal Time Coordinate |
|
UUID |
Universally Unique Identifier |
|
WAR |
Web Archive |
|
WCS |
Web Coverage Service |
|
WFS |
Web Feature Service |
|
WMS |
Web Map Service |
|
WMTS |
Web Map Tile Service |
|
VM |
Virtual Machine |