Prerequisites
In this tutorial, it’s assumed that the reader is familiar with the LuciadCPillar concepts introduced in the Create your first map application tutorial:
-
LuciadCPillar layers:
LayerLayerLayerandRasterLayerRasterLayerRasterLayer -
Model:
ModelModelModelandIRasterModelIRasterModelIRasterModel
Goal
This tutorial teaches you the basic concepts of the LuciadCPillar API for styling raster data on a LuciadCPillar map.
Apply default styling to a raster layer
The tutorial Create your first map application shows you how to create a raster layer using default styling.
Apply custom styling to a raster layer
|
Because the map only shows RGB(A) raster data, LuciadCPillar uses the default color model of the data. |
To specify the styling of raster data, you can use a RasterStyleRasterStyleRasterStyle class.
This is a container class grouping a set of styling settings.
It’s a definition of how the data should look.
For example, you can adjust the opacity and brightness of the raster layer as follows:
RasterStyle rasterStyle = RasterStyle::newBuilder().opacity(0.5).contrast(0.7).build();RasterStyle rasterStyle = RasterStyle.NewBuilder().Opacity(0.5).Contrast(0.7).Build();val rasterStyle = RasterStyle.newBuilder().opacity(0.5).contrast(0.7).build()To allow the raster layer to use a line styleline styleline style (or
complex stroke line stylecomplex stroke line stylecomplex stroke line style),
a fill stylefill stylefill style
or a RasterStyleRasterStyleRasterStyle,
you must pass them to the RasterLayer::BuilderRasterLayer::BuilderRasterLayer::Builder.
layer = RasterLayer::newBuilder()
            .model(rasterModel)
            .rasterStyle(rasterStyle)
            .fillStyle(fillStyle)
            .lineStyle(lineStyle)
            .build();
layer = RasterLayer.NewBuilder()
.Model(rasterModel)
.RasterStyle(rasterStyle)
.FillStyle(fillStyle)
.LineStyle(lineStyle)
.Build();RasterLayer.newBuilder()
.model(model)
.rasterStyle(rasterStyle)
.fillStyle(fillStyle)
.lineStyle(lineStyle)
.build()You can change the style of a raster layer at runtime, after the layer is built, by setting a new raster style.
Please note that this isn’t possible for the fill stylefill stylefill style, the
line styleline styleline style and the
complex stroke line stylecomplex stroke line stylecomplex stroke line style.
For example, you can change the brightness and opacity of the raster layer at runtime as follows:
auto updatedRasterStyle = layer->getRasterStyle().asBuilder().brightness(1.5).opacity(0.8).build();
layer->setRasterStyle(updatedRasterStyle);
var updatedRasterStyle = layer.RasterStyle.AsBuilder().Brightness(1.5).Opacity(0.8).Build();
layer.RasterStyle = updatedRasterStyle;val updatedRasterStyle: RasterStyle = layer.rasterStyle.asBuilder().brightness(1.5).opacity(0.8).build()
layer.rasterStyle = updatedRasterStyleShow a hatched rectangle instead of the actual raster data
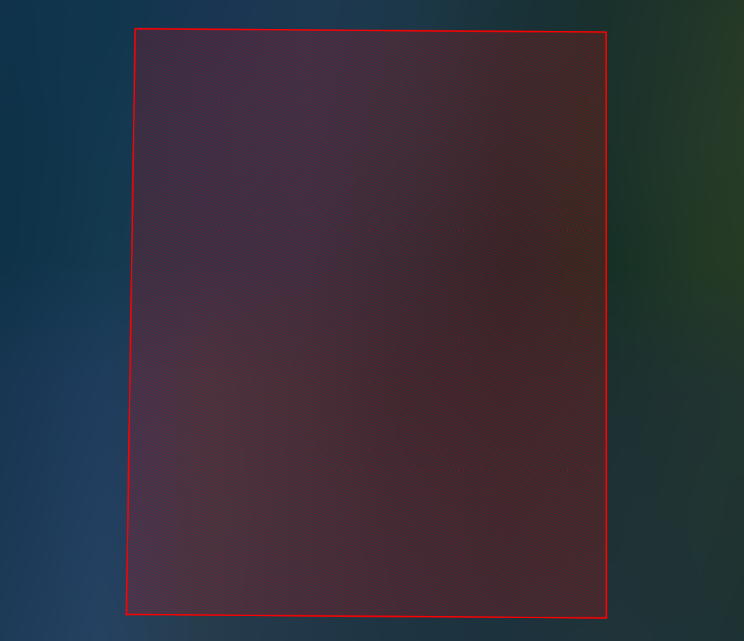
Most raster data is suitable for display at specific scales only. For example, it makes no sense to show detailed raster data of a certain area when users have zoomed out of a map. They won’t be able to distinguish the details on the map at that point.
If the application doesn’t load that raster data when users have zoomed out, application performance increases, and it no longer needs to consume huge amounts of memory. Instead, the LuciadCPillar map shows just the geographical bounds of the raster data set when users zoom out.
When you apply the default styling of the
RasterLayer::BuilderRasterLayer::BuilderRasterLayer::Builder, those bounds get a style that consists of a red hatch pattern.
This example mimics that styling by defining a
line styleline styleline style
for the outline of the bounds, and a
fill stylefill stylefill style
for the fill of the bounds.
Color fillColor = Color(255, 0, 0, 191);
Color lineColor = Color(255, 0, 0);
std::shared_ptr<Image> fillImage = StipplePattern::createImage(fillColor, StipplePattern::Hatched);
FillStyle fillStyle = FillStyle::newBuilder().image(fillImage).build();
LineStyle lineStyle = LineStyle::newBuilder().color(lineColor).width(2.0).build();
var fillColor = Color.FromArgb(191, 255, 0, 0);
var lineColor = Color.FromArgb(255, 255, 0, 0);
var fillImage = StipplePattern.CreateImage(fillColor, StipplePattern.Hatched);
var fillStyle = FillStyle.NewBuilder().Image(fillImage).Build();
var lineStyle = LineStyle.NewBuilder().Color(lineColor).Width(2.0).Build();val lineColor = Color.valueOf(1f, 0f, 0f)
val fillColor = Color.valueOf(1.0f, 0f, 0f, 0.75f)
val fillImage = StipplePattern.createImage(fillColor, StipplePattern.Hatched)
val fillStyle = FillStyle.newBuilder().image(fillImage).build()
val lineStyle = LineStyle.newBuilder().color(lineColor).width(2.0).build()On the map, this looks like:
|
See Why does my imagery layer show a red (hatched) rectangle? for more information about the red hatching pattern. |